Volkswagen Golf Service & Repair Manual: Assembly overview - transverse link, multi-link suspension, four-wheel drive
| 3 - |
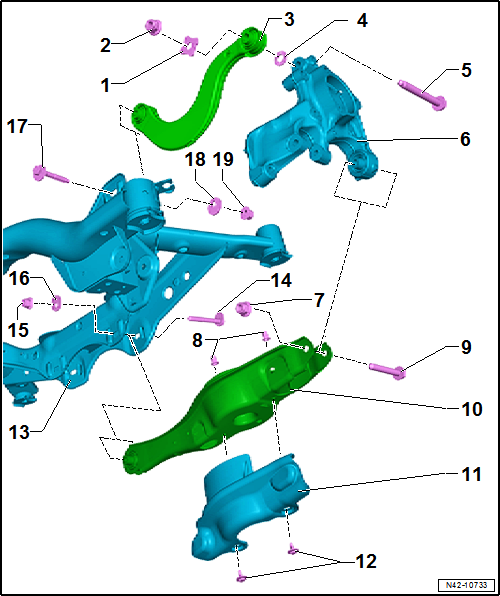
Upper transverse link |
| Removing and installing
→ Chapter |
| Always tighten threaded connections in unladen position
→ Chapter |
| 6 - |
Wheel bearing housing |
| Always tighten threaded connections in unladen position
→ Chapter |
| 10 - |
Lower transverse link |
| Removing and installing
→ Chapter |
| A wheel alignment check must be performed if loosened
→ Chapter |
| Do not turn more than 90° in either direction (i.e. from minimum to
maximum adjustment position). |
| Always tighten threaded connections in unladen position
→ Chapter |
| A wheel alignment check must be performed if loosened
→ Chapter |
| Do not turn more than 90° in either direction (i.e. from minimum to
maximum adjustment position). |
| Always tighten threaded connections in unladen position
→ Chapter |
1 -
Nut
Renew after removing
2 -
Washer
3 -
Upper transverse link
Removing and instal ...
1 -
Subframe
2 -
Bolt
Renew after removing
70 Nm +180°
3 -
Wheel bearing housin ...
Other materials:
General repair instructions
–
→ Chapter „Safety precautions when working on high-voltage
system“ Comply with notes.
–
Read self-diagnosis of auxiliary heater using vehicle
diagnostic tester.
–
...
Removing and installing oil separator
Special tools and workshop equipment
required
Flat scraper
Commercially available studs, M6x20 mm, qty. 2
Sealant remover
Sealant
→&nb ...
Assembly overview - rear window
1 -
Rear window
Removing and installing
→ Chapter
2 -
PUR adhesive sealant
Cross section of bead: -width b- = 7 mm,
-height a- = 10 mm (including precoating,
residual material on window glass and w ...
© 2016-2026 Copyright www.vwgolf.org

 Assembly overview - transverse link, multi-link suspension, front-wheel
drive
Assembly overview - transverse link, multi-link suspension, front-wheel
drive Assembly overview - track rod, multi-link suspension, front-wheel drive