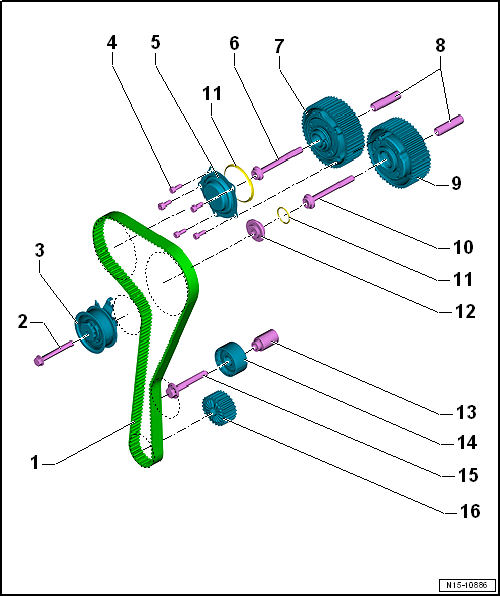
Volkswagen Golf Service & Repair Manual: Assembly overview - toothed belt, engine codes CPTA, CHPA, CZEA, CZDA
| Before removing, mark direction of rotation with chalk or
felt-tipped marker pen. |
| Installing (adjusting valve timing), CPTA, CZEA
→ Anchor |
| Installing (adjusting valve timing), CHPA, CZDA
→ Anchor |
| Removal and installation involve removing engine support
→ Chapter. |
| 7 - |
Exhaust camshaft toothed belt pulley |
| Removing and installing camshaft adjuster
→ Chapter. |
| 9 - |
Inlet camshaft toothed belt pulley |
| Removing and installing camshaft adjuster
→ Chapter. |
| Contact surface between toothed belt pulley and crankshaft must be
free from oil |
| Fitting possible in one position only. |
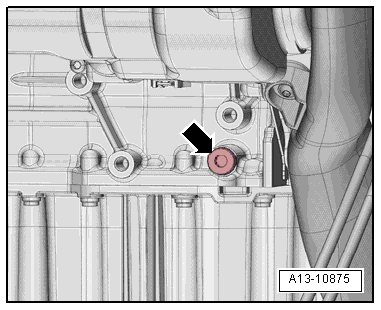
| Plug for “TDC” drilling in cylinder block - specified torque |
 Note Note
| – |
Tighten bolt -arrow- to 30 Nm. |
|
|
|
1 -
Lower toothed belt guard
2 -
Bolt
8 Nm
3 -
Engine support
Specified torque a ...
Special tools and workshop equipment
required
Torque wrench -VAS 6583-
...
Other materials:
Assembly overview - alternator without sliding bushes
1 -
Bolt
Qty. 4
Specified torque: 23 Nm
2 -
Alternator -C-
Removing and installing
→ Chapter
Checking
→ Chapter
Removing and instal ...
Assembly overview
Caution
If excessive force is exerted on sockets without
illumination, the retaining sleeve may be damaged.
Only illuminated sockets (cigarette lighter) can be
removed with the pull ...
Assembly overview - control units, RHD vehicles
1 -
Bracket
For onboard supply control unit -J519-
Removing and installing
→ Chapter
2 -
Onboard supply control unit -J519-
Removing and installing
→ Chapter
...
© 2016-2026 Copyright www.vwgolf.org

 Assembly overview - toothed belt cover
 Checking valve timing, engine codes CHPA, CMBA, CPVA, CXSA, CZCA, CPVB, CZDA