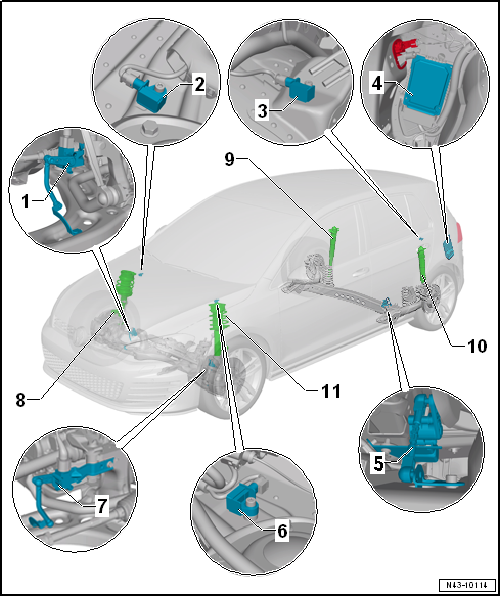
Volkswagen Golf Service & Repair Manual: Assembly overview - electronically controlled damping system, torsion beam
axle, saloon
| 1 - |
Front right vehicle lever sender -G289- |
| Removing and installing
→ Chapter |
| 2 - |
Front right body acceleration sender -G342- |
| Removing and installing
→ Chapter |
| 3 - |
Rear left body acceleration sender -G699- |
| Location: on left suspension strut dome behind left luggage
compartment side trim. |
| Removing and installing
→ Chapter |
| 4 - |
Electronically controlled damping control unit -J250- |
| Removing and installing
→ Chapter |
| Location: electronically controlled damping control unit -J250- is
installed behind left luggage compartment side trim. |
| Function Replace control unit must be
performed with → Vehicle
diagnostic tester if electronically controlled damping
control unit -J250- is renewed. |
| If the reference position has been re-adapted, the front camera for
driver assist systems must be recalibrated on vehicles with lane
departure warning function
→ Chapter „Calibrating front camera for driver assist systems“. |
| 5 - |
Rear left vehicle level sender -G76- |
| Removing and installing
→ Chapter |
| 6 - |
Front left body acceleration sender -G341- |
| Removing and installing
→ Chapter |
| 7 - |
Front left vehicle level sender -G78- |
| Removing and installing
→ Chapter |
| 8 - |
Shock absorber with front right shock absorber damper adjustment
valve -N337- |
| Removing and installing suspension strut
→ Chapter. |
| Repairing suspension strut
→ Chapter. |
| 9 - |
Shock absorber with rear right shock absorber damper adjustment
valve -N339-. |
| Removing and installing shock absorber
→ Chapter. |
| Repairing shock absorber
→ Chapter. |
| 10 - |
Shock absorber with rear left shock absorber damper adjustment valve
-N338-. |
| Removing and installing shock absorber
→ Chapter. |
| Repairing shock absorber
→ Chapter. |
| 11 - |
Shock absorber with front left shock absorber damper adjustment
valve -N336- |
| Removing and installing suspension strut
→ Chapter. |
| Repairing suspension strut
→ Chapter. |
1 -
Front right vehicle lever sender -G289-
Removing and installing
→ Chapter
2 -
Front right body acceleration se ...
Other materials:
Drawers
Fig. 116 Drawer under the front seat
First read and observe the introductory information
and safety warnings A drawer may be located under each of the front seats
.
Opening or closing the drawer
To open, press the button in the drawer grip and open the drawer.
To close, push the dra ...
Removing and installing retainer for aerial amplifier for mobile telephone
-R86-
Removing
–
Removing aerial amplifier for mobile telephone -R86-
→ Chapter.
–
Push locking tabs in direction of arrow
-A-.
...
Battery terminal connection
WARNING
Danger of injury! Observe warning notices and safety
regulations
→ Chapter!
Caution
To prevent damage to ...
© 2016-2026 Copyright www.vwgolf.org


 Assembly overview - electronically controlled damping system, multi-link
suspension, saloon
Assembly overview - electronically controlled damping system, multi-link
suspension, saloon