Volkswagen Golf Service & Repair Manual: Assembly overview - drive shaft, constant velocity joint VL107
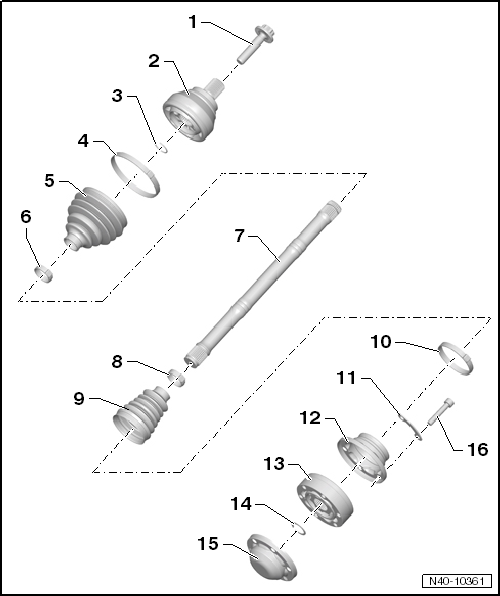
| 1 - | Bolt |
| Renew after removing |
| Loosening and tightening → Chapter |
| Before fitting, clean the threads in the CV joint using a thread tap. |
| 200 Nm +180° |
| 2 - | Outer constant velocity joint |
| Renew only as complete unit |
| Removing → Anchor. |
| Installing: drive onto shaft to stop using plastic hammer |
| Checking → Chapter |
| 3 - | Retaining ring |
| Renew after removing |
| Insert in groove in shaft |
| 4 - | Clamp |
| Renew after removing |
| Tightening → Fig. |
| 5 - | Boot |
| Check for splits and chafing |
| Material: Hytrel (polyester elastomer) |
| 6 - | Clamp |
| Renew after removing |
| Tightening → Fig. |
| 7 - | Drive shaft |
| 8 - | Clamp |
| Renew after removing |
| Tightening → Fig. |
| 9 - | Boot for constant velocity joint |
| Material: Hytrel (polyester elastomer) |
| Without breather hole |
| Check for splits and chafing |
| Drive off constant velocity joint with a drift |
| Coat sealing surface of constant velocity joint with -D 454 300 A2- before installing. |
| 10 - | Clamp |
| Renew after removing |
| Tightening → Fig. |
| 11 - | Locking plate |
| 12 - | Cap |
| Drive off carefully with drift |
| Coat sealing surface of constant velocity joint with -D 454 300 A2- before installing. |
| Adhesive surface must be free of oil and grease! |
| 13 - | Inner constant velocity joint |
| Renew only as complete unit |
| Pressing off → Fig. |
| Pressing on → Fig. |
| Checking → Chapter |
| 14 - | Retaining ring |
| Remove and install with circlip pliers -VW 161 A-. |
| 15 - | Cover |
| Renew after removing |
| Always renew |
| Pressing off → Fig. |
| 16 - | Multi-point socket head bolt |
| Renew after removing |
| M10 x 52 |
| Initially tighten diagonally to 10 Nm and then tighten diagonally to specified torque. |
| 70 Nm |
 Assembly overview - drive shaft, constant velocity joint VL100
1 -
Outer constant velocity joint
Renew only as complete unit
Removing
→ Anchor.
Installing: drive onto sha ...
 Assembly overview - drive shaft, triple roller joint AAR3300i
1 -
Bolt
Renew after removing
Loosening and tightening
→ Chapter
Before fitting, clean the threads in the C ...
Other materials:
Removing and installing manually operated anti-dazzle interior mirror,
without rain and light sensor -G397- and front camera for driver assist systems
-R242-
Removing
–
Turn interior mirror -2- anti-clockwise
-arrow- by 90° (1/4
turn).
–
Remove interior mirror -2- from
glued-on retaining plate -1-.
Installing
Note
...
Electrical controls on the front seats
Fig. 44 Moving the front left seat forwards
and backwards, adjusting the backrest and the seat cushion for height and tilt
Fig. 45 Adjusting the lumbar support.
First read and observe the introductory information
and safety warnings The layout of the controls on the front right-hand seat ...
Comfort
A basic requirement for concentrated and safe driving is the
feeling of comfort in the passenger compartment. Especially when
it is hot and humid, comfort can be attained only through the
use of air conditioning. Of course, open windows, an open
sunroof ...
