Volkswagen Golf Service & Repair Manual: Assembly overview - drive shaft, constant velocity joint VL100
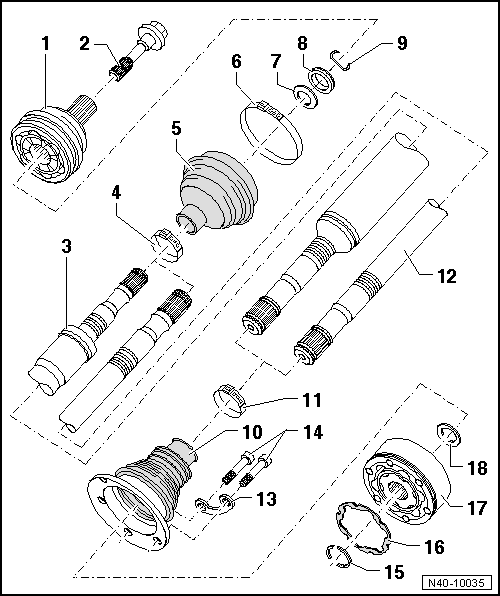
| 1 - |
Outer constant velocity joint |
| Renew only as complete unit |
| Installing: drive onto shaft to stop using plastic hammer |
| Loosening and tightening
→ Chapter |
| Check for splits and chafing |
| Material: Hytrel (polyester elastomer) |
| Installation position
→ Fig. |
| Allocation
→ Electronic Parts Catalogue “ETKA”. |
| Installation position
→ Fig. |
| Allocation
→ Electronic Parts Catalogue “ETKA”. |
| Insert in groove in shaft |
| 10 - |
Boot for constant velocity joint |
| Material: Hytrel (polyester elastomer) |
| Check for splits and chafing |
| Drive off constant velocity joint with a drift |
| Coat sealing surface of constant velocity joint with -D 454 300 A2-
before installing. |
| 14 - |
Multi-point socket head bolt |
| Initially tighten diagonally to 10 Nm and then tighten diagonally to
specified torque. |
| Remove and install with circlip pliers -VW 161 A- |
| Adhesive surface on constant velocity joint must be free of oil and
grease! |
| 17 - |
Inner constant velocity joint |
| Renew only as complete unit |
| Installation position
→ Anchor |
I -
→ Chapter „Assembly overview - drive shaft, constant velocity joint
VL100“
II -
→ Chapter „Assembly overview - ...
1 -
Bolt
Renew after removing
Loosening and tightening
→ Chapter
Before fitting, clean the threads in the C ...
Other materials:
Removing and installing parking brake motor -V282-/-V283-
Special tools and workshop equipment
required
Torque wrench -V.A.G 1331-
Vehicle diagnostic tester
Removing
Note
...
Brake lines
Repairing brake lines
The flanging tool for brake lines -VAS 6056- can be used to
flange brake lines with an outer pipe diameter of 5 mm without
damaging the coating. In certain cases, this allows sections of
brake lines to be renew ...
Assembly overview - front door window
Note
Only the left side is shown. The right side is similar.
1 -
Front door
2 -
Door window
Removing and installing
→ Chapter.
3 -
Inner door cover
Removing and insta ...
© 2016-2026 Copyright www.vwgolf.org

 Overview - drive shaft
 Assembly overview - drive shaft, constant velocity joint VL107