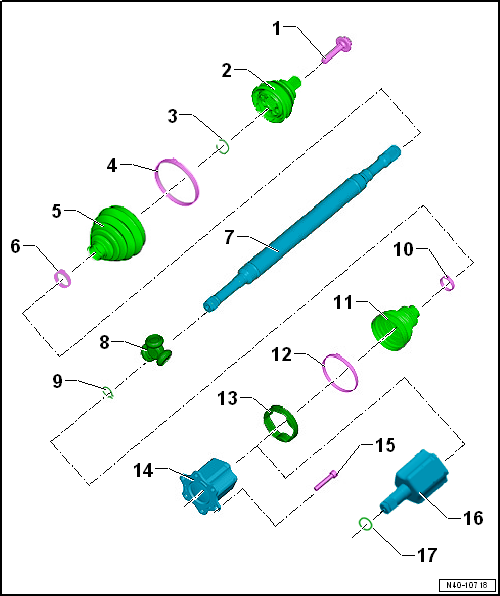
Volkswagen Golf Service & Repair Manual: Assembly overview - drive shaft, triple roller joint AAR3300i
| Loosening and tightening
→ Chapter |
| Before fitting, clean the threads in the CV joint using a thread
tap. |
| 2 - |
Outer constant velocity joint |
| Renew only as complete unit |
| Installing: drive onto shaft with plastic hammer until compressed
circlip seats |
| Insert in groove in shaft |
| 5 - |
Boot for constant velocity joint |
| Check for splits and chafing |
| Material: Hytrel (polyester elastomer) |
| 8 - |
Triple roller star with rollers |
| The chamfer -arrow- points towards
drive shaft splines. |
| Insert in groove in shaft |
| 11 - |
Boot for triple roller joint |
| Check for splits and chafing |
| 15 - |
Multi-point socket head bolt |
| Initially tighten diagonally to 10 Nm and then tighten diagonally to
specified torque. |
| Insert in groove in shaft |
1 -
Bolt
Renew after removing
Loosening and tightening
→ Chapter
Before fitting, clean the threads in the C ...
Special tools and workshop equipment
required
Torque wrench -V.A.G 1332-
...
Other materials:
Mounting front seat on seat repair stand
Special tools and workshop equipment
required
Torque wrench -V.A.G 1331
Torque wrench -V.A.G 1783
...
Installing gearbox
Install in reverse order of removal, observing the
following:
Note
Renew bolts which are tightened by turning through a
specified angle.
Renew self-locking nuts and bolts, and seals, O-rings an ...
Introduction
This chapter contains information on the following subjects:
→ Indicator lamps and fuel gauge
→ Filling the tank with petrol, diesel or E85
→ Things to note for diesel vehicles
→ Capacities
→ Checks when filling the tank
The fuel c ...
© 2016-2026 Copyright www.vwgolf.org

 Assembly overview - drive shaft, constant velocity joint VL107
 Removing and installing drive shaft, left drive shaft, constant velocity
joints VL100 and VL107, except for e-Golf
Removing and installing drive shaft, left drive shaft, constant velocity
joints VL100 and VL107, except for e-Golf