Volkswagen Golf Service & Repair Manual: Assembly overview - door
 Note
Note
| |
Only the left side is shown. The right side is similar. |
| |
After renewal of B-pillar, the specified torque for bolts
-2 and 5- as well as for
-14 and 17- changes. |
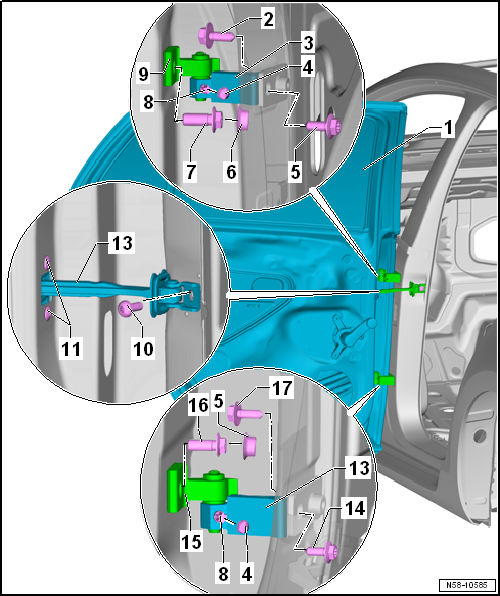
- Removing and installing
→ Chapter
- Adjusting
→ Chapter
- Loosening once to adjust door is allowed, afterwards renew always
- Installed from inside vehicle
- To remove and install, B-pillar lower trim must be removed first
- 50 Nm
Note
| |
After renewal of A-pillar the specified torque changes. |
| |
Specified torque after renewal of A-pillar: 20 Nm + 90° |
- The hinge is split
- Lower part is secured to hinge upper part with bolt
-8-
- Loosening once to adjust door is allowed, afterwards renew always
- Installed from inside vehicle.
- To remove and install, B-pillar lower trim must be removed first.
- 50 Nm
Note
| |
After renewal of A-pillar the specified torque changes. |
| |
Specified torque after renewal of A-pillar: 20 Nm + 90° |
For bolt -7-
- Always renew, loosening it once to adjust door is allowed.
- 50 Nm
- Connects upper part of hinge to bottom part of hinge
- 23 Nm
- The hinge is split
- Upper part is secured to hinge lower part with bolt
-8-
- Removing and installing
→ Chapter
- The hinge is split
- Lower part is secured to hinge upper part with bolt
-8-
- Loosening once to adjust door is allowed, afterwards renew always
- Installed from inside vehicle
- To remove and install, B-pillar lower trim must be removed first.
- 50 Nm
Note
| |
After renewal of A-pillar the specified torque changes. |
| |
Specified torque after renewal of A-pillar: 20 Nm + 90° |
- The hinge is split
- Upper part is secured to hinge lower part with bolt
-8-
- Always renew, loosening it once to adjust door is allowed
- 50 Nm
- Loosening once to adjust door is allowed, afterwards renew always
- Installed from inside vehicle
- To remove and install, B-pillar lower trim must be removed first
- 50 Nm
Note
-
| |
After renewal of A-pillar the specified torque changes. |
-
| |
Specified torque after renewal of A-pillar: 20 Nm + 90° |
Special tools and workshop equipment
required
Door alignment tool -3320-
Universal joint for 3320 -3 ...
© 2016-2026 Copyright www.vwgolf.org


 Door
Door Removing and installing door