Volkswagen Golf Service & Repair Manual: Assembly overview - condenser
 Note
Note
| The illustration shows the Modine condenser. |
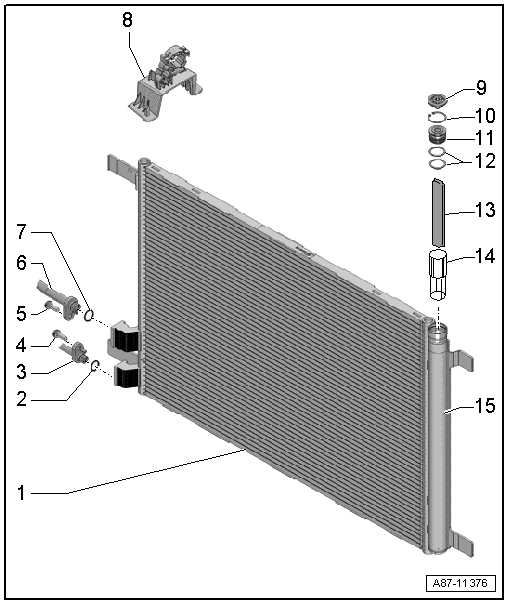
| Different versions. Refer to
→ Electronic Parts Catalogue. |
| Removing and installing
→ Chapter. |
| Renewing; for versions, refer to
→ Electronic Parts Catalogue. |
| Before fitting a seal, coat lightly with refrigerant oil |
| To internal heat exchanger. |
| From air conditioner compressor. |
| Renewing; for versions, refer to
→ Electronic Parts Catalogue. |
| Before fitting a seal, coat lightly with refrigerant oil |
| Different versions. Refer to
→ Electronic Parts Catalogue. |
| Manufacturer Modine : 3 Nm |
| Different versions. Refer to
→ Electronic Parts Catalogue. |
| Renewing; for versions, refer to
→ Electronic Parts Catalogue. |
| Before fitting a seal, coat lightly with refrigerant oil |
| Different versions. Refer to
→ Electronic Parts Catalogue. |
| Denso condenser
→ Chapter. |
| Modine condenser
→ Chapter. |
| Keihin condenser
→ Chapter. |
| Different versions. Refer to
→ Electronic Parts Catalogue. |
| Denso condenser
→ Chapter. |
| Modine condenser
→ Chapter. |
| Keihin condenser
→ Chapter. |
| Different versions. Refer to
→ Electronic Parts Catalogue. |
| Integrated in condenser for this version. |
Note
| Under certain conditions, it is not necessary to renew the receiver
with desiccant bag every time that the refrigerant circuit is opened.
Refer to ELSA under Heating, ventilation, air conditioning system; Air
conditioning system with refrigerant R134a
→ Air conditioning system with refrigerant R134a; Rep. gr.00. |
Special tools and workshop equipment
required
Torque wrench -V.A.G 1331-
C ...
Other materials:
Removing and installing shock absorber, multi-link suspension, right shock
absorber
Special tools and workshop equipment required
Torque wrench -V.A.G 1332-
Torque wrench -V.A.G 1410-
Spring compressor -V.A.G 1752/1-
Spring retainer -V.A.G 1752/3A-
Adapter -V.A.G 1752/9-, not illu ...
City emergency brake function
Fig. 175 The display in the instrument
cluster: advance warning display
First read and observe the introductory information
and safety warnings The city emergency brake function is part of the area
monitoring system (Front Assist) and is active when Front Assist is switched on.
Dependin ...
Description of battery charger -VAS 5900-
The battery charger -VAS 5900- is suitable for charging all
12V batteries supplied by Volkswagen.
Battery charger -VAS 5900-
1 -
Display
2 -&n ...
© 2016-2026 Copyright www.vwgolf.org


 Removing and installing refrigerant circuit pressure sender -G805