Volkswagen Golf Service & Repair Manual: Assembly overview - B-pillar trim
 Note Note
|
| Upper part of B-pillar trim |
| I: Upper B-pillar trim, 4-door model |
| II: Upper B-pillar trim, 2-door model |
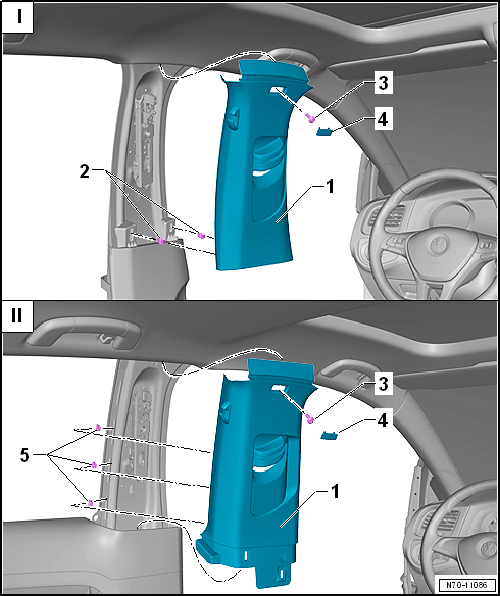
| 1 - | Upper part of B-pillar trim |
- Removing and installing → Chapter
| 2 - | Retaining clip |
- Insert in upper B-pillar trim
- Renew any damaged or deformed retaining clips
| 3 - | Bolt |
- 1.8 Nm
| 4 - | Cover |
- With “airbag” symbol.
| 5 - | Retaining clip |
- Insert in B-pillar trims.
- Renew any damaged or deformed retaining clips
| Lower B-pillar trim |
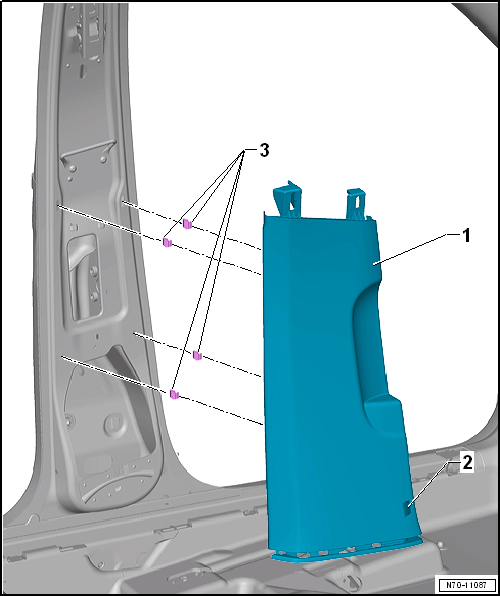
| 1 - | Lower B-pillar trim |
- Removing and installing → Chapter
| 2 - | Button for deactivating interior monitoring and vehicle inclination sensor -E616- |
- Removing and installing → Electrical system; Rep. gr.96
| 3 - | Retaining clip |
- Insert into trim
- Remove any retaining clips left in body mountings using removal tool -T40280-
- Renew any damaged or deformed retaining clips.
 Assembly overview - A-pillar trim
Note
The illustration shows the A-pillar trims on the left side.
The right-hand side is similar (mirror image of left-hand side).
...
 Assembly overview - D-pillar trim
Note
The illustration shows the D-pillar trim on the left side. The
right-hand side is similar (mirror image of left-hand side).
1 -
D-pillar tri ...
Other materials:
Removing and installing rear 3-point seat belt, estate, with belt tensioner
Removing
WARNING
Observe safety instructions for pyrotechnic
components
→ Chapter.
Observe disposal regulations for p ...
Removing and installing mirror trim
Special tools and workshop equipment
required
Torque wrench -V.A.G 1783
Note
Removal and installation are described only for the left mirror
trim. The right side is simi ...
Removing and installing fuel tank, vehicles with multi-link rear suspension
and fuel tank leakage diagnosis function
Special tools and workshop equipment
required
Torque wrench -V.A.G 1331-
Removal wedge -3409-
...
