
Volkswagen Golf Owners Manual: Warning lamp and coolant temperature display
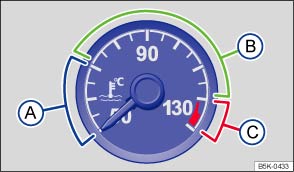
Fig. 194 Coolant temperature display in instrument cluster: Ⓐ cold; Ⓑ normal; Ⓒ warning
 First read and observe the introductory information
and safety warnings
First read and observe the introductory information
and safety warnings In normal driving conditions, the needle will be in the middle section of the scale. The temperature may also rise when the engine is working hard, especially at high ambient temperatures.
Several warning and indicator lamps will light up briefly as a functional check when the ignition is switched on. They will switch off after a few seconds.
| Flashesa) |
Needle position |
Possible cause | Solution |
|---|---|---|---|
 |
Ⓒ Warning area |
Coolant temperature too high. |
 Do not drive on! Do not drive on! Stop the vehicle as soon as possible, and when safe to do so. Stop the engine, let the engine cool down until the needle is back in the normal area. Check the coolant level . |
|
Ⓑ Normal area |
Coolant level too low. | After
the engine has cooled down, check the coolant level and refill engine coolant
if the level is too low . There is a fault if the coolant level is correct. |
|
| – | Fault in the coolant system. |
Do not drive on! Seek expert assistance. |
|
| – |
Ⓐ Cold |
The engine has not yet reached operating temperature. | Avoid high engine revs and heavy engine loads until the engine is warm. |

 WARNING
- Never ignore any illuminated warning lamps or text messages.
- Stop the vehicle as soon as possible and when safe to do so.

 NOTICE
a) Displayed in colour on an instrument cluster with colour display.
 Introduction
This chapter contains information on the following subjects:
→ Warning lamp and coolant temperature display
→ Coolant specification
→ Checking the coolant level and ...
 Coolant specification
First read and observe the introductory information
and safety warnings The cooling system is filled at the factory with a mixture
of specially prepared water and at least 40% coolant additive G ...
Other materials:
Paintwork structure of a factory finish
Structure of a solid-colour (uni) paint finish, conventional
Coat thickness approx. 80-120 µm
1 -
Sheet steel
2 -
Zinc phosphate
3 -
...
Assembly overview - poly V-belt drive, vehicles without air conditioner
compressor
1 -
Bolt
Renew
150 Nm +180°
Use counterhold -T10475- to loosen and tighten.
Risk of damage to engine caused by incorrect valve timing.Do not turn crankshaft
out of TDC position.
2 -
...
Dimensions - lettering on rear lid, “GTI/GTD”
Note
When fitting the lettering, observe the fitting notes
→ Anchor.
1 -
Lettering
Model designation
2 -
Height dimension
75.5 ± 1 mm, from lower edge of lettering to tail light.
...
