Volkswagen Golf Service & Repair Manual: Run-flat tyres - general information
| Tyres with run-flat properties have reinforced side walls
when comparing them with normal tyres. This reduces the slippage
of the side walls and prevents the tyre flanks sticking when the
tyres are run deflated. This ensures the vehicle remains
controllable and the vehicle has almost normal driving
characteristics. The alleviates the necessity to fit the spare
wheel in dangerous conditions e.g hard shoulder of a motorway or
in bad weather conditions. |
| A deflated tyre can be driven further to the next workshop
(approx. 50 km (approx. 30 miles)) at a suitable speed (max. 80
km/h (max. 50 mph)) and in suitable driving style for the
conditions, see
→ Owner's wallet. |
| After checking the respective wheel, the responsibility lies
with the driver to decide if it is safe to drive further with
the deflated tyre. |
|
|
|
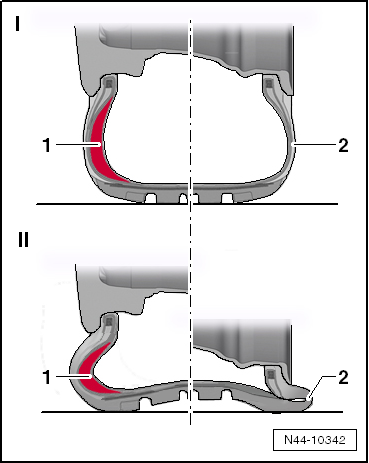
| -I- Tyres with normal air
pressure |
| 1 - |
Tyres with run-flat properties (reinforced side walls
-red-) |
| When a normal tyre -2-
deflates, the side walls are pressed against the wheel rims. The
side walls heat up extremely or stick and are therefore
destroyed when the tyre is deflated. |
| Tyres with run-flat properties -1-
are supported on the reinforced side walls (-red-).
A special tyre mixture and the reduced walkability of the
reinforced side walls reduces the heat created when the tyre is
run and the vehicle remains controllable. |
 Note Note
| Please note the special requirements when using tyres with
run-flat properties
→ Chapter. |
|
|
|
Caution
Retrofitting run-flat tyres to vehicles may only be
undertaken if the tyres are fitted as standard or they
...
© 2016-2026 Copyright www.vwgolf.org


 Run-flat tyres, retrofitting/requirements when using run-flat tyres