Volkswagen Golf Service & Repair Manual: Renewing connector on airbag
 WARNING
| Observe safety instructions for pyrotechnic
components
→ Chapter. |
|
| – |
Remove driver side airbag
→ Chapter. |
| Vehicles with steering wheel without multifunction button |
WARNING
| Before handling pyrotechnic components (e.g.
separating the electrical connector), the person
handling them must ensure that he/she is “electrically
discharged”. To do this e.g. briefly touch the door
striker plate. |
|
|
|
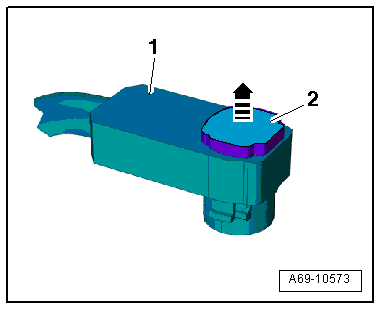
| – |
Release connector lock -2-
using a small screwdriver -arrow-
and pull connector -1- off driver
side airbag igniter -N95-. |
|
|
|
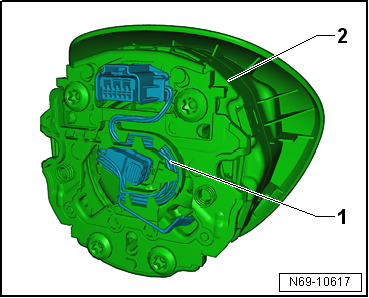
| – |
Disconnect connectors from wiring harness
-1-. |
| – |
Detach wiring harness from retainers and remove it from
driver side airbag -2-. |
| Vehicles with steering wheel with multifunction button |
WARNING
| Before handling pyrotechnic components (e.g.
separating the electrical connector), the person
handling them must ensure that he/she is “electrically
discharged”. To do this e.g. briefly touch the door
striker plate. |
|
|
|
|
| – |
Release connector lock -2-
using a small screwdriver -arrow-
and pull connector -1- off driver
side airbag igniter -N95-. |
|
|
|
| – |
Disconnect connectors from wiring harness
-1-. |
| – |
Detach wiring harness from retainers and remove it from
driver side airbag -2-. |
WARNING
| |
Observe safety instructions for pyrotechnic
components
→ Chapter. |
| |
Before handling pyrotechnic components (e.g.
connecting the electrical connector), the person
handling them must ensure that he/she is “electrically
discharged”. To do this e.g. briefly touch the door
striker plate. |
|
|
|
|
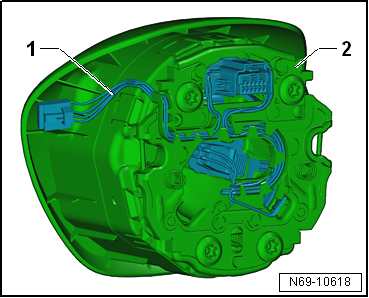
| – |
Connect connector -1- to airbag
igniter -arrow A-. |
| – |
Press in connector lock -2--arrow B-.
Doing so, the connector will be fully inserted into airbag
igniter and locked at the same time. |
| Further installation is carried out in reverse order of
removal. Observe the following: |
 Note Note
| Ensure that the electrical connectors are pushed fully onto
stop and engage audibly. |
| |
→ Chapter „Assembly overview - driver side airbag“ |
|
|

|
Special tools and workshop equipment
required
Commercially available Torx screwdriver T25 of approx. 100
mm length
...
Other materials:
Information on the air conditioning system
First read and observe the introductory information
and safety warnings The cooling system for the vehicle interior only works
when the engine is running and the blower is switched on.
The air conditioning system operates most effectively with the windows and the
panorama tilting roof clos ...
Assembly overview - LED headlights
1 -
LED module for headlight main beam bulb
Left headlight main beam bulb -M30-
Right headlight main beam bulb -M32-
Removing and installing
→ Chapter
2 -
LED module for headlight ...
Removing and installing fuse holder A -SA-
Removing
–
Remove fuse holder B
→ Chapter.
–
Take securing bar -4- out of
fuse holder B upwards.
–
Release retaining tab -1--arrow-
a ...
© 2016-2026 Copyright www.vwgolf.org

 Removing and installing driver side airbag igniter -N95-