Volkswagen Golf Service & Repair Manual: Removing and installing tyre pressure sensor, tyre pressure sensor without
valve, production version
| Special tools and workshop equipment
required |
|
|
|
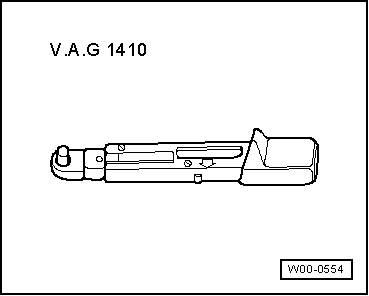
| Torque wrench -V.A.G 1410- |
| Carry out the following work: |
| – |
Remove tyre from wheel rim. |
|
|
|
| Be sure to check which version is installed, before
performing further work. |
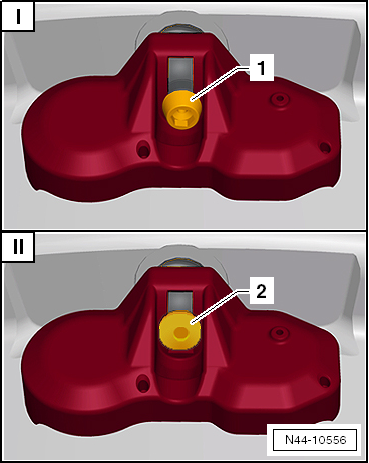
| I - Customer service version |
| In the customer service version, the tyre pressure sensor is
secured on the valve by means of a torx socket bolt
-1-. |
| If the customer service version is installed, the following
work sequence applies
→ Anchor. |
| In case of the production version, the tyre pressure sensor
is secured on the valve by means of a flat square head bolt
-2-. |
| If the production version is installed, the following work
sequence applies
→ Anchor. |
|
|
|
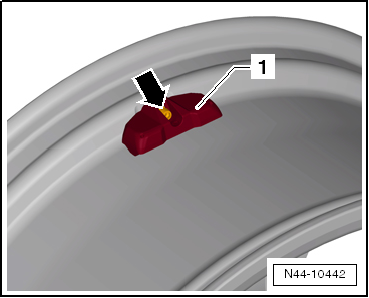
| – |
Press tyre pressure sensor -1-
against wheel rim, and secure it using a new bolt
-arrow-. |
| – |
Counter hold on metal valve (for example using 2 mm twist
drill). |
 Note Note
| After fitting, carry out a visual inspection and check that
it is securely seated. The tyre pressure sensor
-1- must be bolted such that there
is no play, and its support feet must be located in the drop
centre of the rim. |
| The bolt must not be retightened to specified torque after
the installation has been completed. |
| → Chapter „Assembly overview - tyre pressure sensor, tyre
pressure sensor without valve“ |
|
|
|
Special tools and workshop equipment
required
Torque wrench -V.A.G 1410-
Ca ...
Special tools and workshop equipment
required
Torque wrench -V.A.G 1410- and 11 mm insert
...
Other materials:
Assembly overview – front side window
1 -
Centring clip
2 -
Retaining clip
Qty. 2
3 -
Front side window
Removing front side window
→ Chapter
4 -
Seal
Integral part of front side window.
...
2-pack clear coat
Designation:
2-pack clear coat -LLS MAX 210-
Issued 12.2010
Product description
The 2-pack clearcoat -LLS MAX 210- is a high-gloss
2-component clear coat for the permanent se ...
Mobile telephone preparation, Bluetooth car phone online
The Bluetooth car phone is integrated in control unit 1 for
information electronics -J794-.
Connection to mobile telephone -R54- is established via
Bluetooth.
Aerial for Bluetooth -R152- is integrated into control unit
...
© 2016-2024 Copyright www.vwgolf.org

 Caution
 Removing and installing tyre pressure sensor, tyre pressure sensor without
valve, customer service version
Removing and installing tyre pressure sensor, tyre pressure sensor without
valve, customer service version Removing and installing tyre pressure sensor, metal valve body