Volkswagen Golf Service & Repair Manual: Removing and installing steering column, RHD
| Special tools and workshop equipment
required |
|
|
|
| Torque wrench -V.A.G 1331- |
|
|
|
| – |
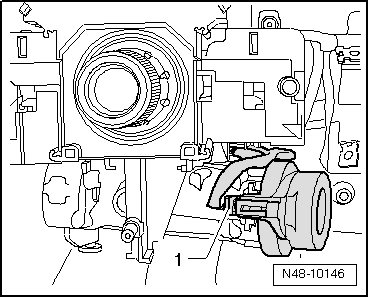
Pull connector -1- off
immobiliser reader coil -D2-. |
| Vehicles with keyless entry and start system “Keyless
Access” |
|
|
|
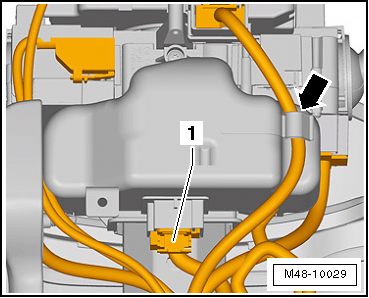
| – |
Disconnect connector -1-. |
| – |
Unclip cable from holder on electronic steering column lock
control unit -J764--arrow-. |
| Continuation for all vehicles |
| – |
Remove footwell vent below steering column
→ Heating, air conditioning system; Rep. gr.87. |
|
|
|
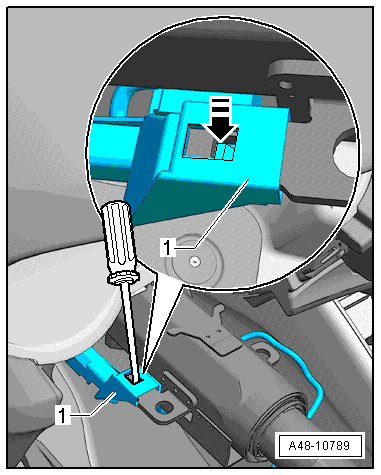
| – |
Release tab -arrow- using a
small screwdriver. |
| – |
Pull cable guide -1- off tab
forwards. |
|
|
|
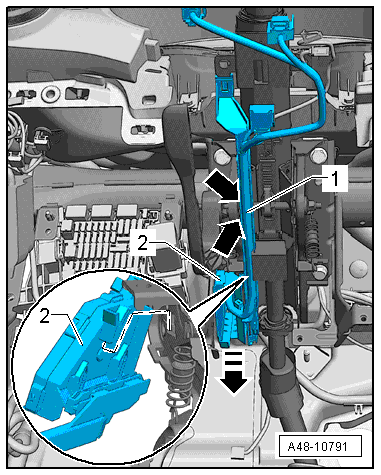
| – |
Release tabs -arrows- of cable
guide -1- using a small
screwdriver. |
| – |
Pull cable guide -1- off
steering column downwards. |
| – |
Disengage cable retainer under steering column
-2- and pull off downwards. |
| – |
Move electrical wire for steering column to side. |
|
|
|
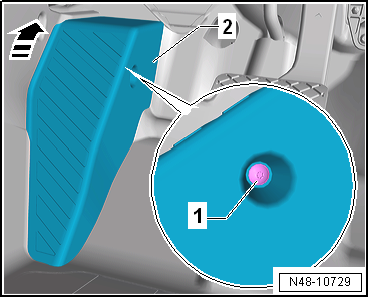
| – |
Push foot support -2- upwards
in -direction of arrow- and remove. |
| – |
Fold floor covering to the rear. |
|
|
|
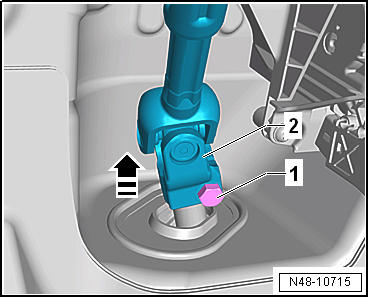
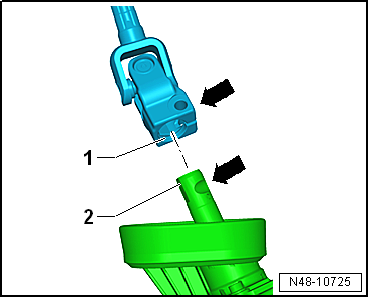
| – |
Unscrew bolt -1- from universal
joint -2- and pull off universal
joint in -direction of arrow-. |
 Caution
| The following work must not be performed while the
universal joint is separated from the steering rack: |
| Not adhering to these instructions will result in
irreparable damage. |
|
|
|
|
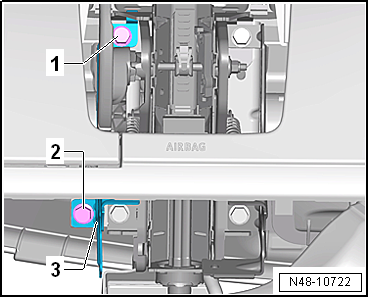
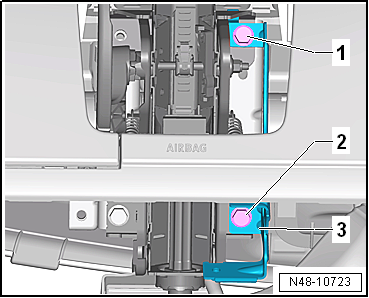
| – |
Remove bolts -1- and
-2-. |
| – |
Remove left bracket -3- for
knee airbag. |
|
|
|
| – |
Remove bolts -1- and
-2-. |
| – |
Remove right bracket -3- for
knee airbag. |
|
|
|
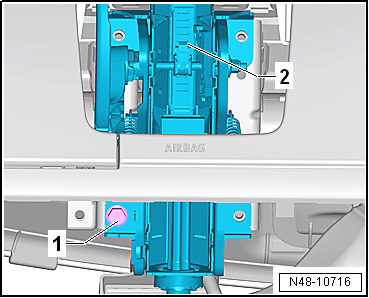
| – |
Unscrew bolt -1-, and hold
steering column -2- when doing
this. |
|
|
|
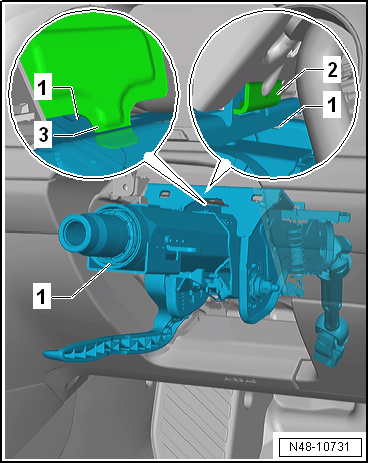
| – |
Unhook lugs -2- and
-3- of steering column
-1- upwards from mounting bracket
and remove. |
Caution
| Ensure the steering column is handled and
transported correctly
→ Chapter. |
|
| Install in reverse order of removal, observing the
following: |
|
|
|
| – |
Hook steering column -1- into
installation aids on mounting bracket at top
-3- and bottom
-2-. |
|
|
|
| – |
Align steering column -2- with
mounting bracket. Screw in bolt -1-
hand-tight. |
|
|
|
| – |
Install right bracket -3- for
knee airbag. |
| – |
Tighten bolts -1- and
-2- only hand-tight. |
|
|
|
| – |
Install left bracket -3- for
knee airbag. |
| – |
Tighten bolts -1- and
-2- only hand-tight. |
|
|
|
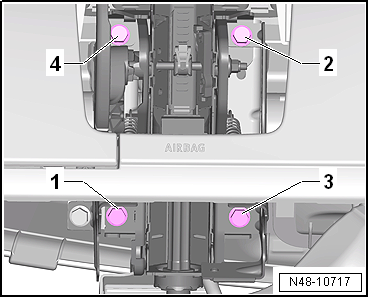
| – |
Tighten bolts
-1-, -2-,
-3- and -4-
one after another to specified torque. |
|
|
|
| – |
The flat surface of the steering column
-1- must lie against the flat
surface of the steering rack -2-.
The cut-out in the steering rack must align exactly with the
hole for the securing bolt -arrows-. |
|
|
|
| – |
Fit universal joint -2- onto
steering pinion in opposite -direction of
arrow-. |
| – |
Insert new hexagon bolt -1- and
tighten. |
| – |
Fold floor covering forwards. |
|
|
|
| – |
Install foot support -2- in
opposite -direction of arrow-. |
| Vehicles with ignition/starter switch |
|
|
|
| – |
Connect connector -1- to
immobiliser reader coil -D2-. |
| Vehicles with keyless entry and start system “Keyless
Access” |
|
|
|
| – |
Clip cable into holder on electronic steering column lock
control unit -J764--arrow-. |
| Continuation for all vehicles |
| – |
Install steering column switch module
→ Electrical system; Rep. gr.94. |
|
|
|
| – |
Fit cable retainer under steering column
-2- so that lugs in guide engage in
steering column. |
| – |
Fit cable guide -1-. Lugs
-arrows- must engage in steering
column. |
| – |
Install footwell vent below steering column
→ Heating, air conditioning system; Rep. gr.87. |
| – |
Install knee airbag
→ General body repairs, interior; Rep. gr.69. |
| – |
Install lower steering column trim
→ General body repairs, interior; Rep. gr.68. |
| – |
Install upper steering column trim
→ General body repairs, interior; Rep. gr.68. |
| – |
Install steering wheel
→ Chapter. |
| – |
Install driver side airbag unit
→ General body repairs, interior; Rep. gr.69 |
| – |
Carry out basic setting for steering angle sender -G85-
using → Vehicle
diagnostic tester. |
| → Chapter „Assembly overview - steering column“ |
| Footwell vent below steering column
→ Heating, air conditioning system; Rep. gr.87. |
| Steering column switch module
→ Electrical system; Rep. gr.94. |
| Knee airbag
→ General body repairs, interior; Rep. gr.69. |
| Driver side airbag unit
→ General body repairs, interior; Rep. gr.69. |
| Lower steering column trim
→ General body repairs, interior; Rep. gr.68. |
| Upper steering column trim
→ General body repairs, interior; Rep. gr.68. |
|
|
|
Special tools and workshop equipment
required
Torque wrench -V.A.G 1331-
...
Note
When renewing control unit, select
Renewal function for respective control unit in “Guided
fault finding” or “Guided functions” using U ...
Other materials:
Removing and installing belt height adjuster, 2-door model
Removing
–
Press belt height adjuster button and move slider of belt
height adjuster to lowest position.
–
Detach upper B-pillar trim
→ Chapter.
–
...
Washing the vehicle
First read and observe the introductory information
and safety warnings The longer substances such as insects, bird droppings,
resinous tree sap, road dirt, industrial deposits, tar, soot or road salt and other
corrosive materials remain on the vehicle, the more damage they do to the paintwo ...
Introduction
This chapter contains information on the following subjects:
→ Drink holders in the front centre console
→ Drink holders in the rear centre armrest
→ Drink holder in the rear side trim
Bottle holder
Bottle holders are located in the open stowage areas of t ...
© 2016-2026 Copyright www.vwgolf.org

 Note
Note WARNING
 Removing and installing steering column, LHD
 Removing and installing control unit for electronic steering column lock
-J764-
Removing and installing control unit for electronic steering column lock
-J764-