Volkswagen Golf Service & Repair Manual: Removing and installing steering column, LHD
| Special tools and workshop equipment
required |
|
|
|
| Torque wrench -V.A.G 1331- |
|
|
|
| – |
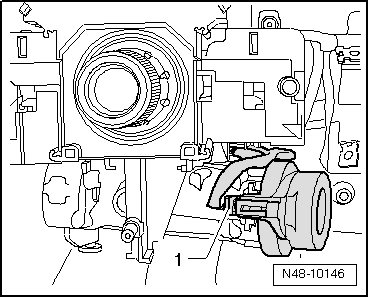
Pull connector -1- off
immobiliser reader coil -D2-. |
| Vehicles with keyless entry and start system “Keyless
Access” |
|
|
|
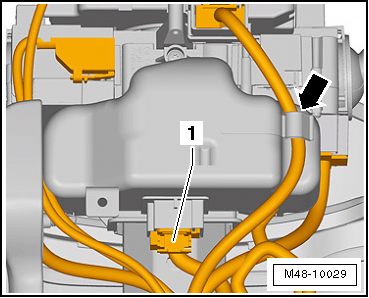
| – |
Disconnect connector -1-. |
| – |
Unclip cable from holder on electronic steering column lock
control unit -J764--arrow-. |
| Continuation for all vehicles |
| – |
Remove footwell vent below steering column
→ Heating, air conditioning system; Rep. gr.87. |
|
|
|
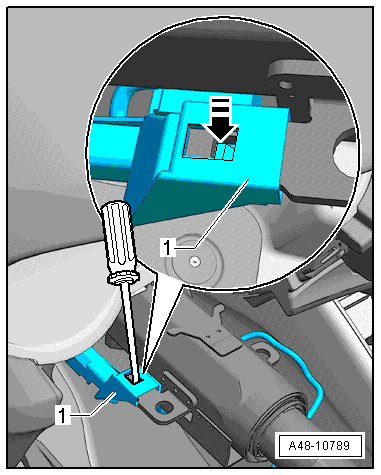
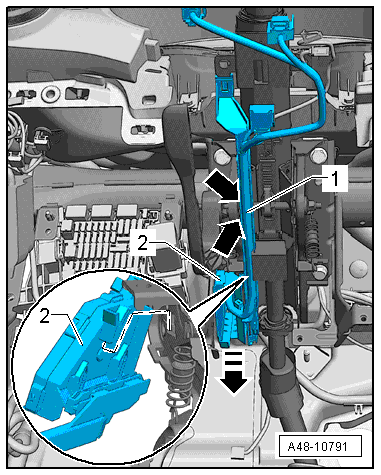
| – |
Release tab -arrow- using a
small screwdriver. |
| – |
Pull cable guide -1- off tab
forwards. |
|
|
|
| – |
Release tabs -arrows- of cable
guide -1- using a small
screwdriver. |
| – |
Pull cable guide -1- off
steering column downwards. |
| – |
Disengage cable retainer under steering column
-2- and pull off downwards. |
| – |
Move electrical wire for steering column to side. |
|
|
|
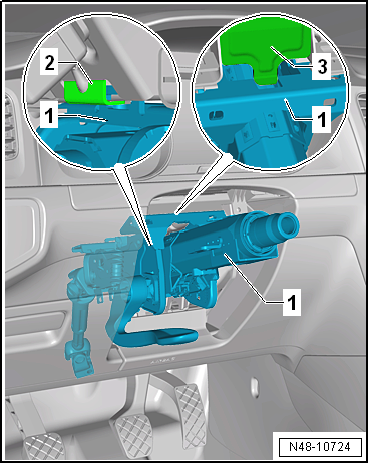
| – |
Unscrew bolt -1- and fold
footwell trim -2- in direction of
arrow towards vehicle interior. |
|
|

|
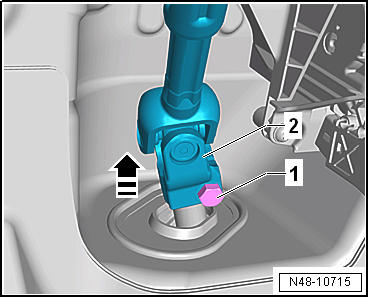
| – |
Unscrew bolt -1- from universal
joint -2- and pull off universal
joint in -direction of arrow-. |
 Caution
| The following work must not be performed while the
universal joint is separated from the steering rack: |
| Not adhering to these instructions will result in
irreparable damage. |
|
|
|
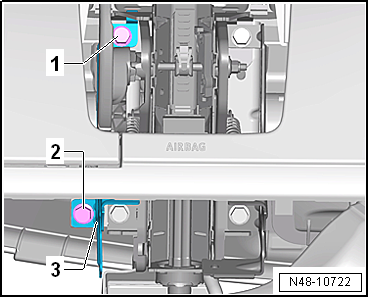
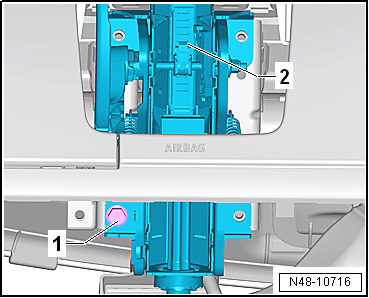
|
| – |
Remove bolts -1- and
-2-. |
| – |
Remove left bracket -3- for
knee airbag. |
|
|
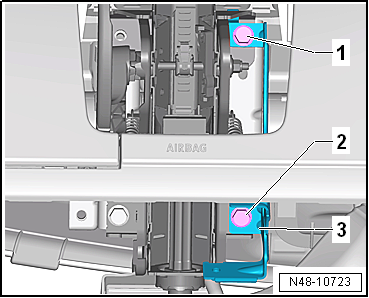
|
| – |
Remove bolts -1- and
-2-. |
| – |
Remove right bracket -3- for
knee airbag. |
|
|
|
| – |
Unscrew bolt -1-, and hold
steering column -2- when doing
this. |
|
|
|
| – |
Unhook lugs -2- and
-3- of steering column
-1- upwards from mounting bracket
and remove. |
Caution
| Ensure the steering column is handled and
transported correctly
→ Chapter. |
|
| Install in reverse order of removal, observing the
following: |
|
|
|
| – |
Hook steering column -1- into
installation aids on mounting bracket at top
-3- and bottom
-2-. |
|
|
|
| – |
Align steering column -2- with
mounting bracket. Screw in bolt -1-
hand-tight. |
|
|
|
| – |
Install right bracket -3- for
knee airbag. |
| – |
Tighten bolts -1- and
-2- only hand-tight. |
|
|
|
| – |
Install left bracket -3- for
knee airbag. |
| – |
Tighten bolts -1- and
-2- only hand-tight. |
|
|
|
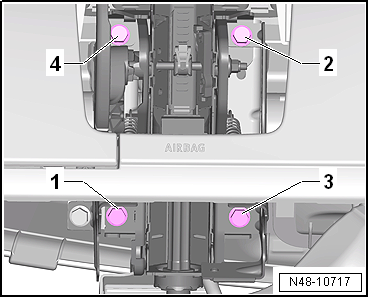
| – |
Tighten bolts
-1-, -2-,
-3- and -4-
one after another to specified torque. |
|
|
|
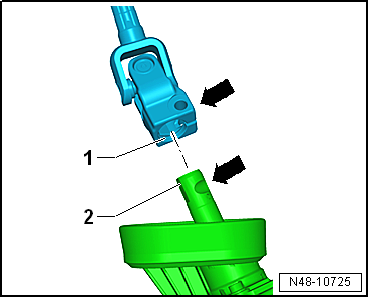
| – |
The flat surface of the steering column
-1- must lie against the flat
surface of the steering rack -2-.
The cut-out in the steering rack must align exactly with the
hole for the securing bolt -arrows-. |
|
|
|
| – |
Fit universal joint -2- onto
steering pinion in opposite -direction of
arrow-. |
| – |
Insert new hexagon bolt -1- and
tighten. |
|
|
|
| – |
Fold footwell trim -2- forwards
and secure with bolt -1-. |
| Vehicles with ignition/starter switch |
|
|
|
| – |
Connect connector -1- to
immobiliser reader coil -D2-. |
| Vehicles with keyless entry and start system “Keyless
Access” |
|
|
|
| – |
Clip cable into holder on electronic steering column lock
control unit -J764--arrow-. |
| Continuation for all vehicles |
| – |
Install steering column switch module
→ Electrical system; Rep. gr.94. |
|
|
|
| – |
Fit cable retainer under steering column
-2- so that lugs in guide engage in
steering column. |
| – |
Fit cable guide -1-. Lugs
-arrows- must engage in steering
column. |
| – |
Install footwell vent below steering column
→ Heating, air conditioning system; Rep. gr.87. |
| – |
Install knee airbag
→ General body repairs, interior; Rep. gr.69. |
| – |
Install lower steering column trim
→ General body repairs, interior; Rep. gr.68. |
| – |
Install upper steering column trim
→ General body repairs, interior; Rep. gr.68. |
| – |
Install steering wheel
→ Chapter. |
| – |
Install driver side airbag unit
→ General body repairs, interior; Rep. gr.69 |
| – |
Carry out basic setting for steering angle sender -G85-
using → Vehicle
diagnostic tester. |
| → Chapter „Assembly overview - steering column“ |
| Footwell vent below steering column
→ Heating, air conditioning system; Rep. gr.87. |
| Steering column switch module
→ Electrical system; Rep. gr.94. |
| Knee airbag
→ General body repairs, interior; Rep. gr.69. |
| Driver side airbag unit
→ General body repairs, interior; Rep. gr.69. |
| Lower steering column trim
→ General body repairs, interior; Rep. gr.68. |
| Upper steering column trim
→ General body repairs, interior; Rep. gr.68. |
|
|
|
WARNING
Adherence to proper steering column handling is
essential.
Improp ...
Special tools and workshop equipment
required
Torque wrench -V.A.G 1331-
...
Other materials:
Aqua Premium system
Designation:
Uni (solid-colour) waterborne mixing paint -LWM 083 ...-
Metallic, pearlescent, special-effect waterborne mixing
paint -LWM 084/ 086...-
Uni (solid-colour) waterborne base ...
Checking the electrolyte level of the vehicle battery
Fig. 197 Engine compartment: pushing up
the vehicle battery sleeve
First read and observe the introductory information
and safety warnings The electrolyte level of the vehicle battery should be
checked regularly in high-mileage vehicles, in hot countries and in older vehicle
batteries. T ...
Assembly overview - cover and padding for backrest
1 -
Upholstery clip
For attaching backrest cover to backrest padding
Renew after removal
When installing, fit in same location using upholstery clip pliers
-V.A.G 1634
2 -
Beading strip
Sewn to backrest cover
Seats with th ...
© 2016-2026 Copyright www.vwgolf.org

 Note
Note WARNING
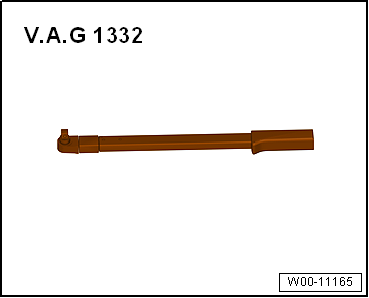
 Handling and transporting steering column
 Removing and installing steering column, RHD