Volkswagen Golf Service & Repair Manual: Removing and installing selector mechanism without selector lever cable,
manufacturer ZF
| In the interior, the centre console must be removed. |
| The heat shield beneath the vehicle must be removed. |
| – |
Remove selector lever handle
→ Chapter. |
| – |
Remove centre console
→ General body repairs, interior; Rep. gr.68. |
| – |
Remove centre console vent
→ Heating, air conditioning; Rep. gr.87. |
| Continued for all vehicles: |
|
|
|
| – |
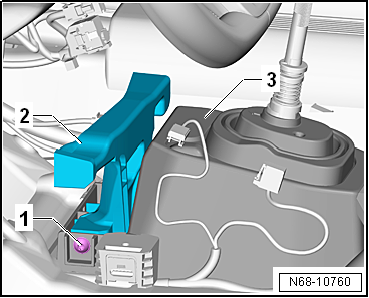
If fitted, remove mounting bracket -2-.
To do this, unscrew bolts -1- on
right and left. |
| – |
Separate electrical connector from selector mechanism to
vehicle wiring harness. |
| – |
Shift selector lever on selector mechanism to position “N”.
Only in this position the selector lever cable can be released. |
| – |
Remove heat shield for centre tunnel below selector
mechanism
→ General body repairs, exterior; Rep. gr.66. |
|
|
|
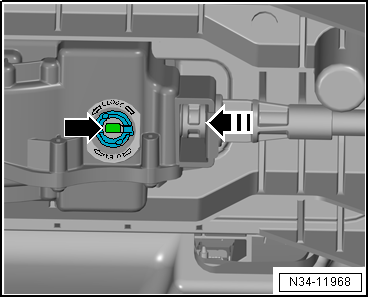
| – |
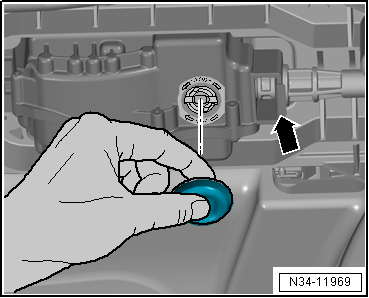
Remove plug and securing clip -arrow-. |
| Renew the securing clip after each removal. |
|
|
|
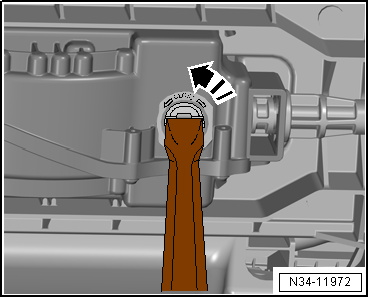
| – |
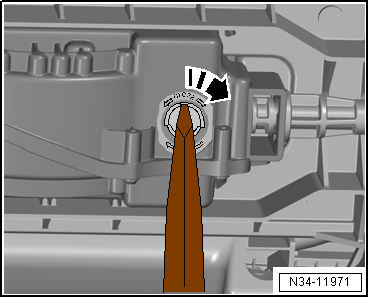
Fit a large screwdriver in grooves of locking mechanism and
turn it 90° in direction of arrow. |
| – |
Pull selector lever cable out of selector mechanism. |
|
|
|
| – |
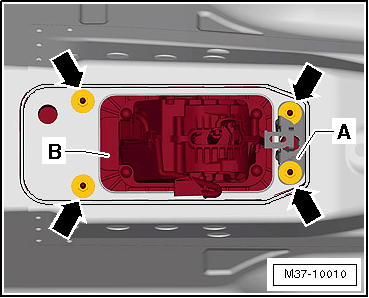
If fitted, remove bracket -A-. |
| – |
Remove nuts -arrows- inside
vehicle. |
| – |
Remove selector mechanism -B-
together with selector housing downwards. |
| Install in reverse order of removal. During this step,
observe the following: |
 Note Note
| Do not bend or kink selector lever cable. |
| Do not grease selector lever cable. |
| Following installation of selector mechanism, selector lever
cable must be checked for ease of movement and be adjusted. |
| Selector lever on selector mechanism must be set to position
“N”. Only in this position the selector lever cable can be
engaged. |
|
|
|
| – |
Insert selector lever cable into selector mechanism until it
is visible in locking mechanism -arrow-. |
|
|
|
| – |
Fit a large screwdriver in grooves of locking mechanism and
turn it 90° in direction of arrow. |
|
|
|
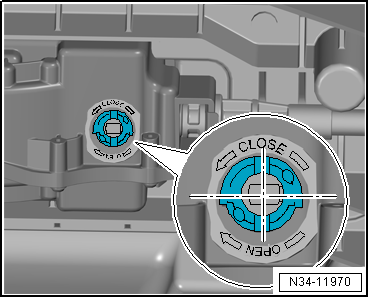
| – |
The selector lever cable is properly engaged when the
grooves in the locking mechanism are at right angles to the
selector lever cable. |
|
|
|
| – |
Install new securing clip -arrow-
and insert plug. |
| – |
Install heat shield below selector mechanism
→ General body repairs, exterior; Rep. gr.66. |
|
|
|
| – |
If present, install mounting bracket
-2-
→ General body repairs, interior; Rep. gr.68. |
| – |
Install centre console vent
→ Heating, air conditioning; Rep. gr.87. |
| Continued for all vehicles: |
| – |
Install centre console
→ General body repairs, interior; Rep. gr.68. |
| – |
Install selector lever handle
→ Chapter. |
| – |
Adjust selector lever cable
→ Chapter. |
| – |
Check selector mechanism
→ Chapter. |
| Selector housing to body
→ Chapter |
|
|
|
Special tools and workshop equipment
required
Removal lever -80 - 200-
Brief des ...
Special tools and workshop equipment
required
Removal lever -80 - 200-
Removing
...
© 2016-2026 Copyright www.vwgolf.org

 Removing and installing selector mechanism with selector lever cable
 Removing and installing selector lever cable, manufacturer ZF