Volkswagen Golf Service & Repair Manual: Removing and installing rear fog light bulb -L46-/-L47-
 Note Note
| Removal and installation are described for the left side.
Removal and installation on the right side are carried out in
the same way. |
| – |
Turn light switch to “0” position. |
 Caution
| Danger of damage to component surfaces. |
| When using leverage tools, mask visible areas of the
component with commercially available adhesive tape. |
|
|
|
|
| – |
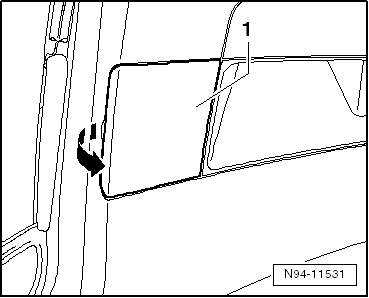
If needed, apply a narrow screwdriver at opening on side.
|
| – |
Press off cover -1- in
-direction of arrow-. |
|
|
|
| – |
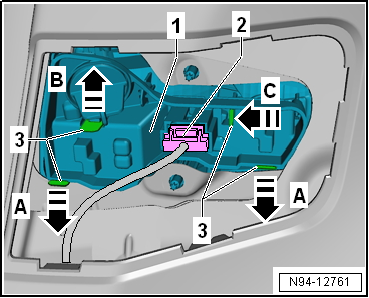
Disconnect electrical connector -2-. |
| – |
Press catches -3- in direction
of arrows -A-,
-B- and -C-,
respectively. |
| – |
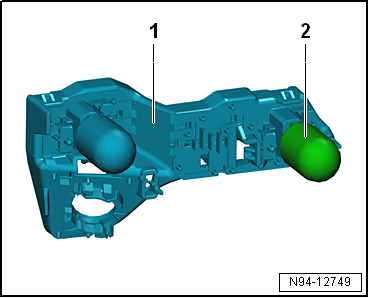
Pull bulb carrier -1- out of
tail light. |
|
|
|
| – |
Pull rear fog light bulb -2-
out of bulb carrier -1-. |
| Install in the reverse order of removal, observing the
following: |
Caution
| Risk of damage to the bulb. |
| Do not touch the glass part of the bulb with bare
fingers. Fingers leave traces of grease on the glass
bulb, which vaporise when the bulb is switched on and
cause the glass bulb to cloud over. |
| Wear, for example, clean fabric gloves when
inserting bulbs. |
|
|
|
 |
Note
Removal and installation are described for the left side.
Removal and installation on the right side are carried out in
the same way.
...
Note
Removal and installation are described for the left side.
Removal and installation on the right side are carried out in
the same way.
...
© 2016-2026 Copyright www.vwgolf.org

 Removing and installing tail light bulb -M2-/-M4-
 Removing and installing brake and tail light bulb -M21-/-M22