Volkswagen Golf Service & Repair Manual: Removing and installing radiator cowling
| – |
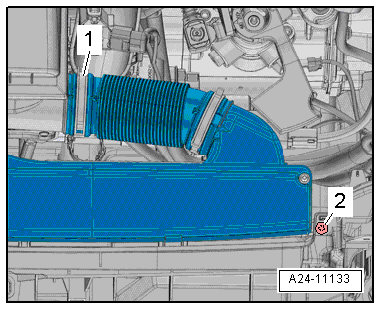
Release hose clip -1- and
detach air hose. |
|
|
|
| – |
Unscrew bolt -2- on left and
right. |
| – |
Unclip air duct at lock carrier and detach. |
Risk of hand injury caused by the radiator fan starting automatically.Do
not grasp into the radiator fan when disconnecting the connector. |
|
|
| – |
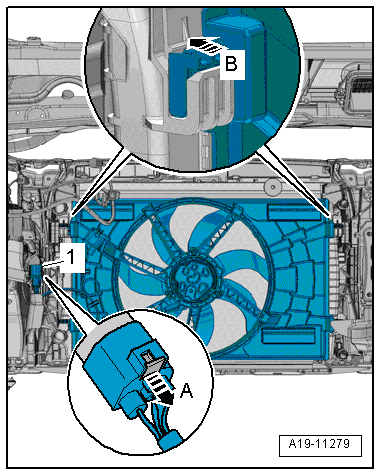
Unplug electrical connector -1-
for radiator fan (push retainer to the rear
-arrow A- and press down release
catch). |
| – |
Press locking tabs on left and right sides of radiator cowl
-arrow B- and at the same time lift
radiator cowl off radiator. |
| – |
To do this, turn radiator cowl on one side through approx.
45° upwards. |
 Note
| If there are minor dents in the fins, refer to
→ Chapter. |
| Installation is carried out in the reverse order; note the
following: |
| – |
Electrical connections and routing → Current
flow diagrams, Electrical fault finding and Fitting locations. |
| Specified torque of air duct
→ Chapter |
|
|
|
Note
Radiator and water radiator for charge air cooling circuit
are removed together.
Removing
–
...
Risk of hand injury caused by the radiator fan
starting automatically.Do not grasp into the radiator fan when
disconnecting the connector.
Removing
...
Other materials:
Repairing subframe
Special tools and workshop equipment required
Assembly tool -T10205-
Torque wrench -V.A.G 1332-
Hydraulic press -VAS 6178-
Foot pump -VAS 6179-
Assembly tool -VAS 6779-
...
Seam seals, middle body
Note
Seam seals made during repair work must be identical in
appearance and thickness to the original seam seals.
To avoid damage or faulty operation, brush seam seals smooth
near attachments which must be attached.
...
Removing and installing right vent temperature sender -G151
Special tools and workshop equipment
required
Vehicle diagnostic tester
Removing
Note
Only on vehicles with Climatronic. On vehicles with heater
or air conditioning syste ...
© 2016-2026 Copyright www.vwgolf.org


 Removing and installing radiator, Golf, Golf SV, Golf Estate
 Removing and installing radiator fan -V7