Volkswagen Golf Service & Repair Manual: Removing and installing fuel line for auxiliary/supplementary heater
| – |
Observe safety precautions
→ Chapter. |
| – |
Observe rules for cleanliness
→ Chapter. |
| – |
Fuel tank must not be more than 3/4
full. This ensures that the fill level is below the flange of
the fuel delivery unit. |
| – |
Draining fuel tank
→ Chapter |
| – |
Remove rear bench seat
→ General body repairs, interior; Rep. gr.72. |
|
|
|
| – |
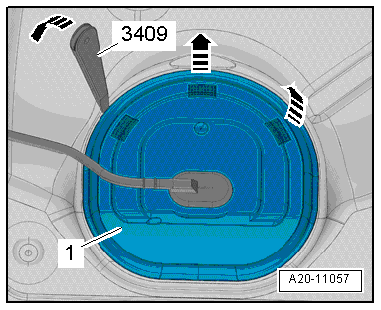
Unclip cover -1- for flange at
retaining tabs -arrows-, using
removal wedge -3409-. |
|
|
|
| – |
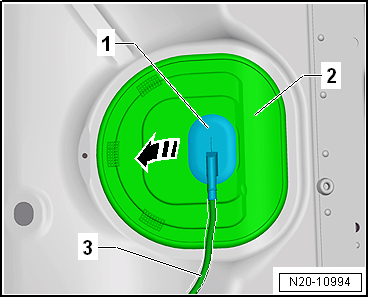
Unclip sealing grommet -1-
downwards from cover -2-. |
| – |
Push cover -2- back along
wiring harness -3-. |
|
|
|
| Vehicles with front-wheel drive |
| – |
Release and pull off connector -1-
on sealing flange. |
| – |
If fitted, detach connector -2-
for metering pump -V54- of auxiliary heater on sealing flange
and lay connector aside. |
|
|

|
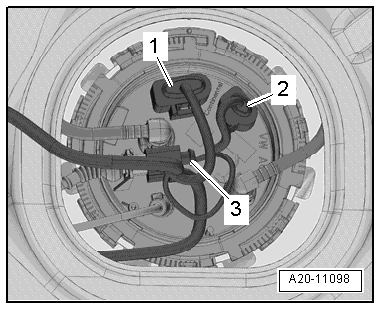
| Vehicles with four-wheel drive: |
| – |
Release and pull off connectors -1-
and -2- on sealing flange. |
| – |
If fitted, detach connector -3-
for metering pump -V54- of auxiliary heater on sealing flange
and lay connector aside. |
|
|
|
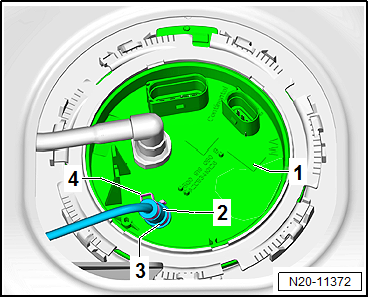
| If the fuel line for metering pump
-V54- is to be disconnected from fuel delivery unit: |
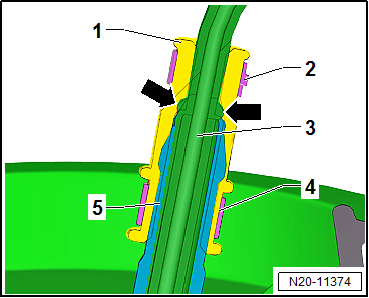
| – |
Open lower clamp -3- on sealing
flange -1-. |
The fuel system is pressurised.Risk of injury due to fuel which may
spurt out.Wear eye protection.Wear protective gloves.Release pressure:
place clean cloth around connection and carefully open connection.
| – |
Do not open upper clamp -4-. |
| – |
Pull fuel line -2- together
with grommet off sealing flange. |
| If a new fuel delivery unit is installed: |
| – |
Remove fuel line
→ Anchor. |
|
|
|
| – |
Remove fuel delivery unit
→ Chapter. |
| – |
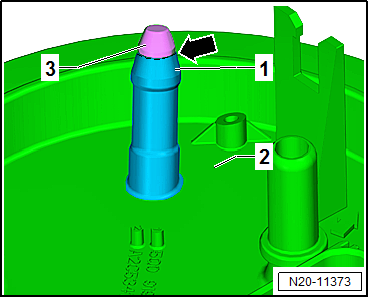
The connection on the fuel delivery unit
-2- must be opened. |
| – |
To do this, cut off sealing piece -3-
on connection -1-. |
| – |
Cut it off on the respective marking line
-arrow-. |
| – |
Deburr edges of cutting point. |
| – |
Prevent any dirt or swarf from entering the fuel delivery
unit. |
| – |
Check fuel delivery unit for soiling, and clean it as
necessary. |
| – |
Install fuel delivery unit
→ Chapter. |
|
|
|
| – |
Insert fuel line -3- in
connection -5-. |
| – |
Insert fuel line to stop -arrow-. |
| – |
While doing this, fit grommet -1-
over connection. |
| – |
If the fuel line or grommet has been renewed, the upper
clamp must be renewed as well. |
| – |
Renew clamps -2- and
-4-, if they have been opened. |
| – |
Secure hose connections with the hose clips corresponding to
original equipment. |
| → Chapter „Assembly overview - fuel delivery unit and fuel gauge
sender“ |
|
|
|
Special tools and workshop equipment
required
Special wrench -T10202-
...
Other materials:
Removing and installing camshaft adjuster
Special tools for removing and installing the camshaft
adjuster of exhaust camshaft
Special tools and workshop equipment
required
Support bracket -10 - 222 A-
...
Masking areas, front body
Masking areas, plenum chamber
A -
No sealant on threads or contact surfaces.
C -
No cathodic dip primer, surfacer or top coat on threads or contact
surfaces.
D -
Threads free of surfacer and top-coat pa ...
Hydraulic system
General notes on brake fluid
Only use new brake fluid conforming to VW standard
(VW 501 14).
Note
Brake fluid is poisonous. Also due to its corrosive effect
brake fluid must not come into c ...
© 2016-2026 Copyright www.vwgolf.org

 Removing and installing fuel delivery unit/fuel gauge sender, vehicles with
four-wheel drive
Removing and installing fuel delivery unit/fuel gauge sender, vehicles with
four-wheel drive