Volkswagen Golf Service & Repair Manual: Removing and installing front backrest
| Special tools and workshop equipment
required |
|
|
|
| |
Torque wrench -V.A.G 1331- |
| – |
Remove front seat
→ Chapter. |
| – |
Secure seat on seat repair stand
→ Chapter. |
| – |
Remove seat trim on tunnel side
→ Chapter. |
| – |
Remove seat trim on sill side
→ Chapter. |
|
|
Torque wrench -V.A.G 1331 |
| – |
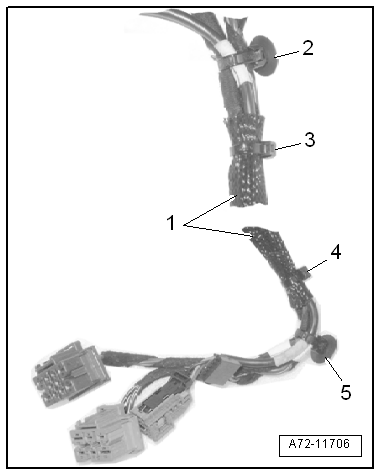
Disconnect connectors of wiring harnesses leading to
backrest. |
| – |
Unclip clips -2- and
-5- of wiring harness
-1- from seat pan. |
| – |
Release wiring harness -1-
together with braided sleeve from seat pan. |
| – |
To do this, remove all cable ties -3-
and -4-. |
| The wiring harness between coupling station and side airbag
is continuous. |
| – |
Thread wiring harness leading to side airbag out if braided
sleeve. |
| – |
To do this, remove cable ties -3-
and -4-. |
|
|
|
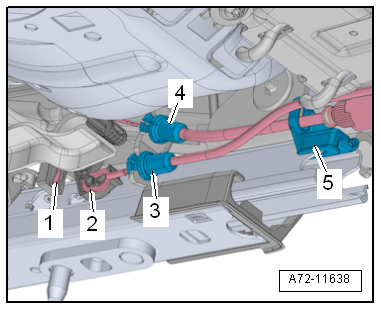
| Only for vehicles with entry assistance |
| – |
Detach Bowden cable support bracket
-3, 4- from retainer for entry assistance on seat pan. |
| – |
Unclip Bowden cables -1 and 2-
for entry assistance from seat rail release mechanism. |
| – |
Detach retainer -5- for Bowden
cable from seat rail. |
|
|
|
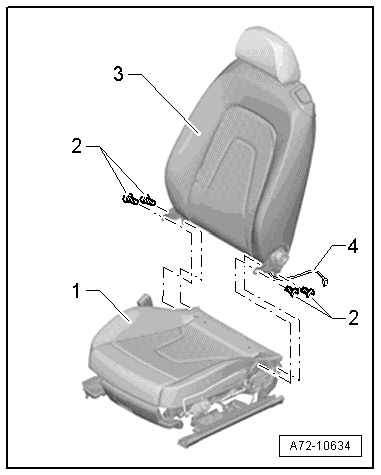
| Continued for all vehicles |
| – |
Fold backrest -3- forwards onto
seat pan -1-. |
| – |
Push seat pan padding to side. |
| – |
Carefully pull side airbag wiring harness
-4- out of seat pan. |
| Install in reverse order, but note the following: |
| – |
Renew any damaged cable ties and clips. |
| – |
Route wires in their original positions. |
| |
→ Chapter „Assembly overview - front seat“ |
| |
→ Chapter „Assembly overview - seat pan“ |
| |
→ Chapter „Assembly overview - front backrest“ |
|
|
|
Note
Removal and installation are described for the left vehicle
side. Follow same instructions for the right side as
appropriate.
...
Special tools and workshop equipment
required
Removal wedge -3409-
Removi ...
Other materials:
Introduction
This chapter contains information on the following subjects:
→ Jump lead connection point (earth connection)
→ How to start the engine using jump leads
If the engine fails to start because the vehicle battery is flat, the flat battery
can be connected to the battery of another ...
Overview of fitting locations - seat variants
1 -
Driver seat
Configuration depends on vehicle equipment
Assembly overview - front seat
→ Chapter
Assembly overview - front backrest
→ Chapter
Assembly overview - seat pan
→ Chapter.
2 -
Fro ...
Assembly overview - curtain airbag
1 -
Line to prevent twisting
Is used to ensure that curtain airbag is not twisted.
Must be entirely visible after installation
2 -
Curtain airbag
Driver side: with driver side curtain airbag igniter -N251-
Front passenger side: ...
© 2016-2026 Copyright www.vwgolf.org

 Removing and installing seat trim on sill side, electrically adjustable seat
 Removing and installing seat depth adjustment