Volkswagen Golf Service & Repair Manual: Removing and installing fresh air intake, RHD vehicles
| – |
Remove plenum chamber cover
→ General body repairs, exterior; Rep. gr.50. |
| – |
Remove cover for fresh air intake
→ Chapter. |
| – |
Remove air quality sensor -G238- (only on vehicles with
Climatronic)
→ Chapter. |
|
|
|
| – |
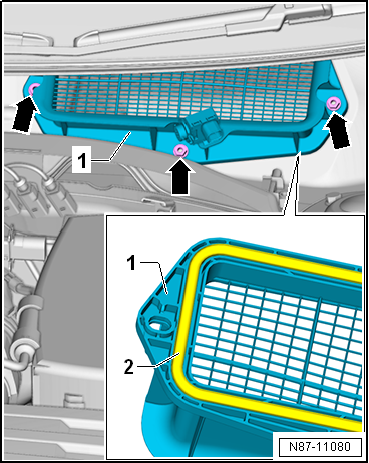
Remove fresh air intake -1-
from plenum chamber. |
| Install in reverse order. |
| – |
Align air intake grille on metal collar. |
| – |
Hold air intake grille and screw on outer nut half-way onto
welded stud. |
| – |
Screw on nut on opposite side. |
 Note Note
| The seal -2- must be properly
seated on air intake grille. |
| Water may enter the fresh air intake if the grille is
damaged or not properly fitted. This may result in complaints
about odours from the heater and air conditioning system and/or
about moisture in the vehicle. |
|
|
|
|
Component |
Specified torque |
| Nut |
3 Nm |
Removing
–
Remove plenum chamber cover
→ General body repairs, exterior; Rep. gr.50.
–
...
Note
The illustration shows a left-hand drive vehicle. The
removal and installation procedure is identical for both
versions.
...
© 2016-2026 Copyright www.vwgolf.org

 Removing and installing fresh air intake, LHD vehicles
 Removing and installing air intake duct