Volkswagen Golf Service & Repair Manual: Removing and installing coolant pipes at heat exchanger (Valeo)
 Note Note
| There are different designs and makes of heater and air
conditioning unit. The individual components of the various
heaters and air conditioning units are similar but not identical
(distinguishing features
→ Chapter). The combined fitting of different makes
of component is therefore not permissible
→ Electronic Parts Catalogue. |
|
|
|
| – |
Remove heater and air conditioner unit
→ Chapter. |
| – |
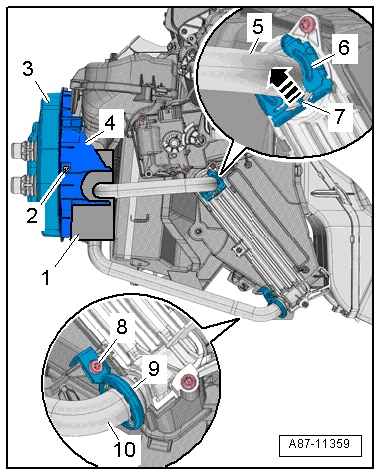
Detach the sealing collar -3-
to the plenum chamber bulkhead. |
| – |
Detach the coolant pipe holder -4-
to the left. |
| – |
Lift locking element -7- and
pull off clip -6-. |
| – |
Pull coolant pipe -5- off heat
exchanger. |
| – |
Remove screw-type clip -9- and
pull coolant pipe -10- off heat
exchanger. |
| – |
Detach the coolant pipes. |
|
|
|
| Installation is carried out in the reverse order. When
installing, note the following: |
| – |
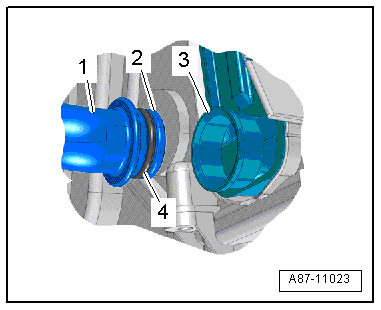
Check connection -3- of the
heat exchanger and connection -2-
of the coolant pipes for damage or contamination. |
| – |
Clean and smoothen sealing surface for seals. |
| – |
Moisten new seals -4- with
coolant (or lubricate lightly with silicone grease) and fit them
to coolant pipe -1-. |
| – |
Push coolant pipes into heat exchanger as far as stop. |
Risk of malfunction on heat exchanger due to defective seals and
leaks.Never squeeze seals.Never cant coolant pipes.Slide on coolant
pipes completely. |
|
|
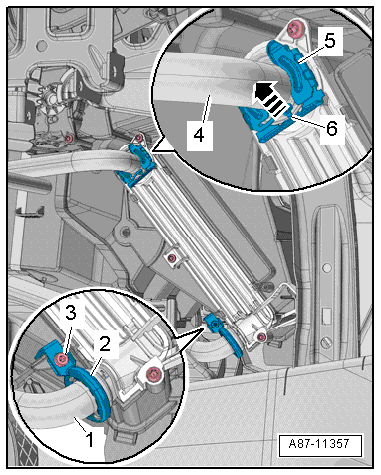
| – |
Fit a new clip -5- or
screw-type clip -2- onto coolant
pipe / heat exchanger joint. |
| – |
Check clip and screw-type clip for proper seating on
connections of heat exchanger and check coolant pipes. The
coolant pipes must not rest against air distribution housing or
any other components. |
| – |
Install heater and air conditioning unit
→ Chapter. |
| – |
Read event memory, and clear any entries displayed vehicle
diagnostic tester in “Guided fault finding” mode. |
| – |
As a final step, check operation of heater and air
conditioning system. |
| → Chapter „Assembly overview - heater and air conditioning unit“ |
|
|
|
Special tools and workshop equipment
required
Drip tray for workshop hoist -VAS 6208-
& ...
Note
There are different designs and makes of heater and air
conditioning unit. The individual components of the various
heaters and air conditioning u ...
© 2016-2026 Copyright www.vwgolf.org

 Removing and installing Denso heat exchanger, RHD vehicles
 Removing and installing coolant pipes at heat exchanger (Denso)