Volkswagen Golf Service & Repair Manual: Removing and installing condensation drainage (LHD)
| – |
Remove right centre console trim in footwell
→ General body repairs, interior; Rep. gr.68. |
Risk of damage to airbag control unit. Connectors may corrode if
moisture enters.After disconnecting, cover or seal off connectors to
prevent the ingress of moisture.
| – |
Pull connector off airbag control unit -J234--4-. |
|
|
|
| – |
Cover airbag control unit -J234- and connector
-4- with impermeable sheeting. |
| – |
Carefully push floor covering aside and cover it in area
under condensation drain hose with waterproof foil and water
absorbing paper. |
| – |
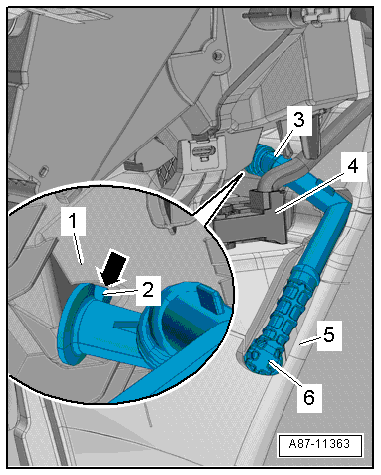
Carefully pull condensation drain hose
-3- off heater and air conditioning unit
-1- and off body
-5-. |
| Installation is carried out in the reverse order. When
installing, note the following: |
| – |
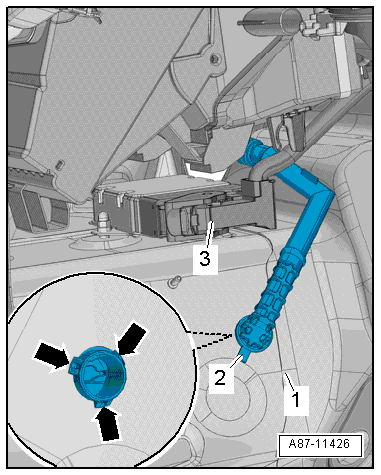
The condensation drain hose can be properly pushed onto
heater and air conditioning unit to stop in only one position. |
|
|
|
| Lug -arrow- on connecting piece
must engage in guide -2-. |
| If a commercially available cable tie was installed to
retain the condensation drain -3-,
then renew it. |
| The condensation drain hose must be routed below the wiring
harness of the airbag control unit -J234--4-
in the figure. |
| – |
Insert the condensation drain hose -6-
in the body opening until it is heard to engage. |
|
|
|
| The holder -2- at the
condensation drain hose must be properly clipped in
(pre-tensioned) at the body opening -1-. |
| The sealing lip must not be loose at the body opening. |
| The retainer tabs -arrows- must
be fully engaged. |
| If the holder is not sufficiently pre-tensioned, seal off
joint between body and holder, e.g. with silicon adhesive
sealant
→ Electronic Parts Catalogue. |
 Note Note
| Install condensation drain hose in such a way that it is not
twisted or pinched. |
| When installing floor covering, ensure that condensation
drain hose is not pinched by floor covering. |
| If the condensation drain hose is not fitted firmly enough
at the heater and air conditioning unit connection, secure it
with a hose clamp for example to prevent slipping. Hose clip
→ Electronic Parts Catalogue. |
| Centre console; Assembly overview - centre console
→ General body repairs, interior; Rep. gr.68. |
|
|
|
Checking
–
Remove right centre console trim in footwell
→ General body repairs, interior; Rep. gr.68.
...
Removing
–
Remove right centre console trim in footwell
→ General body repairs, interior; Rep. gr.68.
...
© 2016-2026 Copyright www.vwgolf.org

 Checking condensation drainage
 Removing and installing condensation drain (RHD)