Volkswagen Golf Service & Repair Manual: Removing and installing charge pressure sender -GX26-
| Charge pressure sender -GX26- consists of |
| Charge air pressure sender -G31- |
| Intake air temperature sender -G42- |
|
|
|
| – |
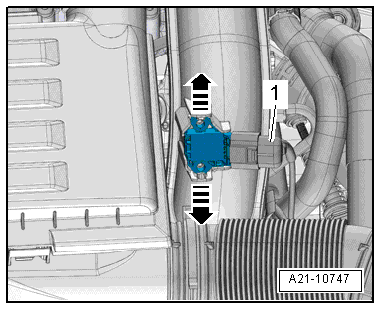
Disconnect electrical connector -1-. |
| – |
Release fasteners -arrows-, and
remove charge pressure sender -GX26-. |
| Installation is carried out in the reverse order; note the
following: |
 Note Note
| If the retaining tabs broke off during removal, the sender
can be secured using two securing bolts as per
→ Electronic Parts Catalogue. Specified torque:
→ Anchor |
|
|
|
| Component |
Specified torque |
| Charge air pressure sender
-GX26- |
3 Nm |
Note
Check all air hoses and pipes for firm seating and leaks before
carrying out tests or repairs.
Observe rules for cleanliness
→ Chapter.
...
Special tools and workshop equipment
required
Hose clamps up to 25 mm -3094-
...
© 2016-2026 Copyright www.vwgolf.org

 Assembly overview - charge air system
 Removing and installing charge air cooler