Volkswagen Golf Service & Repair Manual: Removing and installing brake caliper, FS III front brake
| Special tools and workshop equipment
required |
|
|
|
| Torque wrench -V.A.G 1331- |
|
|
|
| Brake pedal actuator -V.A.G 1869/2- |
 Note Note
| This procedure applies only to exchanging or the following
repair work on the brake caliper. |
| – |
Connect bleed bottle bleed hose -1-
to bleed valve of brake caliper. |
| – |
Apply brake pedal depressor -V.A.G 1869/2-. |
| – |
Close bleeder valve and remove bleeder bottle. |
| – |
Pull both cover caps out of brake caliper bearing bushes. |
| – |
Loosen both guide pins and remove from brake caliper. |
| – |
Pull brake caliper from brake support plate. |
| – |
Take brake pads out of brake caliper. |
| – |
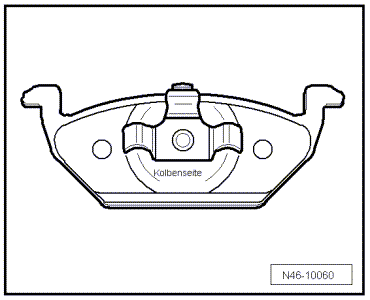
Insert brake pads into brake caliper and piston. |
|
|
|
| – |
Insert brake pad with “piston side” written on backing plate
into brake piston. |
|
|
|
| – |
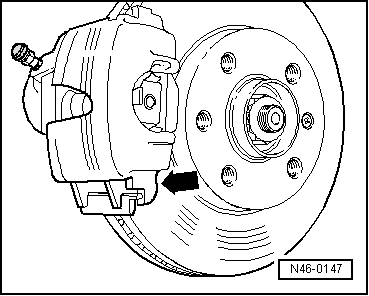
Install brake caliper with brake pads on wheel bearing
housing. |
|
|
|
| – |
First position brake caliper with brake pads at bottom
-arrow- of brake carrier. |
| – |
Bolt brake caliper to brake carrier with both guide pins. |
| Brake caliper stud must be positioned behind brake carrier
guide! |
| – |
Bolt brake hose to brake caliper. |
| – |
Remove brake pedal actuator -V.A.G 1869/2-. |
| – |
Bleed brake system
→ Chapter. |
Note
| Firmly depress brake pedal several times with vehicle
stationary so that the brake pads are properly seated in their
normal operating position. |
| → Chapter „Assembly overview - FS III front brake“ |
| Wheel bolts
→ Running gear, axles, steering; Rep. gr.44. |
|
|
|
Special tools and workshop equipment
required
Torque wrench -V.A.G 1331-
...
Special tools and workshop equipment
required
Torque wrench -V.A.G 1331-
...
Other materials:
Masking areas, front body
Masking areas, plenum chamber
A -
No sealant on threads or contact surfaces.
C -
No cathodic dip primer, surfacer or top coat on threads or contact
surfaces.
D -
Threads free of surfacer and top-coat pa ...
Introduction
This chapter contains information on the following subjects:
→ Warning and indicator lamps
→ Electronic parking brake
→ Parking
→ Information on the brakes
→ Brake support systems
→ Switching TCS or TCS with ESC on and off ...
Removing and installing Bowden cable B for entry assistance
Removing
–
Remove front seat
→ Chapter.
–
Secure front seat on seat repair stand
→ Chapter.
–
Move front seat to highest position.
...
© 2016-2026 Copyright www.vwgolf.org

 Removing and installing brake pads, front brakes PC57 and C60
 Removing and installing brake caliper, front brakes PC57 and C60