Volkswagen Golf Service & Repair Manual: Removing and installing automatic anti-dazzle interior mirror, with rain and light sensor -G397- and front camera for driver assist systems -R242-
|
|
 Note Note
|
|
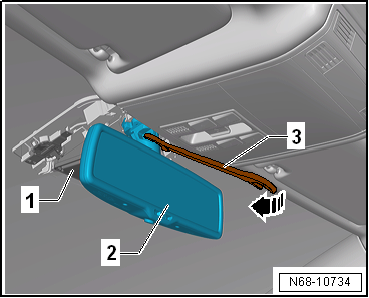
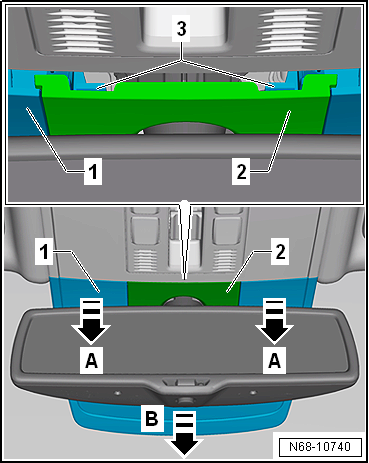
 Removing and installing manually operated or automatic anti-dazzle interior
mirror, with rain and light sensor -G397- and without front camera for driver
assist systems -R242-
Removing and installing manually operated or automatic anti-dazzle interior
mirror, with rain and light sensor -G397- and without front camera for driver
assist systems -R242-
Removing
–
Swing interior mirror downwards by approx. 25° as far as
stop.
–
Pull rear cover -2- d ...
 Removing and installing retaining plate for manually operated or automatic
anti-dazzle interior mirror, without rain and light sensor -G397- and front
camera for driver assist systems -R242
Removing and installing retaining plate for manually operated or automatic
anti-dazzle interior mirror, without rain and light sensor -G397- and front
camera for driver assist systems -R242
Materials
Glass-metal adhesive kit “D 000 703 A1”
Special tools and workshop equipment
required
...
Other materials:
Removing and installing door arrester
Special tools and workshop equipment
required
Note
The description of removal and installation only applies
to the left wing. The right side is si ...
Removing and installing refrigerant line between condenser and air
conditioner compressor
Special tools and workshop equipment
required
Torque wrench -V.A.G 1331/- (5…50 Nm)
Air conditioner service station
...
Repairs and faults in the airbag system
First read and observe the introductory information
and safety warnings Repairs and modifications must always be carried
out according to Volkswagen specifications .
Modifications and repairs to the front bumper, the doors, the front seats, the
headliner, or the bodywork should be carri ...
