Volkswagen Golf Service & Repair Manual: Instructions for use of flanging tool
| Unbolt relevant brake line at brake caliper or wheel brake
cylinder; catch escaping brake fluid and dispose of this as per
regulations. |
|
|
|
| – |
Cut through brake line at a suitable point (straight, freely
accessible section) using pipe cutter -2-. |
| – |
Remove section to be renewed. |
| – |
Degrease brake line surface. |
|
|
|
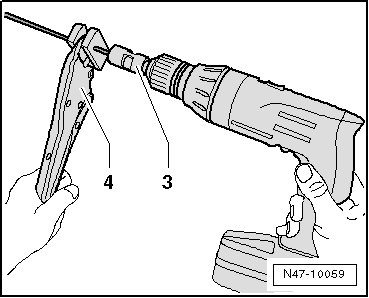
| – |
Clamp brake line in set of grips -4-
so that approx. 50 mm project from plastic jaws. |
| – |
Clamp scraper -3- into a drill
and place it onto brake line. |
| – |
At slow drill speed and with gentle pressure on brake line,
scrape coating off brake line. |
| Length of scraping is determined by stop in scraper. |
| – |
Pull scraper off brake line and remove scrapings. |
|
|
|
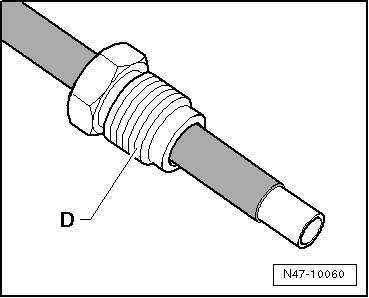
| – |
Remove grip wrench and slide brake line nut
-D- onto brake line. |
|
|
|
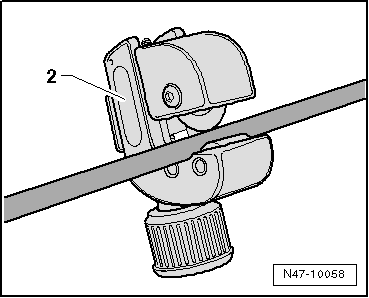
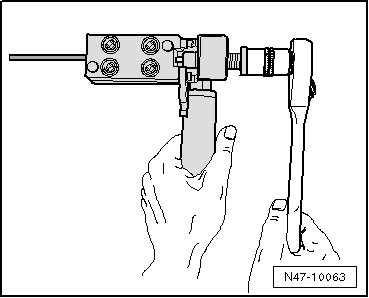
| – |
Slide brake line -B- up to stop
-A- in flanging tool. |
 Note Note
| Brake line must be positioned against stop when the hexagon
socket head bolts are tightened, or the flange will not be
formed correctly. |
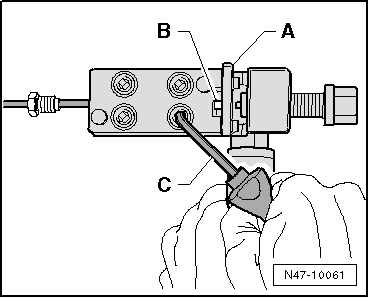
| – |
Tighten brake line in flanging tool until brake line can no
longer be moved. Fold up stop -A-
and now tighten hexagon socket head bolts diagonally using
special wrench -C-. |
|
|
|
| – |
Turn spindle as far as stop in flanging tool. |
| – |
Turn spindle back again. |
| – |
Unscrew hexagon socket head bolts in diagonal sequence. |
| – |
Remove brake line from flanging tool, then clean and inspect
brake line and flange. |
| Briefly flush the section of brake line remaining in the
vehicle: |
| – |
Connect brake filling and bleeding unit -VAS 5234-, connect
bleeder bottle hose to brake line flange and allow brake filling
and bleeding unit -VAS 5234- to run briefly until a little brake
fluid has run through. |
| – |
Blow out new brake line to be inserted with compressed air. |
|
|
|
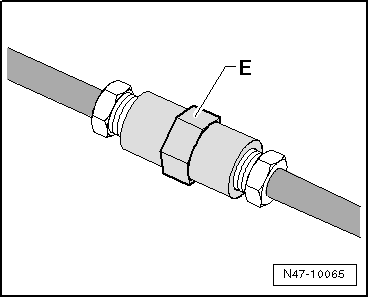
| – |
Join brake lines using connector -E-. |
| – |
Bleed brake system
→ Chapter. |
|
|
|
The flanging tool for brake lines -VAS 6056- can be used to
flange brake lines with an outer pipe diameter of 5 mm without
damaging the coating. In certain cases ...
Other materials:
Removing and installing front air distribution flap actuation unit,
Climatronic
Removing
–
Remove dash panel
→ General body repairs, interior; Rep. gr.70.
–
Remove the air duct for the defroster vent
→ Chapter.
–
...
Removing and installing subwoofer -R211-
The subwoofer -R211- is located in the spare wheel well.
Removing
–
Switch off ignition and all electrical consumers, and remove
ignition key.
–
Take out luggage compartment f ...
Checklist
Always carry out the following actions for changing a bulb in the
given order :
Park the vehicle on a firm and level
surface at a safe distance from the flow of traffic.
Switch on the electronic parking brake
Braking, stopping and parking Brakes Parking .
Turn the light swit ...
© 2016-2026 Copyright www.vwgolf.org

 Assembly overview - flanging tool
 Hydraulic system