Volkswagen Golf Service & Repair Manual: Installing gearbox
| Install in reverse order of removal, observing the
following: |
 Note Note
| Renew bolts which are tightened by turning through a
specified angle. |
| Renew self-locking nuts and bolts, and seals, O-rings and
gaskets. |
| Secure all hose connections with the correct type of hose
clips (same as original equipment)
→ Electronic Parts Catalogue. |
| Fit all cable ties in the original position when installing. |
| Recalibrate the immobiliser after installing a
»new« gearbox. |
|
|
|
| – |
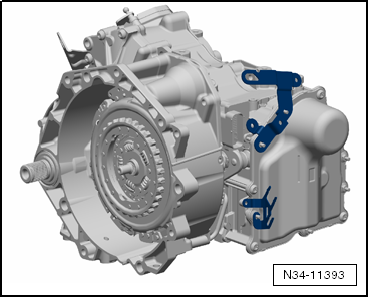
In some cases, there are brackets on the front of the
removed gearbox. Attach these brackets to the
»new« gearbox. |
|
|
|
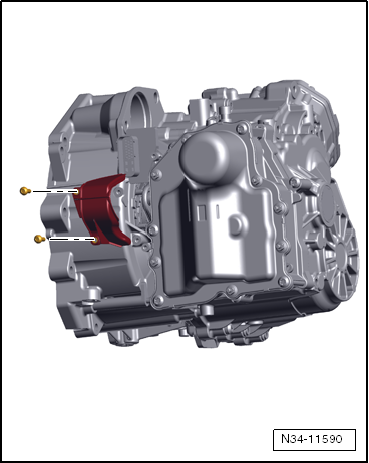
| In some vehicles, a cover is fitted over the engaging
levers. |
| The cover prevents dirt getting in. |
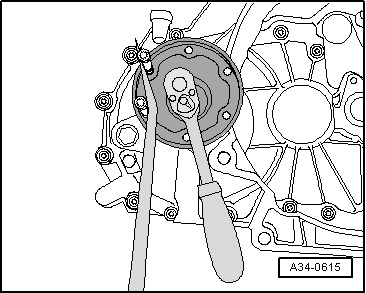
| Only Polo with petrol engine: |
| – |
Remove right flange shaft. |
|
|
|
| – |
Screw 2 bolts into flange and counterhold flange shaft with
a lever in order to remove and install flange shaft. |
| – |
Remove flange shaft with spring. |
| – |
Close opening in drive shaft using a suitable plug. |
|
|
|
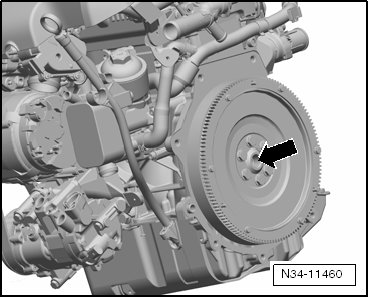
| – |
Renew needle bearing -arrow- in
crankshaft
→ Rep. gr.13. |
Note
| If the needle bearing in the crankshaft is damaged, the
gears cannot be selected properly anymore because the clutch is
supported on this bearing. |
|
|
|
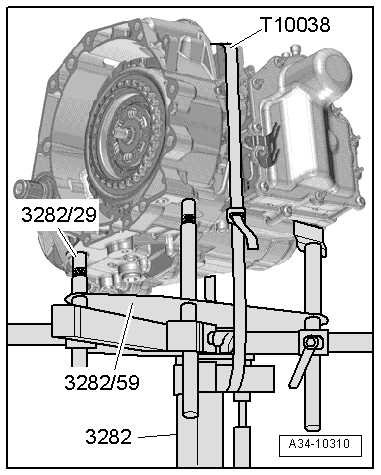
| – |
Fit gearbox onto gearbox support -3282- and secure it in
place. |
| – |
Clean input shaft splines and splines of torsional damper,
remove corrosion and lubricate splines with only a very thin
coating of grease
→ Electronic Parts Catalogue (ETKA). Remove excessive
grease. |
|
|
|
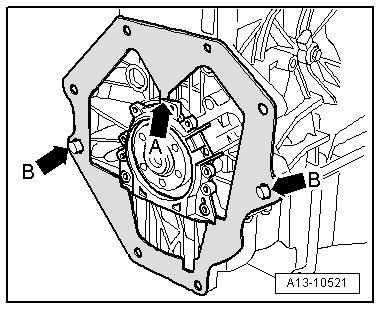
| – |
Make sure that the dowel sleeves
-arrows B- for centring engine and gearbox are fitted in
cylinder block and that the intermediate plate is fitted on the
dowel sleeves. Insert any missing dowel sleeves. |
| – |
For some engines, makes sure that the intermediate plate is
attached to the sealing flange -arrow A-. |
| – |
Carefully raise gearbox using engine and gearbox jack -V.A.G
1383 A- and move it to installation position with gearbox
support -3282-. |
| – |
Bolt gearbox to engine. |
|
|
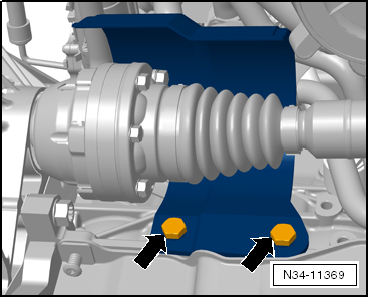
|
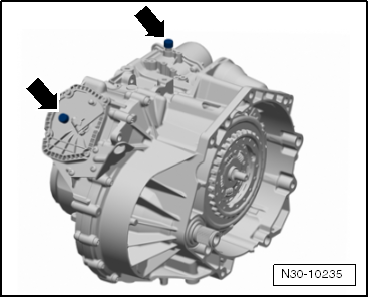
| If the gearbox has been sealed so that no oil can escape,
e.g. after a gearbox repair or after gearbox has been renewed: |
| – |
Remove both plugs from breathers
-arrows- and install breather caps (renew if necessary). |
|
|
|
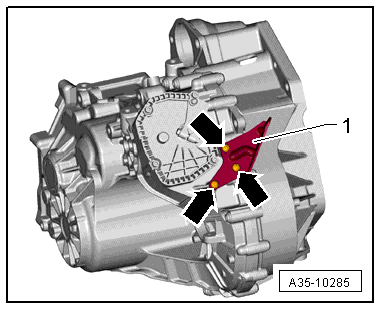
| – |
Bolt cable support bracket -1-
to gearbox. |
| Install left assembly mounting as follows: |
| – |
Always renew all bolts on left assembly mountings. |
|
|
|
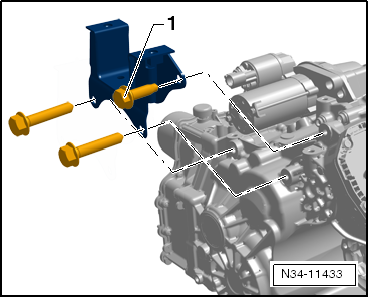
| – |
Bolt gearbox bracket -1- to
gearbox. |
|
|

|
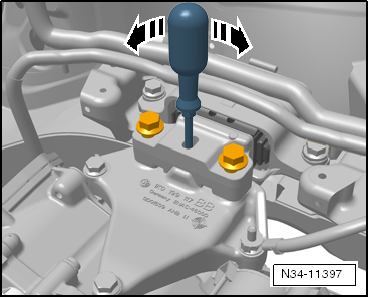
| – |
The bracket can be moved within its seat with a screwdriver
when bolts -2- are tightened
→ Rep. gr.10. |
|
|
|
| – |
Bolt gearbox bracket to gearbox. |
|
|
|
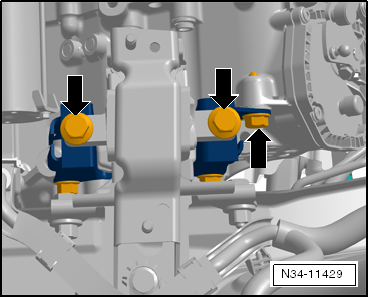
| – |
Then, tighten vertical bolts -arrows-. |
| – |
On Polo with diesel engine, install charge air cooler
→ Rep. gr.21. |
| Continue installation in reverse order of removal. |
| – |
If subframe has been removed, install it
→ Running gear, axles, steering; Rep. gr.40. |
| – |
Install drive shafts
→ Running gear, axles, steering; Rep. gr.40. |
| – |
Install front left wheel housing liner
→ General body repairs, exterior; Rep. gr.66. |
|
|
|
| – |
If present, install heat shield above right drive shaft
→ Running gear, axles, steering; Rep. gr.40. |
| – |
Install starter
→ Electrical system; Rep. gr.27. |
| – |
Check selector lever cable adjustment and adjust it if
necessary
→ Chapter. |
Note
| Recalibrate the immobiliser after installing a
»new« gearbox via vehicle diagnostic
testerGuided functions. |
| Gearbox to engine
→ Chapter |
| Gearbox bracket to gearbox
→ Chapter |
| Wire retainer to gearbox cover
→ Chapter |
| Selector cable support bracket to gearbox
→ Chapter |
| Flange shaft to gearbox
→ Chapter |
|
|
|
Removing gearbox, Golf 2013 ►, Golf
Estate 2014 ►, Golf SV 2015 ►, vehicles with petrol engine
Brief description
...
petrol engine, 1.4 l natural gas engine:
Item
Bolt
Nm
1, 5, 9
M12x70
80
2, 4
...
Other materials:
Contact corrosion
Contact corrosion can occur if unsuitable fasteners (bolts,
nuts, washers, etc.) are used.
Therefore, only fastening elements with a special surface
coating are installed in the vehicle.
In addition, rubber and plastic p ...
Notes for wheel alignment
Wheel alignment must be performed only using a VW/AUDI-approved
wheel alignment unit!
Whenever wheels are aligned, both the front and rear axles
must be measured.
–
Carry alignment out with the wheel alignm ...
Assembly overview – tank flap unit, e-Golf
1 -
Fuel tank flap
–
Removing and installing
→ Chapter.
2 -
Tank flap unit
Removing and installing.
3 -
Bolt
1.5 Nm
4 -
Immediate char ...
© 2016-2026 Copyright www.vwgolf.org

 Removing gearbox
 Specified torques for gearbox