Volkswagen Golf Service & Repair Manual: Checking systems with a restrictor and reservoir and air conditioner
compressor regulating valve -N280- (with externally regulated air conditioner
compressor)
 Note Note
| Connecting air conditioner service station
→ Chapter. |
| Observe the test prerequisites
→ Chapter. |
| – |
Raise engine speed to 2,000 rpm. |
| – |
Observe air conditioner service station pressure gauge. |
Note
| Switching pressures for the air conditioner compressor
regulating valve -N280- and the radiator fan -V7- are
vehicle-specific. |
|
|
|
| Rising from starting pressure (when pressure gauge is
connected) to 20 bar. |
|
|
|
| Falling from starting pressure (when pressure gauge is
connected) to diagram value. |
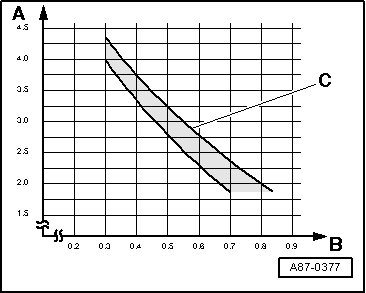
| A - |
Low pressure (measured at the service connection) in bar
absolute pressure. |
| B - |
Control current for the air conditioner compressor
regulating valve -N280-. |
| C - |
Permitted tolerance range. |
Note
| Under unfavourable conditions (very high ambient
temperatures, high atmospheric humidity), the pressure on the
high-pressure side can increase to a maximum of 29 bar. |
| The control current -B- is
indicated in the measured values block. |
| The high pressure is indicated in the measured values block
→ Rep. gr.87. |
| The low pressure is adjusted to within tolerances within the
output range for the air conditioner compressor depending on the
control current for the air conditioner compressor regulating
valve -N280-. |
| Under unfavourable conditions (very high ambient
temperatures, high atmospheric humidity), the output may be
insufficient to achieve the specification in every case. |
| The set working current for the regulating valve must be
greater than 0.3 A to ensure that the regulating valve is
reliably activated. |
| At the setting for “maximum cooling power”, the control
current should be approx. 0.8 A (indicated in the measured
values block)
→ Rep. gr.87. |
| Absolute pressure means that 0 bar corresponds to an
absolute vacuum. The normal ambient pressure corresponds to 1
bar absolute pressure. On most pressure gauges, a reading of 0
bar corresponds to an absolute pressure of one bar (which is
confirmed by the existence of - 1 bar marking beneath the 0
scale marking). |
|
|
|
|
Possible deviation from specification |
Possible cause of fault |
Rectifying
fault |
| High pressure remains constant or increases only slightly
(above the pressure measured when the engine is stopped), |
| Low pressure falls quickly to the diagram value or lower,
|
| The required cooling output is not delivered. |
|
| Actuation of air conditioner compressor regulating valve
-N280- is defective. |
| Insufficient refrigerant in circuit. |
|
| – |
Check actuation of air conditioner compressor regulating
valve -N280-.
|
| – |
Look for leaks using leak detector and rectify them. |
| – |
Recharge refrigerant circuit. |
|
| Low pressure matches the diagram value, |
| The required cooling output is not delivered. |
|
|
|
| Low pressure is too low (see diagram), |
| The required cooling output is not delivered. |
| Low pressure is too low (see diagram), |
| The required cooling output is not delivered. |
|
|
|
Note
| If no fault can be found for this complaint, purge (clean)
refrigerant circuit with refrigerant R134a
→ Chapter. If this is not possible in your workshop,
blow through refrigerant circuit with compressed air and dry
with nitrogen
→ Chapter. |
|
|
|
|
Possible deviation from specification |
Possible cause of fault |
Rectifying
fault |
| High pressure increases only slightly above the pressure
measured when the engine is stopped, |
| Low pressure falls only slightly, |
| The required cooling output is not delivered. |
|
| Actuation of air conditioner compressor regulating valve
-N280- is defective. |
| The air conditioner compressor is defective. |
|
| – |
Check actuation of air conditioner compressor regulating
valve -N280-. |
| – |
Purge (clean) refrigerant circuit
→ Chapter. |
| – |
Renew air conditioner compressor. |
|
| High pressure rises above specification, |
| Low pressure falls only slightly, |
| The required cooling output is not delivered. |
|
| Restriction or obstruction in the refrigerant circuit. |
|
| – |
Feel the refrigerant circuit with the hand to sense the
temperature gradient. |
| At one component a temperature gradient will be detected: |
| – |
If a hose or pipe is kinked or crushed, renew it. |
| – |
In case of an obstruction, blow through refrigerant circuit
with compressed air and nitrogen. |
| – |
Purge (clean) refrigerant circuit
→ Chapter. |
|
| High pressure and low pressure are normal at first, but
after a while, the high pressure increases beyond the
specification, |
| The low pressure falls to the diagram value or lower, |
| The cooling power called for is not delivered. |
|
| Moisture in the refrigerant circuit. |
|
| – |
Blow through refrigerant circuit with compressed air and
nitrogen. |
| – |
Repeat the check; if the system does not operate correctly |
| – |
Purge (clean) refrigerant circuit
→ Chapter. |
| – |
Recharge refrigerant circuit. |
|
| Low pressure is too low (see diagram), |
| The cooling power required is delivered. |
|
| Actuation of air conditioner compressor regulating valve
-N280- is defective. |
| The air conditioner compressor is defective. |
|
| – |
Check actuation of air conditioner compressor regulating
valve -N280-. |
| – |
Purge (clean) refrigerant circuit
→ Chapter. |
| – |
Renew air conditioner compressor.
|
|
Note
| If the fault is “high pressure normal, low pressure too low
” note the following: if faulty the evaporator could ice up or
the required cooling output is not delivered. |
| In this case, the evaporator may ice up although the correct
quantity of refrigerant is present in the refrigerant circuit. |
| Check the measured value of the evaporator output
temperature sender -G263- or evaporator temperature sensor
-G308-. |
| Check the actuation of the air conditioner compressor
regulating valve -N280- |
|
|
|
|
Possible deviation from specification |
Possible cause of fault |
Rectifying
fault |
| High pressure normal or too high, |
| Low pressure too high (see diagram), |
| The air conditioner compressor is noisy (especially
immediately after being switched on), |
| The required cooling output is not delivered. |
|
| Too much refrigerant in circuit. |
|
| – |
Extract some refrigerant from the refrigerant circuit. |
| The quantity of refrigerant extracted is about equal to the
prescribed charge quantity: |
| – |
Renew the air conditioner compressor. |
| The quantity of refrigerant extracted is significantly
greater than the prescribed charge quantity: |
| – |
Recharge refrigerant circuit. |
|
| High-pressure and low-pressure are normal, |
| The required cooling output is not delivered. |
|
| Too much refrigerant oil in circuit. |
|
| – |
Drain refrigerant circuit. |
| – |
Purge (clean) refrigerant circuit
→ Chapter. |
|
| High-pressure and low-pressure are normal, |
| The air conditioner compressor is noisy (especially
immediately after being switched on), |
| The cooling power required is delivered. |
|
|
|
Note
| Overfilling with refrigerant oil can occur if the refrigerant oil
level was not checked after the air conditioner compressor was renewed. |
| If the air conditioner compressor is not to be replaced, drain
refrigerant oil from air conditioner compressor via the drain plug. From
the total amount of refrigerant oil, fill 50 g direct into air
conditioner compressor and fill remainder in refrigerant circuit
according to
→ vehicle-specific workshop manual. |
Switch off ignition.
–
Connect manifold gauge (air conditioner service station).
–
Read pressure gauge. ...
Note
Connecting air conditioner service station
→ Chapter.
Observe the test prerequisites
→ Cha ...
© 2016-2025 Copyright www.vwgolf.org

 Checking
 Checking systems with an expansion valve, receiver and air conditioner
compressor regulating valve -N280- (with externally regulated air conditioner
compressor)
Checking systems with an expansion valve, receiver and air conditioner
compressor regulating valve -N280- (with externally regulated air conditioner
compressor)