Volkswagen Golf Service & Repair Manual: Bleeding fuel line to metering pump -V54- (filling with fuel)
 Note Note
| Air/fuel vapour in the fuel supply to the auxiliary heater
can lead to malfunction when the auxiliary heater is in the
sparking mode. To prevent air/fuel vapour from being drawn in by
the metering pump -V54- and conveyed to the auxiliary heater
when the auxiliary heater is first switched on after performing
repairs on the fuel tank or the fuel delivery unit, the fuel
take-off pipe must be filled with fuel (bled) after performing
repairs in this area.
|
| The fuel line must be bled, for example if the fuel line was
removed and the entire fuel line is filled with air. For
example, if only the fuel delivery unit was removed and there is
only a small amount of air in the fuel line; it is sufficient to
switch on the auxiliary heater and let it run for some time in
full load mode (at least 10 minutes) to check its operation
after completing work on the fuel system. |
| After completing work on the fuel system, switch on the
auxiliary heater, and let it run for some time in full load mode
(at least 10 minutes). |
| On vehicles with high-voltage system, it may not be possible
to switch on the auxiliary heater via the control panel,
depending on the charge level of the hybrid battery unit -AX1-
and the ambient temperature. If the -J255- gets the information
that the hybrid battery unit -AX1- is sufficiently charged, that
there is sufficient power available to operate the high-voltage
heater (PTC) -Z115- and that the ambient temperature is above
-10°C, the -J255- activates the -Z115- (the auxiliary heater is
not activated). In this case, the auxiliary heater can be
switched on using e.g. the “Basic setting” function. For
additional information refer to vehicle diagnostic tester in
“Guided fault finding” mode. |
 Note Note
|
|
|
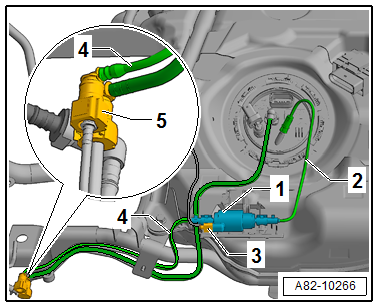
| On vehicles with high-voltage system, the metering pump
-V54--1- cannot be accessed if the
fuel tank is installed. Therefore, bleed fuel line
-2- (and corresponding riser tube)
leading to metering pump -V54- after completing work on the fuel
system of the auxiliary heater (e.g. upon repair work on the
fuel delivery unit or the -V54--1-). |
| – |
Disconnect fuel line -4-
leading from -V54--1- to auxiliary
heater at connection -5-
→ Rep. gr.20 (Separating plug-in connectors). |
 Note Note
| Observe safety precautions when working on the fuel supply
system
→ Rep. gr.20. |
| – |
Hold a container under the opened connection (e.g. the
container of the diesel extractor -VAS 5226-). |
| – |
Activate -V54--1- e.g. via the
“Basic setting” function for the auxiliary heater (“Line
filling”) for approx. 30 seconds; vehicle diagnostic tester in
“Guided fault finding” mode. |
| – |
Observe the fuel which escapes at connection
-5-. |
 Note Note
| If after 30 seconds fuel escapes continuously from
connection -5-, the fuel line is
filled completely with fuel.
|
| – |
Connect fuel line to connection -5-. |
| – |
After all removed components have been reinstalled, switch
on the auxiliary heater, and let it run in full load mode for
approx. 10 minutes. |
 Note Note
| On vehicles with high-voltage system, it may not be possible
to switch on the auxiliary heater via the control panel,
depending on the charge level of the hybrid battery unit -AX1-
and the ambient temperature. If the -J255- gets the information
that the hybrid battery unit -AX1- is sufficiently charged, that
there is sufficient power available to operate the high-voltage
heater (PTC) -Z115- and that the ambient temperature is above
-10°C, the -J255- activates the -Z115- (the auxiliary heater is
not activated). In this case, the auxiliary heater can be
switched on using e.g. the “Basic setting” function. For
additional information refer to vehicle diagnostic tester in
“Guided fault finding” mode. |
|
|
 |
–
If you are uncertain as to whether the metering pump -V54--C-
has an end sealing valve or not, connect e.g. hand vacuum pump
-VAS 6213- to connection ...
Other materials:
Test after driving for 10 minutes
First read and observe the introductory information
and safety warningsReconnect the tyre filler hose and check the tyre pressure
on the tyre pressure display ⑥.
1.3 bar (19 psi / 130 kPa) and lower:
Do not drive on! The tyre cannot be sealed adequately with
the breakdown set.
...
Assembly overview - locking mechanism
Note
The assembly overview shows the locking mechanism for left rear seat
back rest (1/3). The locking mechanism for the right rear seat backrest
(2/3) is similar.
1 -
Backrest frame
2 -
Trim for locking mechanism
...
Assembly overview - front brakes
Note
After every brake pad change, depress brake pedal firmly
several times with vehicle stationary, so that brake pads are
properly seated in their normal operating position.
Use the brake filling and bleeding equip ...
© 2016-2026 Copyright www.vwgolf.org

 Note
Note Note
Note Note
Note Note
Note Note
Note Checking metering pump -V54- with end sealing valve

