
Volkswagen Golf Service & Repair Manual: Assembly overview - wheel bearing assembly, torsion beam axle
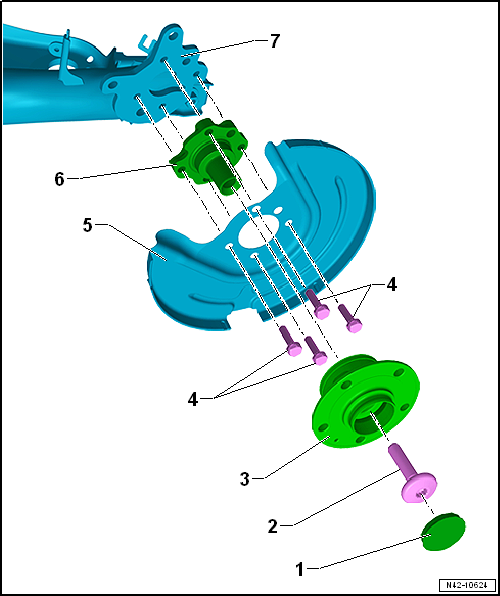
| 1 - | Dust cap |
| Renew after removing |
| Pressing off and driving in → Chapter |
| A proper seal can be achieved only by installing a new dust cap. |
| 2 - | Bolt |
| Renew after removing |
| 200 Nm +90° |
| 3 - | Wheel bearing unit |
| Removing and installing → Chapter |
| The wheel bearing and wheel hub are assembled in one housing. |
| This wheel bearing unit is maintenance-free and does not require adjustment. Adjustments and repairs are not possible! |
| 4 - | Bolt |
| Renew after removing |
| 30 Nm +90° |
| 5 - | Heat shield |
| 6 - | Stub axle |
| 7 - | Axle beam |

 Assembly overview - suspension, multi-link suspension, front-wheel drive
1 -
Wheel bearing housing
Removing and installing
→ Chapter
2 -
Bonded rubber bush
Renewing
& ...
Other materials:
Removing and installing evacuating and charging valves on low and
high-pressure side
Special tools and workshop equipment
required
Torque wrench -V.A.G 1783
Ratchet insert 1/4 inch -VAS 6234
...
Assembly overview - starter, vehicles with dual clutch gearbox (DQ250-6F)
1 -
Starter -B-
Removing and installing
→ Chapter
2 -
Bolt
Specified torque: 40 Nm
3 -
Electrical connector
4 -
Nut
Speci ...
Run-flat tyres, structure and identification of a SST tyre
Removing and fitting run-flat tyres
→ Chapter.
If run-flat tyres are used, a Tyre Pressure Monitor display
must be fitted.
Damage to the tyre and the resulting pressure loss cannot be
detected with the n ...
