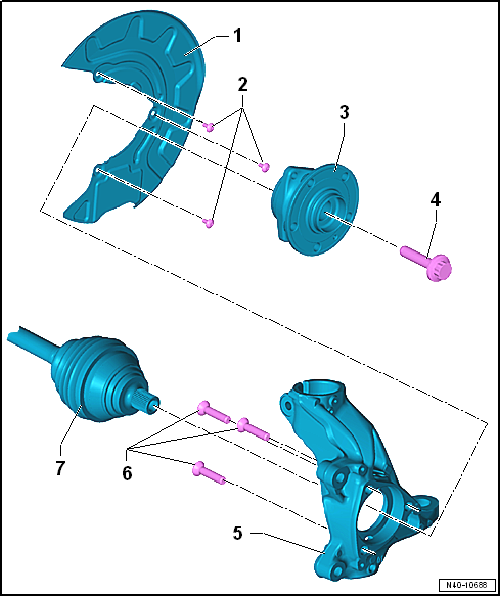
Volkswagen Golf Service & Repair Manual: Assembly overview - wheel bearing assembly
| Removing and installing
→ Chapter |
| Loosening and tightening
→ Chapter |
| 5 - |
Wheel bearing housing |
| Different versions, allocation
→ Electronic Parts Catalogue “ETKA”. |
| Removing and installing
→ Chapter |
| Do not let drive shaft hang down under its own weight when
performing repair work, as otherwise excessive bending could damage
inner CV joint |
| Before fitting the outer joint in the wheel hub, apply a thin coat
of assembly paste to the splines on the outer joint
→ Electronic Parts Catalogue “ETKA”. |
Special tools and workshop equipment required
Ball joint puller -3287A-
Spreader -3424-
Ball joint puller -T10187-
Torq ...
Other materials:
Removing automatic distance control unit from and installing on retaining
plate, variant 2
Note
If the automatic distance control unit -J428- is renewed,
start the respective function → Vehicle
diagnostic tester.
Special tools and workshop equipment
required
...
Fitting the front towing eye
Fig. 246 In the right-hand side of the
front bumper: removing the cover
Fig. 247 Front bumper, right-hand side:
screwing in the towing eye
First read and observe the introductory information
and safety warningsThe towing eye is screwed into a threaded hole behind
a cover on the right of ...
Towing a trailer
Fig. 154 ParkPilot screen display when
towing a trailer (colour)
First read and observe the introductory information
and safety warnings Only the scanned area to the front of the vehicle is
shown on the infotainment system screen in vehicles with a factory-fitted towing
bracket and a tra ...
© 2016-2026 Copyright www.vwgolf.org


 Removing and installing wheel bearing housing