Volkswagen Golf Service & Repair Manual: Assembly overview - fuel tank, vehicles with multi-link rear suspension
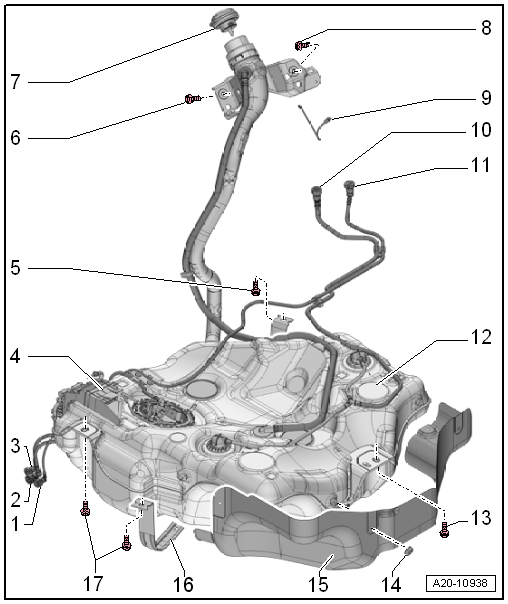
| Vehicles with auxiliary heater |
| To pull off, press release button on connection. |
| Plug-in connectors must engage »audibly«
when joined. |
| Ensure plug-in connector is secured properly by pulling it. |
| Disconnect plug-in connectors
→ Chapter |
| To pull off, press release button on connection. |
| Plug-in connectors must engage »audibly«
when joined. |
| Ensure plug-in connector is secured properly by pulling it. |
| Disconnect plug-in connectors
→ Chapter |
| To activated charcoal filter solenoid valve 1 -N80- |
| To pull off, press release button on connection. |
| Plug-in connectors must engage »audibly«
when joined. |
| Ensure plug-in connector is secured properly by pulling it. |
| Disconnect plug-in connectors
→ Chapter |
| For fuel pump control unit -J538-. |
| Removing and installing fuel pump control unit -J538-
→ Chapter. |
| Screw in until engages audibly |
| Secured to tank flap unit by means of retaining strap. |
| For securing fuel filler neck. |
| For diverting electrostatic charge |
| To activated charcoal filter |
| To pull off, press release button on connection. |
| Plug-in connectors must engage »audibly«
when joined. |
| Ensure plug-in connector is secured properly by pulling it. |
| Disconnect plug-in connectors
→ Chapter |
| To activated charcoal filter |
| To pull off, press release button on connection. |
| Plug-in connectors must engage »audibly«
when joined. |
| Ensure plug-in connector is secured properly by pulling it. |
| Disconnect plug-in connectors
→ Chapter |
| Removing and installing
→ Chapter. |
1 -
Cap
Screw in until engages audibly
Secured to tank flap unit by means of retaining strap.
2 -
Earth connecti ...
Other materials:
Checklist
To ensure your own safety and the safety of your passengers, observe
the following actions in the specified order :
Find a firm and level surface suitable
for lifting the vehicle.
Switch off the engine. Select a gear
if the vehicle has a manual gearbox, or move the selector lever ...
Removing and installing coolant temperature sender -G62
Removing
Engine cold
–
Briefly open cap of coolant expansion tank
-arrow- in order to release
residual pressure in the cooling system, then tighten the cap
...
Removing and installing vibration damper
Special tools and workshop equipment
required
Counterhold -T10475-
Removing
–
Remove noise insulation
→ General body repairs, ...
© 2016-2026 Copyright www.vwgolf.org

 Fuel tank
 Assembly overview - fuel tank, vehicles with front-wheel drive and torsion
beam rear suspension
Assembly overview - fuel tank, vehicles with front-wheel drive and torsion
beam rear suspension