Volkswagen Golf Service & Repair Manual: Assembly overview - centre armrest
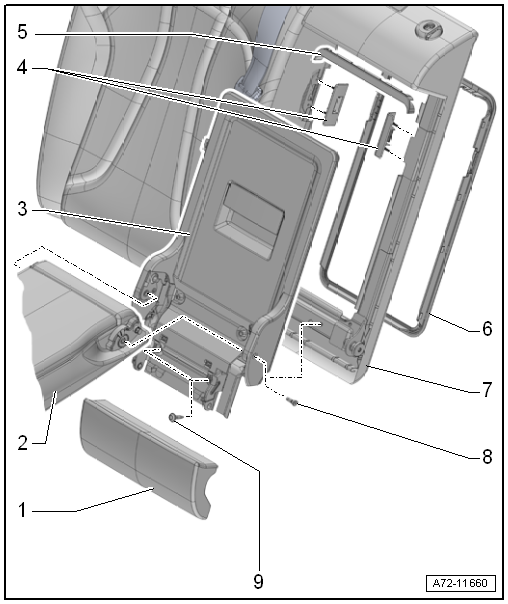
- Allocation
→ Electronic Parts Catalogue
- Removing and installing
→ Chapter
- Removing and installing
→ Chapter
- For through-loading aperture
- Removing and installing
→ Chapter
- For lid catch
- Removing and installing
→ Chapter
- Clipped into rear seat backrest
- Removing and installing
→ Chapter
- For through-loading aperture
- Clipped into rear seat backrest.
- Removing and installing
→ Chapter
| 7 - |
Right rear seat backrest (2/3) |
- With through-loading aperture
- Allocation
→ Electronic Parts Catalogue
- Qty. 2
- Self-tapping
- Renew after removal
- 12 Nm
Note
The assembly overview shows the locking mechanism for left rear seat
back rest (1/3). The locking mechanism for the right rear seat backrest
(2/3) is similar.
...
1 -
Side padding
Allocation
→ Electronic Parts Catalogue
Removing and installing
→ Chapter
2 -
Mounting gromme ...
Other materials:
Removing and installing bonnet lock, RHD vehicle
Special tools and workshop equipment
required
Torque wrench -V.A.G 1331-
–
Open bonnet.
–
Remove Bowden cable on mounting bracket ...
Work instructions
Unbolt relevant brake line at brake caliper or wheel brake
cylinder; catch escaping brake fluid and dispose of this as per
regulations.
–
Cut through brake line at a suitable point (straigh ...
Removing and installing rear treble loudspeakers -R14-/-R16-, 4-door
Rear left treble loudspeakers -R14-/rear right treble
loudspeakers -R16- are located in rear door trim panels.
Note
If the treble loudspeaker must be renewed, the loudspeaker
grille must also be renewed.
...
© 2016-2026 Copyright www.vwgolf.org

 Assembly overview - locking mechanism
 Assembly overview - side padding