Volkswagen Golf Service & Repair Manual: Wheel change, installation instructions for wheel change
 WARNING
| Perform the checks and follow the instructions
listed below. This is important to ensure that the wheel
bolts and the wheels are properly secured. |
|
 Note
Note
| On vehicles with tyre pressure indicator, the tyre pressure
indicator has to be recalibrated any time one or more wheels are
removed or fitted
→ Anchor. |
|
|
|
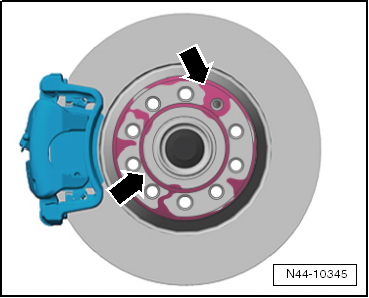
| – |
Check to ensure that contact surfaces
-arrows- on brake disc are free of corrosion and dirt. |
|
|
|
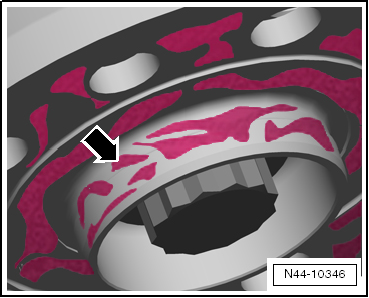
| – |
Check to ensure that contact surface
-arrow- on centring seat of brake disc are free of
corrosion and dirt. |
|
|
|
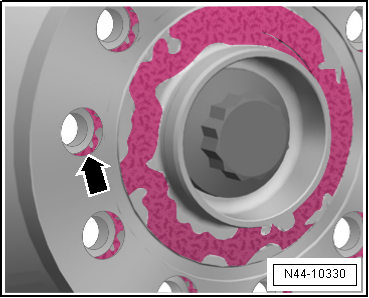
| – |
Check to ensure that contact surface
-arrow- on inner side of wheel (rim) and also centring
seat of rim are free of corrosion and dirt. |
| – |
The concave seats * in the holes
for the wheel bolts and the threads of the wheel bolts must also
be free of corrosion and dirt, oil or grease. |
| * The concave seat is the curved
surface of a section of a sphere cut by a plane. |
|
|
|
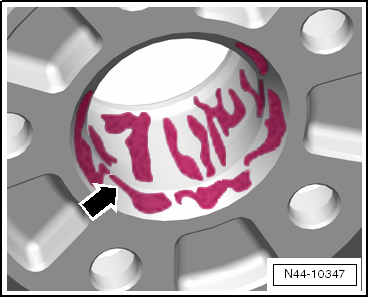
| – |
Check whether the wheel bolts can be easily screwed in by
hand. The thread of the wheel bolts must not come into contact
with the bore in the brake disc -arrow-. |
| If the thread of the wheel bolt touches the hole
-arrow-, turn the brake disc
relative to the wheel hub accordingly. |
| If necessary, remove dirt and corrosion: |
| Oil or grease from contact surfaces |
| Oil or grease from threads in wheel hub |
| Oil or grease from threads in wheel bolts |
WARNING
| Damaged, badly corroded or difficult to remove wheel
bolts must be renewed. |
|
|
|
|
Warming cold tyres to minimum installation temperature
Note
This instruction also applies to ultra-high performance
tyres (h ...
–
Preserving wheel centring seat
→ Chapter.
1 -
When fitting the wheel, pull in all wheel bolts uniformly by ...
© 2016-2026 Copyright www.vwgolf.org

 Wheel change, installation requirements
 Wheel change, wheel installation