VW Golf manuals

Volkswagen Golf Service & Repair Manual: Removing and installing belt height adjuster, 4-door model and estate

Volkswagen Golf Service & Repair Manual / General body repairs, interior / Pasanger protection / Seat belts / Removing and installing belt height adjuster, 4-door model and estate

Removing
–  Press belt height adjuster button and move slider of belt height adjuster to lowest position.
–  Detach upper B-pillar trim → Chapter.
–  Place B-pillar trim with belt webbing attached to one side.
   
–  Remove bolt -4-.
–  Remove belt guide fitting -1- with belt webbing.
–  Remove bolt -3-.
–  Pull belt height adjuster -2- upwards off B-pillar.
Installing
Install in reverse order, but note the following:
–  If parts of the belt system are removed because of an accident, the belt system bolts must be renewed.
  Note
  As a replacement part, belt height adjusters always come with slider for belt height adjuster set to lowest position (assembly position).
  If previously removed belt height adjusters are reinstalled, they must be moved to lowest position for installation (assembly position).
–  Attach belt height adjuster -2- on B-pillar.
–  Tighten bolt -3-.
–  Install belt end fitting -1- and tighten bolt -4-.
  Note
The belt height adjuster button must not be pressed when installing the B-pillar trim.
 

Removing and installing belt height adjuster, 4-door model and estate

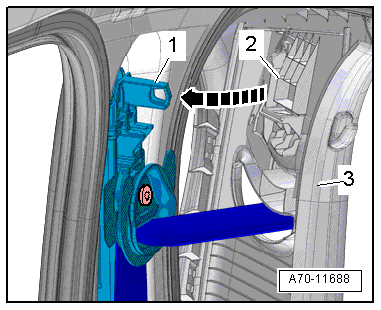
–  Initially, fit B-pillar trim -3- upwards into mounting in roof.
  Mounting -2- of sliding part on B-pillar trim must engage in retaining pin -1- on belt height adjuster -arrow-.
–  If a new belt height adjuster is installed, firmly push sliding part upwards after B-pillar trim has been installed.
  This will release the installation guard of the belt height adjuster.
–  Check the following functions:
  Belt height adjuster must engage audibly in each of the 3 possible positions (including top position).
  Belt height adjuster button must return to top position after any operation.
  Belt guide fitting must move to vertical position or operated position on its own.
If one of the requirements is not fulfilled, check belt height adjuster for correct installation and renew it if necessary.
Specified torques
  → Chapter „Assembly overview - front three-point seat belt, 4-door model and estate“
 

Removing and installing belt height adjuster, 4-door model and estate

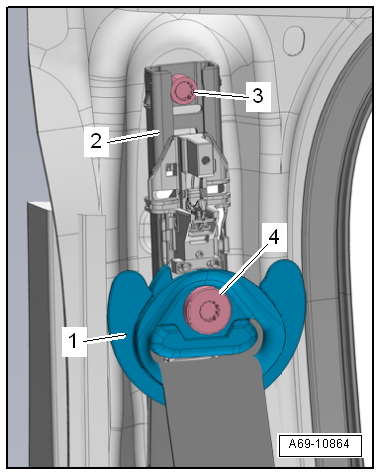
Removing and installing belt height adjuster, 2-door model
Removing –  Press belt height adjuster button and move slider of belt height adjuster to lowest position. –&nbs ...

Removing and installing rear belt buckle
Removing –  Remove bench seat / single seats → Chapter. Right side: belt buckle with belt end fitting ...

Other materials:

Before operating the air conditioning system after recharging with refrigerant
After installing a new air conditioner compressor or filling with fresh refrigerant oil (e.g. after blowing out refrigerant circuit), turn compressor pulley 10 revolutions by hand before starting engine. This will prevent damage to the air conditioner ...

Bleeding hydraulic system following standard procedure
  Note Bleeding the hydraulic system using brake filling and bleeding equipment -VAS 5234- is described. A pre-pressure of 2 bar is required for bleeding the ABS hydraulic unit -N55-. Specia ...

Removing and installing front air distribution flap actuation unit, Climatronic, RHD vehicles
Removing –  Remove dash panel central tube → General body repairs, interior; Rep. gr.70. –  Remove air duct for defroster vent → Chapter. –&nb ...

© 2016-2025 Copyright www.vwgolf.org