Volkswagen Golf Service & Repair Manual: Undercoated areas
 Note
Note
| Undercoating (stone-chipping protection) applied during repair work
must be identical in appearance and thickness to the original
undercoating. |
| Water drainage holes must remain clear. |
| All threaded studs and welded nuts with metric threads as well as
all other studs and contact surfaces for assembly must be functional
following the application of the undercoating. |
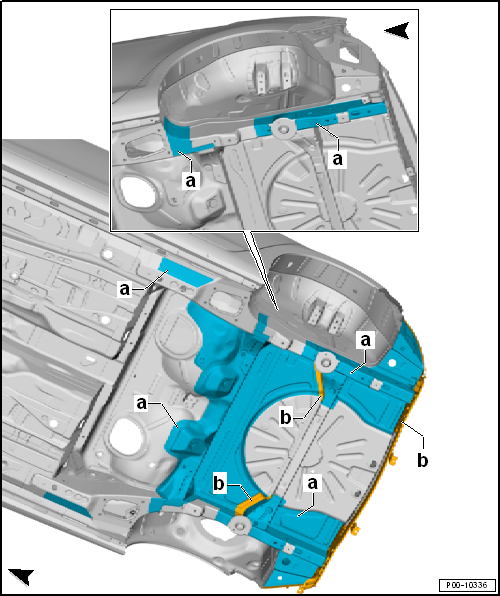
| Undercoating, detail view, front body |
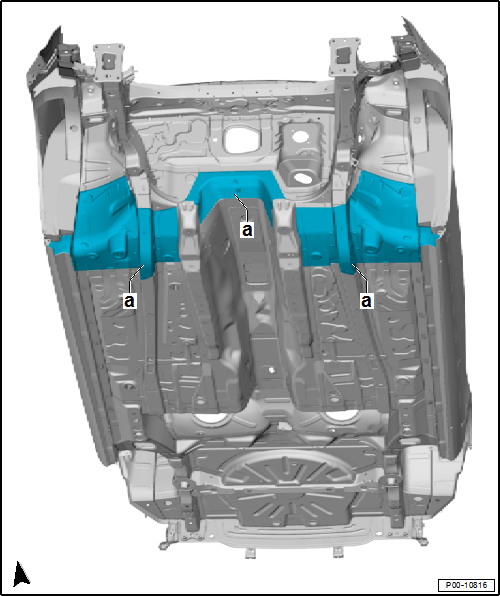
Note
| Undercoating (stone-chipping protection) applied during repair work
must be identical in appearance and thickness to the original
undercoating. |
| Water drainage holes must remain clear. |
| All threaded studs and welded nuts with metric threads as well as
all other studs and contact surfaces for assembly must be functional
following the application of the undercoating. |
| Undercoating, detail view, rear body |
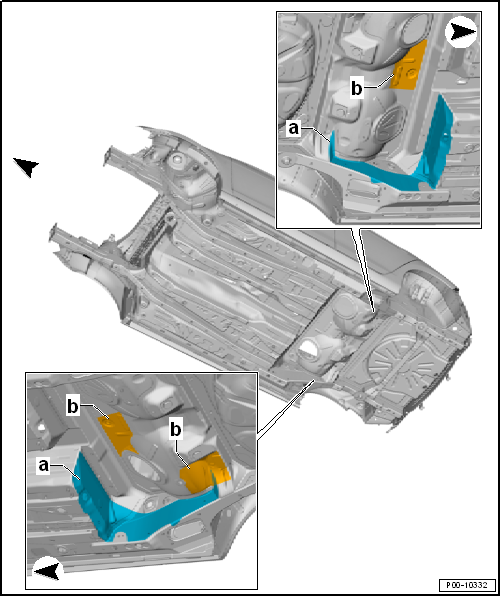
Note
| Undercoating (stone-chipping protection) applied during repair work
must be identical in appearance and thickness to the original
undercoating. |
| Water drainage holes must remain clear. |
| All threaded studs and welded nuts with metric threads as well as
all other studs and contact surfaces for assembly must be functional
following the application of the undercoating. |
| Undercoating, side member, with sectional view |
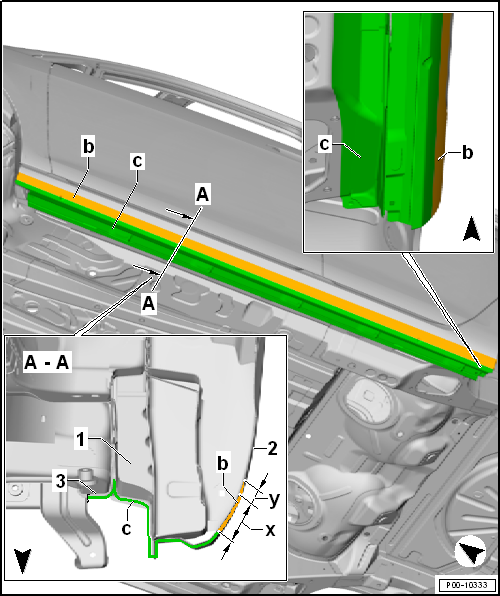
| 1 - |
Inner part of side member |
| Height -x- = 35 mm corresponds to
thickness of 0,5 mm. |
| Height -y- = 10 mm decreasing thickness
down to approx. 0.3 mm. |
Note
| Undercoating (stone-chipping protection) applied during repair work
must be identical in appearance and thickness to the original
undercoating. |
| Water drainage holes must remain clear. |
| All threaded studs and welded nuts with metric threads as well as
all other studs and contact surfaces for assembly must be functional
following the application of the undercoating. |
| Undercoating, rear body, front-wheel drive |
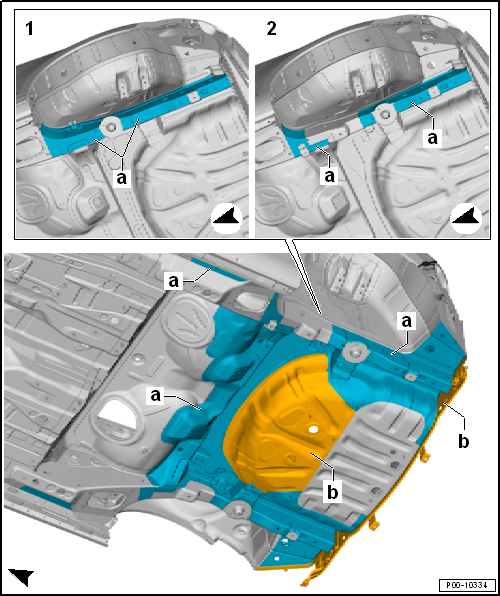
| 1 - |
Longitudinal member/rear wheel housing, vehicles with torsion beam
rear suspension |
| 2 - |
Longitudinal member/rear wheel housing, vehicles with multi-link
suspension |
Note
| Undercoating (stone-chipping protection) applied during repair work
must be identical in appearance and thickness to the original
undercoating. |
| Water drainage holes must remain clear. |
| All threaded studs and welded nuts with metric threads as well as
all other studs and contact surfaces for assembly must be functional
following the application of the undercoating. |
| Undercoating, rear underbody, 4-Motion vehicles |
| In the magnifying glass view the left longitudinal member/rear wheel
housing is shown. The right side is the mirror image. |
Note
Undercoating (stone-chipping protection) applied during repair work
must be identical in appearance and thickness to the original
undercoating.
Wate ...
Note
Undercoating (stone-chipping protection) applied during repair work
must be identical in appearance and thickness to the original
undercoating.
Wate ...
Other materials:
Adjusting glass panel
Special tools and workshop equipment
required
Height-adjustment of glass panel
Torque wrench -V.A.G 1783-
–
Loosen securing bolts for ...
Removing and installing trim panel for dash panel
Special tools and workshop equipment
required
Removal wedge -3409-
Removing
–
Release trim panel -1- from
catches - ...
Removing and installing mounting bracket
Special tools and workshop equipment
required
Note
Removal and installation are described only for the right
door handle bracket. The right side is similar.
Removing ...
© 2016-2026 Copyright www.vwgolf.org

 Undercoated areas, body overview indicating differing coat thicknesses
 Undercoating, additional protected areas on CNG-powered vehicles