Volkswagen Golf Service & Repair Manual: Removing and installing steering wheel
| Special tools and workshop equipment
required |
|
|
|
| – |
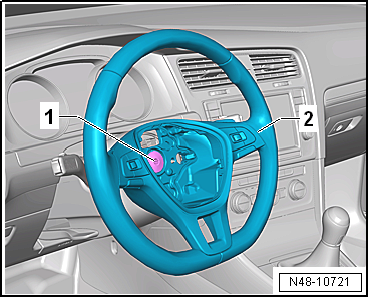
Check that steering column has a centre punch mark that
aligns with mark on steering wheel. |
| – |
If this is not the case, the position of the steering wheel
to steering column must be marked on the steering column with a
centre punch mark. |
| – |
Pull steering wheel -2- off
steering column. |
| Install in reverse order of removal, observing the
following: |
| Make sure that the wheels are pointing straight ahead before
fitting the steering wheel. |
| – |
When installing a steering wheel that has been removed, make
sure that the markings on the steering column and steering wheel
are in line. |
| – |
When installing a new steering wheel (without marking), the
steering wheel must be mounted in middle position (steering
wheel spoke must be horizontal and wheels in straight position). |
| – |
Install steering wheel. |
| – |
Install airbag unit
→ General body repairs, interior; Rep. gr.69. |
| – |
If the steering wheel is skewed, the steering wheel must be
removed again and fitted onto the splines of the steering
column. |
| → Chapter „Assembly overview - steering wheel“ |
|
|
|
1 -
Steering column
Removing and installing
→ Chapter
The centre punch marks -arrows- on the
steering wheel and the stee ...
Other materials:
Special driving situations
Fig. 170 A: vehicle in a bend B: motorbike
in front is outside the range of the radar sensor
Fig. 171 C: vehicle is changing lanes.
D: turning vehicle, stationary vehicle
First read and observe the introductory information
and safety warnings The Adaptive Cruise Control (ACC) has physica ...
Removing and installing battery tray
Special tools and workshop equipment
required
Torque wrench -V.A.G 1331-
Removing
Vehicles with TDI engine
–
Remove air ...
Removing and installing door
Special tools and workshop equipment
required
Door alignment tool -3320-
Universal joint for 3320 -3320/1-
Bit for 3320 -3320/2-
...
© 2016-2026 Copyright www.vwgolf.org

 Note
Note WARNING
 Assembly overview - steering wheel
 Steering column