Volkswagen Golf Service & Repair Manual: Removing and installing wing
| Special tools and workshop equipment
required |
|
|
|
|
|
|
Torque wrench -V.A.G 1783- |

Note
| Removal and installation are described only for the left wing.
Removal and installation of the right wing are similar. |
| – |
Remove front wheel housing liner
→ Chapter. |
| – |
Remove front bumper cover
→ Chapter. |
| – |
Remove headlights
→ Vehicle electrics; Rep. gr.94 |
| – |
Removing left plenum chamber cover
→ Chapter. |
| – |
Remove water deflector
→ Chapter. |
| – |
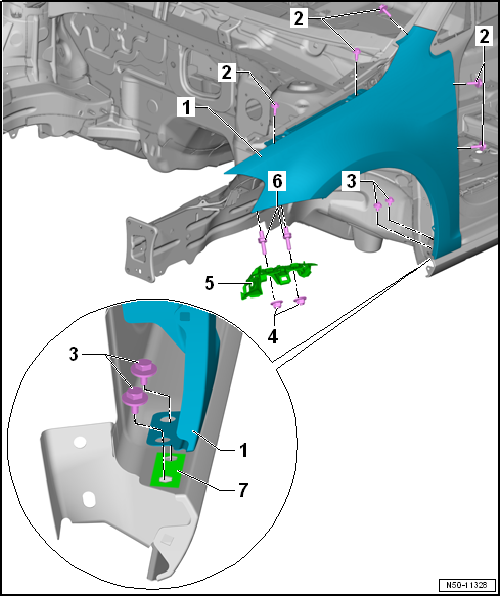
Unscrew hexagon nut -4- and remove
guide bracket -5-. |
| – |
Wing insulation
→ Item. |
| – |
Remove insulation for rib section
→ Item. |
| – |
Remove centre hex studs -6-. |
| – |
Remove bolts -2- and
-3- |
| – |
Remove wing -1- carefully. |
Note
| The zinc intermediate piece -AKL 381 035 50--7-
(if there is one) will be damaged during removal. |
Note
| Install wing -1- without subjecting it
to tensile stress. |
| Install in the reverse order of removal observing the following: |
| – |
Wing is aligned free of stress with wing bracket loosened
→ Chapter. |
| – |
Always insert zinc intermediate piece -AKL 381 035 50--7-
between wing and side member. |
| – |
Ensure joints are parallel and shut lines are equal
→ Rep. gr.00. |
| |
Wing
→ Chapter „Assembly overview - wing“ |
1 -
Front deformable element
2 -
Bolt
6.0 Nm
3 -
Rear deformable element
4 -
Bolt ...
Special tools and workshop equipment
required
Torque wrench -V.A.G 1783-
&nbs ...
Other materials:
Vehicle-specific weight ratings
First read and observe the introductory information
and safety warnings All data in the official vehicle documents take precedence
over these data. All data in this manual apply to the basic German model. The vehicle
data sticker in the service schedule and the official vehicle documents sho ...
Removing and installing rear underbody cover – petrol/diesel
Note
The removal and installation procedures may have to be modified
slightly depending on engine fitted.
–
Loosen lock washer -3-.
–
Unclip spreader rivet -2- and remove
bolt -4-.
–
Remove rea ...
Removing and installing lock cylinder
Removing and installing lock cylinder
Special tools and workshop equipment
required
Note
The removal and installation sequence is only for the
left lock ...
© 2016-2026 Copyright www.vwgolf.org

 Assembly overview - deformable element
 Removing and installing wing bracket