Volkswagen Golf Service & Repair Manual: Removing and installing water drain hoses
 Note
Note
| In models for “NAR” market, the left rear water drain hose ends
in the left wheel housing. |
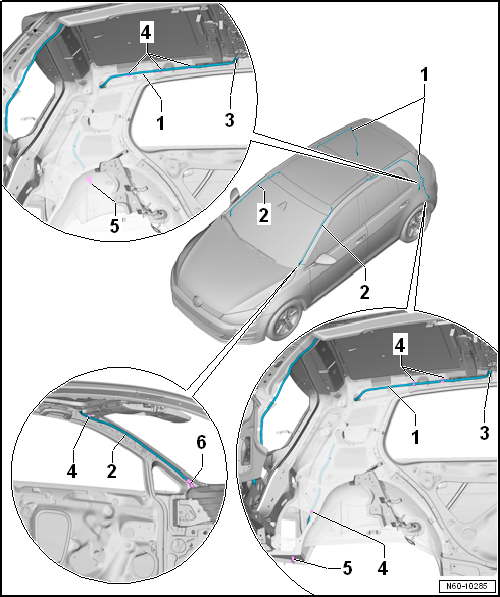
| Removing front water drain hose |
| – |
Remove A-pillar trim
→ General body repairs, interior; Rep. gr.70. |
| – |
Remove moulded headliner
→ General body repairs, interior; Rep. gr.70. |
| – |
Pull the front water drain hose -2- out
of clips -4- and drain grommets
-6-. |
| Removing rear water drain hose |
| – |
Remove C-pillar trim
→ General body repairs, interior; Rep. gr.70. |
| – |
Remove moulded headliner
→ General body repairs, interior; Rep. gr.70. |
| – |
Pull the rear water drain hose -1- out
of clips -4- and drain grommets
-5-. |
Special tools and workshop equipment
required
Cleaning a ...
Other materials:
Removing and installing trim for operating and display unit
Removing
–
Starting at bottom, unclip trim for operating and display
unit -1- from operating and display
unit -2- and remove it.
Installing
Note
Before installing, chec ...
Aqua Premium system
Designation:
Uni (solid-colour) waterborne mixing paint -LWM 083 ...-
Metallic, pearlescent, special-effect waterborne mixing
paint -LWM 084/ 086...-
Uni (solid-colour) waterborne base ...
Masking areas, rear body
Masking areas, rear underbody
A -
No sealant on threads or contact surfaces.
B -
Threads waxed
D -
Threads free of surfacer and top-coat paint (joint surface may be
painted)
E -
...
© 2016-2026 Copyright www.vwgolf.org

 Cleaning water drain hoses
 Bumper