Volkswagen Golf Service & Repair Manual: Removing and installing front seat
 Note Note
-
| |
Removal and installation is described for the left
seat. Apply the same instructions for removal and
installation of the right seat as appropriate. |
-
| |
Removal and installation is described for a manually
adjustable seat. Apply the same instructions for removal and
installation of an electrically adjustable seat as
appropriate. |
| Special tools and workshop equipment
required |
|
|
|
| |
|
Torque wrench -V.A.G 1331- |
| |
Airbag adapter -VAS 6282- |

WARNING
| Observe general safety regulations when working on
airbag, belt tensioner and battery isolator units
(pyrotechnic components)
→ Chapter. |
|
| – |
Move seat to foremost position using fore and aft adjustment
mechanism. |
| In the event of a defective seat longitudinal adjustment
motor -V28-/-V31- it is not possible to adjust the front seat
using the seat adjustment operating unit -E470-/-E471-. In this
case carry out the appropriate procedure
→ Chapter. |
|
|

|
| – |
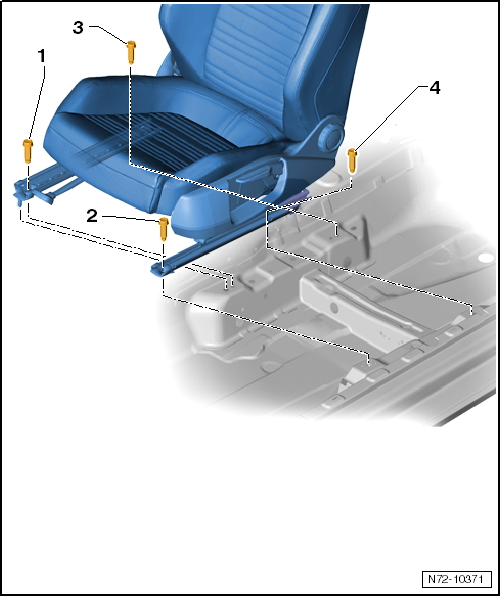
Unscrew bolts -3- and
-4-. |
| – |
Move seat to rearmost position using fore and aft adjustment
mechanism. |
| – |
Remove bolts -1- and
-2- |
| – |
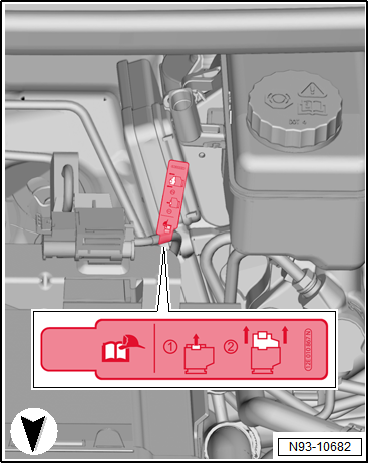
For “e-Golfs” or “Golf GTEs”, disconnect the maintenance
connector for high-voltage system -TW-. |
| – |
Disconnect battery
→ Electrical system; Rep. gr.27. |
| – |
Tilt seat towards rear. |
| – |
Open cover in floor covering. |
| – |
Depending on vehicle equipment, release and pull wiring
harnesses off coupling station on seat. |
| – |
Connect airbag adapter
→ Chapter. |
 Caution
| If seat is lifted out of vehicle or transported, it
must not, in order to prevent damage, be gripped by
attaching parts such as, e.g. belt buckle, lever for
seat longitudinal adjustment, lever for seat height
adjustment or seat trim panels. |
|
| – |
Use suitable means to protect attachments against damage. |
| – |
Insert right hand between backrest and padding. Grasp the
front end of the padding with your left hand and lift the seat
out of the vehicle. |
| Install in reverse order, but note the following: |
|
|
|
| – |
Lift seat into vehicle through front door aperture. |
| – |
Put down seat on front edge first. |
| – |
Guide seat into centring pins. |
WARNING
| If, when installing a seat a thread in seat cross member
mounting plate is damaged, reworking damaged threads is
prohibited! In this case, the seat cross member mounting plate
must be replaced. |
|
| If seat cross member mounting plate threads have been damaged: |
| – |
Renew seat cross member mounting plate concerned
→ Rep. gr.51. |
| – |
Remove airbag adapter -VAS 6282-. |
| – |
Engage side airbag wiring harness in coupling station. |
| – |
Depending on vehicle equipment, engage wiring harnesses in coupling
station. |
| – |
Close cover in floor covering. |
WARNING
| Ensure that nobody is in vehicle. |
|
| – |
For “e-Golfs” or “Golf GTEs”, connect the maintenance
connector for high-voltage system -TW-. |
| – |
Connect battery
→ Electrical system; Rep. gr.27. |
Note
| If airbag warning lamp -K75- indicates a fault following
installation, event memory must be read, deleted and then read
again → Vehicle
diagnostic tester. |
| |
→ Chapter „Assembly overview - front seat“ |
|
|
|
1 -
Bracket
Removing
–
Remove bracket -4-.
–
Remove seat cover and padding from seat pan
→ Chapter.
...
Checking seat longitudinal adjustment motor -V28-/-V31-
–
Move front seat to highest position.
Note
To ...
© 2016-2026 Copyright www.vwgolf.org

 Assembly overview - fire extinguisher
 Removing front seat if seat longitudinal adjustment motor -V28-/-V31- is
defective
Removing front seat if seat longitudinal adjustment motor -V28-/-V31- is
defective