Volkswagen Golf Service & Repair Manual: Removing and installing belt height adjuster, 2-door model
| – |
Press belt height adjuster button and move slider of belt
height adjuster to lowest position. |
| – |
Detach upper B-pillar trim
→ Chapter. |
| – |
Place B-pillar trim with belt webbing attached to one side. |
|
|
|
| – |
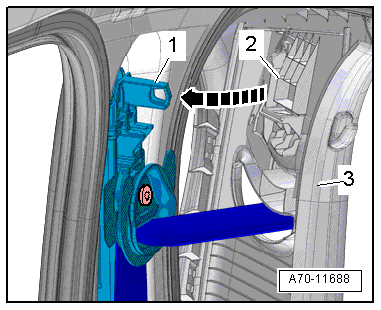
Initially, fit B-pillar trim -3-
upwards into mounting in roof. |
| |
Mounting -2- of sliding part on
B-pillar trim must engage in retaining pin
-1- on belt height adjuster -arrow-. |
| – |
If a new belt height adjuster is installed, firmly push
sliding part upwards after B-pillar trim has been installed. |
| |
This will release the installation guard of the belt height
adjuster. |
| – |
Check the following functions: |
| |
Belt height adjuster must engage audibly in each of the 3
possible positions (including top position). |
| |
Belt height adjuster button must return to top position
after any operation. |
| |
Belt guide fitting must move to vertical position or
operated position on its own. |
| If one of the requirements is not fulfilled, check belt
height adjuster for correct installation and renew it if
necessary. |
| |
→ Chapter „Assembly overview - front three-point seat belt,
2-door model“ |
|
|
|
Removing
–
Unscrew bolt -1- on belt end
fitting -2-.
Installing
...
Removing
–
Press belt height adjuster button and move slider of belt
height adjuster to lowest position.
–&nbs ...
Other materials:
Evaporator output temperature sender -G263- or evaporator temperature sensor
-G308
Function:
The evaporator output temperature sender -G263- or
evaporator temperature sensor -G308- reads the temperature
downstream from the evaporator. This value is transmitted to the
air conditioning system control unit and serves as a ...
Detecting leaks
External damage can cause leaks in the refrigerant circuit. Because a small
leak will involve only small quantities of refrigerant, leaks should be checked
for using an electronic leak detector or by introducing a leak detection
additive to the refrigerant circuit. Electronic leak detectors ca ...
Cleaning and caring for the dash panel, wooden trims and plastic parts
First read and observe the introductory information
and safety warnings
Moisten a clean, lint-free cloth with water and clean the parts.
Treat plastic parts (inside and outside the vehicle) and the dash panel
with a special solvent-free plastic cleaning and care product
that has b ...
© 2016-2026 Copyright www.vwgolf.org

 Note
Note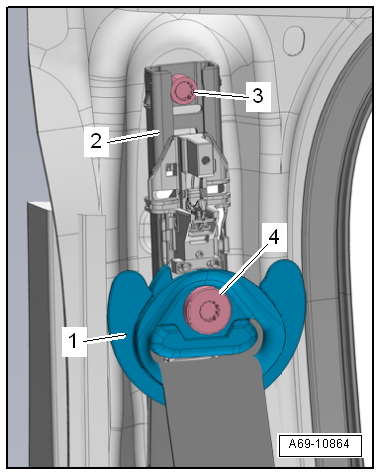
 Removing and installing rear outer belt end fitting
 Removing and installing belt height adjuster, 4-door model and estate