Volkswagen Golf Service & Repair Manual: Exploded view - mechatronic unit
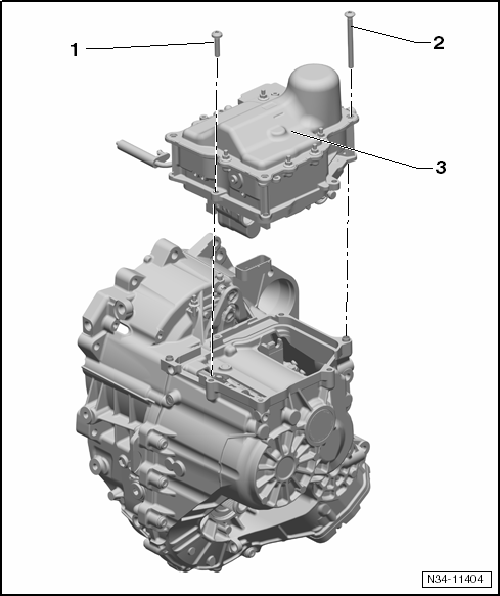
| For securing mechatronic unit for dual clutch gearbox -J743- on
gearbox housing. |
| Always renew after removing. |
| Specified torque and tightening sequence
→ Fig. |
| For securing mechatronic unit for dual clutch gearbox -J743- on
gearbox housing. |
| Always renew after removing. |
| Specified torque and tightening sequence
→ Fig. |
| 3 - |
Mechatronic unit for dual clutch gearbox -J743- |
 Note
Note
| Observe the following when installing a new mechatronic unit:
|
| After unpacking a new mechatronic unit, do not discard the packaging
or the red cap on the breather pipe. These will be needed for returning
the old mechatronic unit. |
| A »new« mechatronic unit is correctly
filled with oil. Do not drain or top up oil. |
| Recalibrate the immobiliser after installing a
»new« mechatronic unit. |
| → Chapter „Removing and installing mechatronic unit for dual clutch
gearbox -J743-“ |
| → Chapter „Moving mechatronic unit for dual clutch gearbox -J743- into
removal position by hand“ |
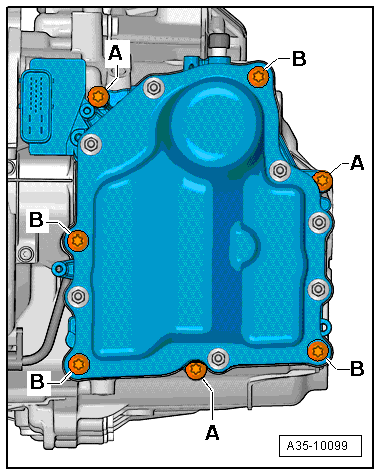
| Mechatronic unit for dual clutch gearbox -J743- - specified
torque and tightening sequence |
Note
| Always renew after removing. |
| – |
Tighten bolts in 4 stages as follows: |
|
|
|
| Stage |
Bolts |
Specified torque |
| 1. |
-A- |
Screw in to contact by hand. |
| 2. |
Remove
guide bolts -T10406-. |
|
| 3. |
-B- |
Screw in to contact by hand. |
| 4. |
-A, B- |
Tighten to 10 Nm in diagonal
sequence. |
| Component |
Specified torque |
| Engaging lever cover |
8 Nm |
Special tools and workshop equipment
required
Vehicle diagnostic tester
Us ...
© 2016-2026 Copyright www.vwgolf.org

 Mechatronic unit
 Removing and installing mechatronic unit for dual clutch gearbox -J743