Volkswagen Golf Service & Repair Manual: Dismantling and assembling burner unit
| – |
Remove auxiliary heater
→ Chapter. |
| – |
Dismantle auxiliary heater
→ Chapter. |
|
|
|
| – |
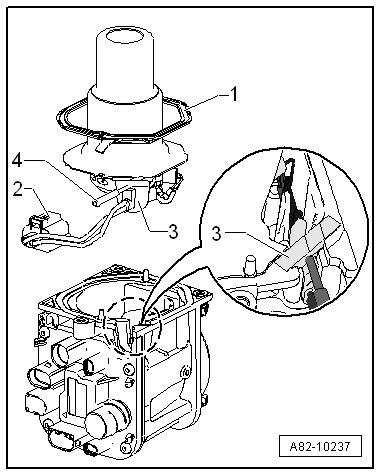
Detach gasket -1- from blower
housing. |
| – |
Release and detach connector -2-. |
| – |
Pull grommet -3- out of blower
housing onto combustion pipe -4-,
using only a little force, and at the same time lift burner unit
off vertically upwards. |
|
|

|
| Renew gasket -1- and grommet
-3-. |
| – |
Check sealing surfaces and clean if necessary. |
| Install in reverse order. |
| – |
Make sure gasket -1- is
positioned correctly and connector -2-
is engaged securely. |
 Note Note
| To prevent a short circuit at wiring/line connections to
glow plug with flame monitor -Q8- make sure that the seal/gasket
-1- is positioned correctly and
that the connector -2- is engaged
correctly. |
| → Chapter „Assembly overview - auxiliary heater attachments“ |
|
|

|
1 -
6-pin connector
Information on pin assignment can be found in the latest current
flow diagram → Current flow
diagrams, Electrical fau ...
© 2016-2026 Copyright www.vwgolf.org

 Note
Note Connector pin assignment for auxiliary heater

