Volkswagen Golf Service & Repair Manual: Checking fuel pressure, engine code CWVA
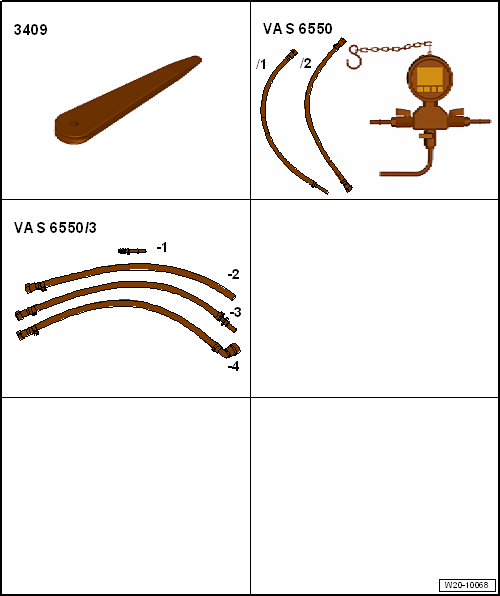
| Special tools and workshop equipment required |
| Pressure tester -VAS 6550- |
| Connector cable -VAS 6550/3-3- |
| Connector cable -VAS 6550/3-4- |
| Vehicle diagnostic tester |
| Voltage supply OK
→ Chapter. |
| – |
Observe safety precautions
→ Chapter. |
| – |
Observe rules for cleanliness
→ Chapter. |
|
|
|
| – |
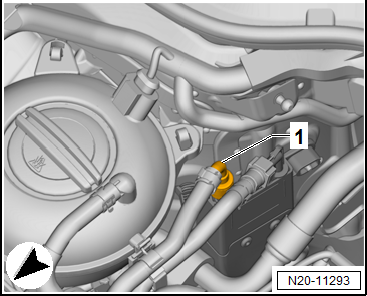
Pull off supply line -1-.
Separate plug-in connectors
→ Chapter. |
The fuel system is pressurised.Risk of injury due to fuel which may
spurt out.Wear eye protection.Wear protective gloves.Release pressure:
place clean cloth around connection and carefully open connection.
| – |
Collect escaping fuel with a cleaning cloth. |
|
|
|
| – |
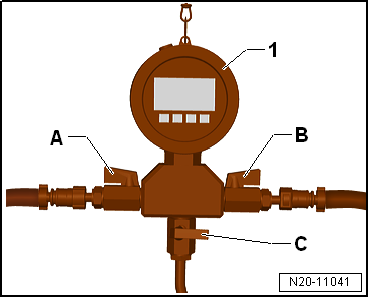
Connect hose -VAS 6550/1- to connection
-A- of pressure tester -VAS 6550-. |
| – |
Connect hose -VAS 6550/1- to fuel supply line
-1- leading to engine. |
| – |
Connect hose -VAS 6550/2- to connection
-B- of pressure tester -VAS 6550-. |
| – |
Use hose -VAS 6550/2- to connect fuel line leading to fuel
tank with pressure tester -VAS 6550-. |
| – |
Ensure plug-in connectors are secured properly by pulling. |
|
|

|
| – |
Ensure that drain tap -C- on
pressure tester-1- is closed. |
| – |
Shut-off valves -A- and
-B- on pressure tester-1-
are open. |
| – |
Connect vehicle diagnostic tester. |
| – |
Select final control diagnosis for fuel pump in vehicle
self-diagnosis program. |
 Note Note
| The fuel pump is now actuated to build up fuel pressure. |
| If the final control diagnosis is to be carried out several
times in succession, it may be necessary to start the engine
briefly before repeating the final control diagnosis. |
| – |
Read off fuel pressure on pressure gauge. |
| Specification: Approx. 4.0 bar. |
| If fuel pressure is OK, check holding pressure
→ Chapter. |
| If the specification is exceeded: |
| – |
Pressure limiting valve in fuel delivery unit is defective. |
| – |
Renew fuel delivery unit
→ Chapter. |
| If the specification is not attained: |
| Proceed as follows to check fuel pressure at fuel delivery
unit: |
| – |
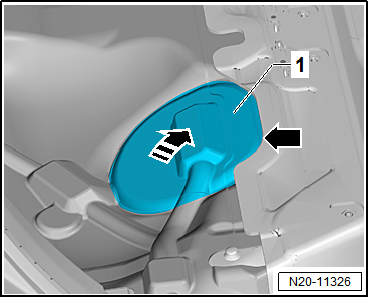
Remove right rear seat
→ General body repairs, interior; Rep. gr.72. |
|
|
|
| – |
Partially detach cover -1- in
floor covering at parting line -arrow-. |
| – |
Do not detach cover completely from floor covering in order
to ensure it is reinstalled in the correct installation
position. |
| – |
Detach it just enough that the cover can be folded upwards. |
| – |
Fold up cover in -direction of arrow-. |
| – |
Remove rear bench seat
→ General body repairs, interior; Rep. gr.72. |
|
|
|
| Continuation for all vehicles: |
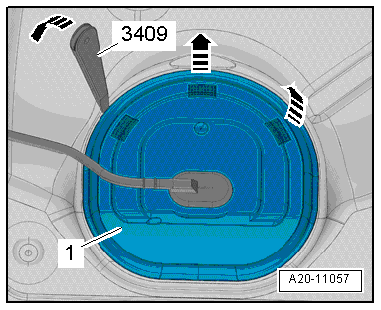
| – |
Unclip cover -1- for flange at
retaining tabs -arrows-, using
removal wedge -3409-. |
|
|
|
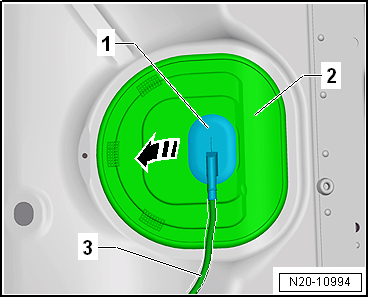
| – |
Unclip sealing grommet -1-
downwards from cover -2-. |
| – |
Push cover -2- back along
wiring harness -3-. |
|
|
|
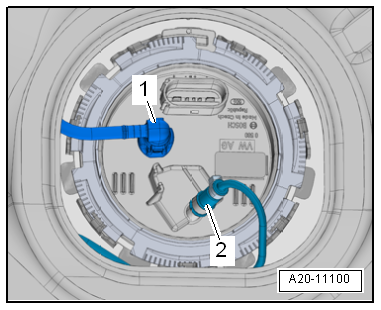
| – |
Pull fuel line -1- off flange.
Separate plug-in connectors
→ Chapter. |
The fuel system is pressurised.Risk of injury due to fuel which may
spurt out.Wear eye protection.Wear protective gloves.Release pressure:
place clean cloth around connection and carefully open connection. |
|
|
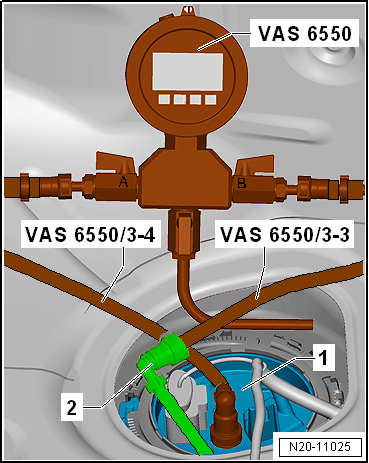
| – |
Connect pressure tester -VAS 6550- with hose -VAS 6550/3-4-
to fuel delivery unit -1-. |
| – |
Connect pressure tester -VAS 6550- and fuel supply line
-2- by means of hose -VAS
6550/3-3-. |
| – |
Ensure plug-in connectors are secured properly by pulling. |
|
|
|
| – |
Ensure that drain tap -C- on
pressure tester-1- is closed. |
| – |
Shut-off valves -A- and
-B- on pressure tester-1-
are open. |
| – |
Repeat final control diagnosis to build up fuel pressure. |
| If specification is attained: |
| – |
Check fuel lines for possible restrictions (kinks) or
blockages. |
| – |
Check fuel line for leaks and damage. |
|
|
|
| If the specification is not attained: |
| – |
Remove fuel delivery unit
→ Chapter and check for contamination. |
| – |
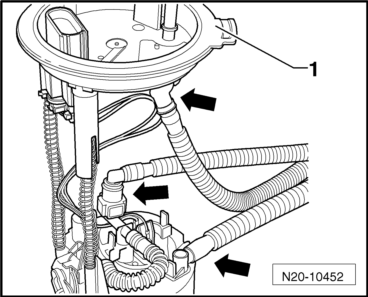
Check that all hoses are connected
-arrows-. |
| – |
Check fuel lines for possible restrictions (kinks) or
blockages. |
| – |
Check fuel lines for leaks and damage. |
| – |
Fuel pump is defective, renew fuel delivery unit
→ Chapter. |
|
|
|
Special tools and workshop equipment required
Removal wedge -3409-
Pressure tester -VAS 6550-
Connector cable -VAS 6550/3-3-
...
Special tools and workshop equipment required
Removal wedge -3409-
Pressure tester -VAS 6550-
Connector cable -VAS 6550/3-3-
...
Other materials:
Dismantling and assembling drive shaft
Special tools and workshop equipment required
Thrust plate -VW 401-
Thrust plate -VW 402-
Press tool -VW 408 A-
Press tool -VW 411-
Tube -VW 416 B-
Thrust washer -VW 447 H-
&nbs ...
Removing and installing front entry light -W31-/-W32-
Caution
Danger of damage to component surfaces.
When using leverage tools, mask visible areas of the
component with commercially available adhesive tape.
...
Checking seat belts
WARNING
The seat belt system must be inspected
systematically after every accident! If damage is
determined at any of the points to be checked, customer
must be informed regarding necessity of changing belt ...
© 2016-2026 Copyright www.vwgolf.org

 Checking fuel pressure
 Checking holding pressure