Volkswagen Golf Service & Repair Manual: Assembly overview - heater and air conditioning unit, Climatronic
 Note Note
| There are different designs and makes of heater and air
conditioning unit. The individual components of the various
heaters and air conditioning units are similar but not
identical. The combined fitting of different makes of component
is therefore not permissible
→ Electronic Parts Catalogue. |
| The following illustrations show a “Valeo” heater/air
conditioning unit, distinguishing features with respect to other
makes
→ Chapter. |
Note
| The illustration shows a left-hand drive vehicle. |
|
|
|
| Assembly overview - heater and air conditioning unit, flap control
(left side) |
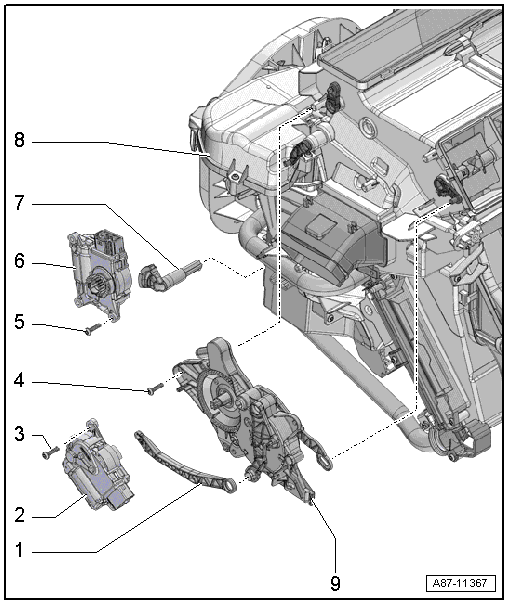
| For actuation of defroster and air distributor flap |
| 2 - |
Air distribution flap control motor |
| Checking: Use vehicle diagnostic tester in “Guided fault finding”
mode and → Current flow
diagrams, Electrical fault finding and Fitting locations |
| Heater and air conditioning system with electric/manual controls: |
| Air distribution flap control motor -V428- with potentiometer for
air distribution flap control motor -G645- |
| Removing and installing
→ Chapter. |
| Front air distribution flap control motor -V426- with potentiometer
for front air distribution flap control motor -G642- |
| Removing and installing
→ Chapter. |
| 6 - |
Temperature flap control motor |
| Checking: Use vehicle diagnostic tester in “Guided fault finding”
mode and → Current flow
diagrams, Electrical fault finding and Fitting locations |
| Heater and air conditioning system with electric/manual controls: |
| Temperature flap control motor -V68- with potentiometer for
temperature flap control motor -G92- |
| Removing and installing
→ Chapter. |
| Left temperature flap control motor -V158- with potentiometer for
left temperature flap control motor -G220- |
| Removing and installing
→ Chapter. |
| 8 - |
Heater and air conditioning unit |
| Many components of the heater and heater/air conditioning unit are
identical |
| Different versions
→ Chapter. |
| The combined fitting of different makes of component is not
permissible |
| The following illustrations show the heater unit from “Valeo”. |
| Removing and installing
→ Chapter. |
| 9 - |
Defroster and air distribution flap actuation unit |
| Fitted only on vehicles with heater or air conditioning system with
electric/manual controls. |
| Removing and installing
→ Chapter. |
Note
| The illustration shows a left-hand drive vehicle. |
|
|
|
| Assembly overview - heater and air conditioning unit, flap control
(right side) |
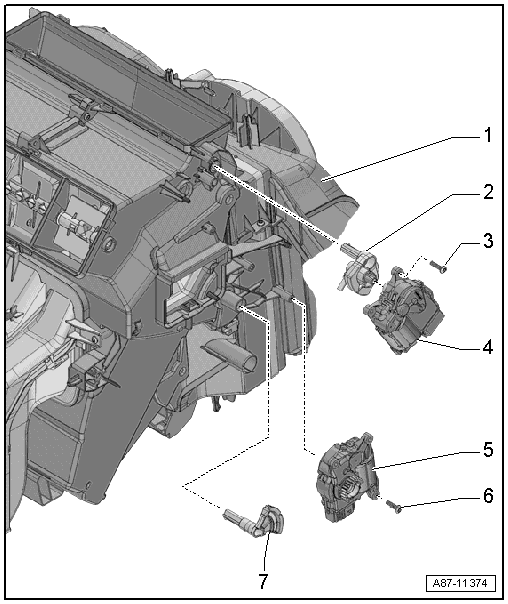
| 1 - |
Heater and air conditioning unit |
| Removing and installing
→ Chapter. |
| 4 - |
Defroster flap control motor -V107- |
| With potentiometer for defroster flap control motor -G135-. |
| Checking: Use vehicle diagnostic tester in “Guided fault finding”
mode and → Current flow
diagrams, Electrical fault finding and Fitting locations |
| Removing and installing
→ Chapter. |
| 5 - |
Right temperature flap control motor -V159- |
| With potentiometer for right temperature flap control motor -G221- |
| Checking: Use vehicle diagnostic tester in “Guided fault finding”
mode and → Current flow
diagrams, Electrical fault finding and Fitting locations |
| Removing and installing
→ Chapter. |
| Assembly overview - heater and air conditioning unit, heat
exchanger, auxiliary air heater element |
| The illustration shows a Valeo heater unit in a left-hand drive
vehicle. |
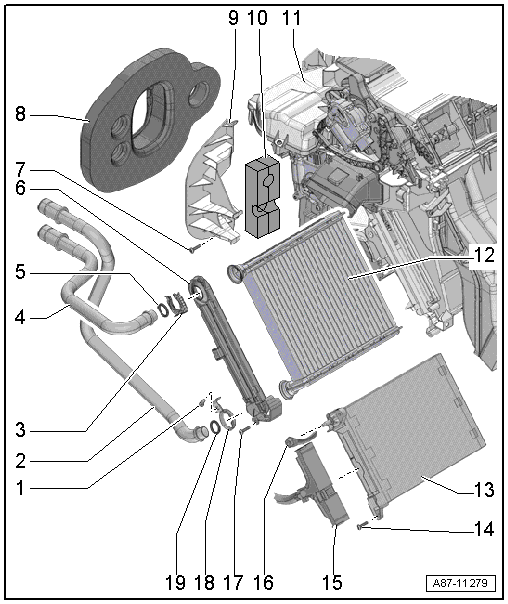
| 2 - |
Coolant pipe with heat exchanger |
| Different versions. Refer to
→ Electronic Parts Catalogue. |
| Coolant supply from the engine |
| Removing and installing
→ Chapter. |
| 4 - |
Coolant pipe with heat exchanger |
| Different versions. Refer to
→ Electronic Parts Catalogue. |
| Coolant return to the engine |
| Removing and installing
→ Chapter. |
| Different versions. Refer to
→ Electronic Parts Catalogue. |
| For sealing and insulation. |
| 11 - |
Heater and air conditioning unit |
| On vehicles without auxiliary air heater element -Z35- with
auxiliary air heater control unit -J604- the opening for the auxiliary
air heater element -Z35- is closed. |
| Removing and installing
→ Chapter. |
| Dismantling and assembling
→ Chapter. |
| Different versions. Refer to
→ Electronic Parts Catalogue. |
| Removing and installing
→ Chapter. |
| 13 - |
Auxiliary air heater element -Z35- with auxiliary air heater control
unit -J604- |
| Checking activation
→ Chapter. |
| Removing and installing
→ Chapter. |
| For auxiliary air heater element -Z35- with auxiliary air heater
control unit -J604-. |
| Different versions. Refer to
→ Electronic Parts Catalogue. |
Note
There are different designs and makes of heater and air
conditioning unit. The individual components of the various
heaters and air conditio ...
© 2016-2026 Copyright www.vwgolf.org


 Assembly overview - add-on parts of heater and air conditioning unit and of
air intake box
Assembly overview - add-on parts of heater and air conditioning unit and of
air intake box