Volkswagen Golf Service & Repair Manual: Assembly overview - dual clutch
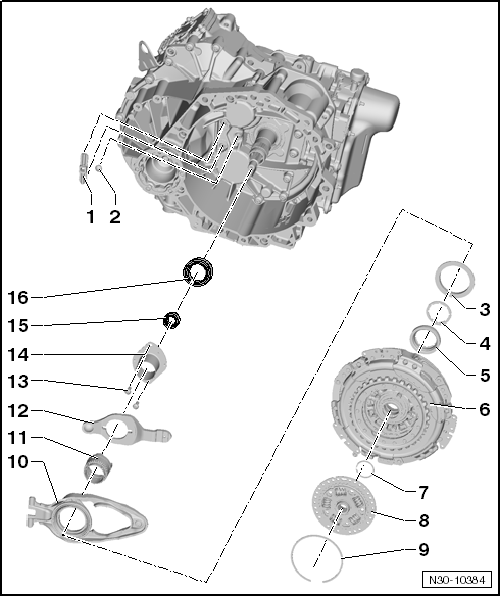
| 1 - | Hinge mounting |
| For large engaging lever “K 1” |
| Cannot be renewed. |
| 2 - | Ball pin |
| For small engaging lever “K 2” |
| Removing and installing → Anchor |
| 3 - | Shim “SK 1” |
| Determining thickness → Chapter |
| 4 - | Shim “SK 2” |
| Determining thickness → Chapter |
| 5 - | Small engagement bearings for “K 2” |
| 6 - | Dual clutch |
| Removing and installing → Chapter. |
| 7 - | Retaining ring |
| Always renew after removing. |
| 8 - | Hub |
| 9 - | Retaining ring |
| Renew |
| 10 - | Large engaging lever for “K 1” |
| With engagement bearing |
| Removing and installing → Chapter |
| 11 - | Upper section of bushing |
| For small engaging lever “K 2” |
| Is removed and installed together with small engaging lever and lower section of bushing |
| 12 - | Small engaging lever for “K 2” |
| Is removed and installed together with upper and lower section of bushing |
| Removing and installing → Chapter |
| 13 - | Bolts |
| Always renew after removing. |
| 8 Nm +90° |
| 14 - | Lower section of bushing |
| For small engaging lever “K 2” |
| Is removed and installed together with small engaging lever and upper section of bushing |
| 15 - | Oil seal for inner input shaft |
| Renewing → Chapter |
| 16 - | Input shaft seal |
| Renewing → Chapter |
 Clutch
...
 Removing dual clutch
Special tools and workshop equipment required
Hook -3438-
Engine bung set -VAS 6122-
Support device -T10323-
-T10356/5- ...
Other materials:
Removing and installing drive shaft, right drive shaft, constant velocity
joints VL100 and VL107, except for e-Golf
Special tools and workshop equipment
required
Torque wrench -V.A.G 1332-
Press tool -T10520-
...
Checking seat belt restraint function for holding additional child seats
(not for driver seat belt) - country-specific
For the functional check, all surrounding components for the
seat belt including the side panel trim must be installed.
Activating the restraint function
Pull out seat belt webbing completely to stop.
...
Using the selection menu in the instrument cluster
Fig. 16 Vehicles without a multifunction
steering wheel: button ① on the windscreen wiper lever for confirming menu points,
and rocker switch ② for changing menus and information displays
Fig. 17 Right-hand side of the multifunction
steering wheel: controls for using the menus and inform ...
