Volkswagen Golf Service & Repair Manual: Aqua Premium system, blending system for 3-stage colours
| Product description/objectives |
| To attain visually perfect colour transition in blending
area or to adjacent parts such as wings or doors. |
| |
Prime plastic surfaces with transparent adhesion promoter
-ALO 822 000 10-, and then fill with elasticised 2-pack HS
surfacer (2-pack primer surfacer for plastics -LKF 696 009
A2-/-LKF 696 040 A2-). |
|
|
|
| – |
Thoroughly clean factory paint, old paint or 2-pack HS
surfacer with silicone remover -LVM 020 000 A5- or slow-drying
silicone remover -LVM 020 100 A5-. |
|
|
|
| – |
Dry-sand repair area using P500/P600-grade sandpaper, or
wet-sand it using water-proof P800/P1000-grade sandpaper. |
|
|
|
| – |
An extensive section of the adjacent area or (parts
surrounding the repair area) must be lightly wet-sanded with
P1000 to P3000-grade sandpaper. |
 Note Note
| Use an emery pad to sand swage lines, edges or door-handle
recesses during preparation work. |
|
|

|
| – |
Thoroughly clean the whole surface with silicone remover
-LVM 020 000 A5- to remove any dust, paint residue from sanding
or any other impurities. |
| – |
Wipe off any excess silicone remover with a lint-free cloth,
leaving no streaks. |
|
|
|
| – |
Allow the moisture on substrates which have been wet-sanded
or cleaned to evaporate completely. |
| Tack cloths of the latest generation with an effective
adhesion formula, e.g. duster -VAS 6177-) to minimise the risk
of chemical or sticky residue
→ Chapter „Tack cloth -VAS 6177-“. |
| |
Isolate any bare metal surfaces using 2-pack wash primer
-LHV 043 000 A2-, and then apply 2-pack HS Performance surfacer. |
| |
It is strongly recommended to spray a sample object. |
|
|
|
| Blending in 3-stage colours: |
| Preparing the blending additive: |
| – |
Mix blending additive for Aqua Premium -LVM 035 100 A3- with
10% Aqua Premium hardener -LVM 045 000 A1-. |
|
|
|
| Repair process, blending into adjacent surfaces (e.g.
colour-matching between wing and door) |
|
|
|
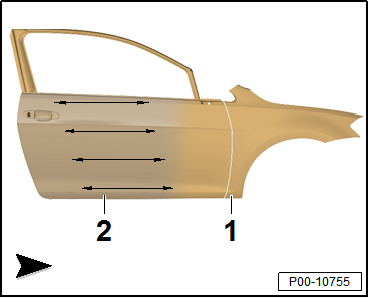
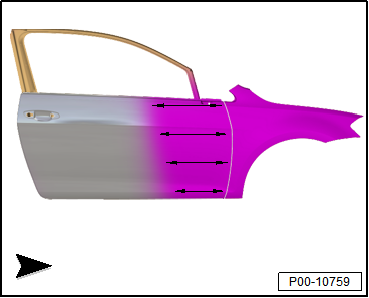
| – |
In the blending area, apply one or two full coats of
blending additive for Aqua Premium -LVM 035 100 A3--2-
at normal spraying pressure onto the old paint/surfaced
substrate -1-. |
Note
| Ensure that the blending area is large enough. |
|
|
|
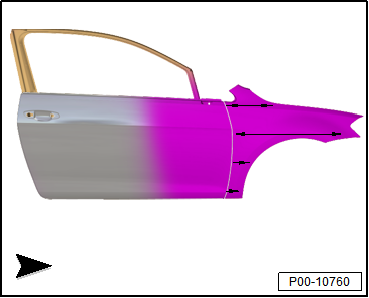
| – |
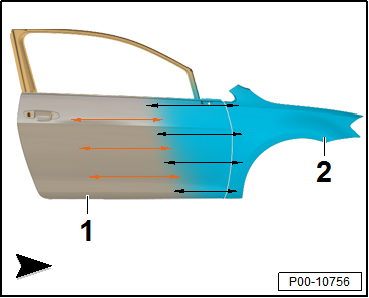
Apply the base coat -2- mixed
with 5% Aqua premium hardener -LVM 045 000 A1- and, for solid
colours 10% additive for Aqua premium -LVM 035 301 A3-, or for
effect colours mixed with 20% additive for Aqua premium -LVM 035
301 A3- to the repair area and adjacent blending area until
coverage is opaque. |
| – |
The fade-out area should be located within the wet blending
additive for Aqua Premium -LVM 035 100 A3--1-. |
Note
| In the event of large surfaces, high temperatures and a low
humidity up to 10% of Aquaplus demineralised water -LVW 010 000
A5- may be added. |
| |
Effect colour, 45-60 minutes at +20°C |
| |
Solid colours: 90-120 minutes at +20°C |
|
|
|
| |
Flash-off with an air diffuser at +20°C to +40°C until the
entire surface is matt. |
| |
Allow to flash-off initially for 5 to 10 minutes, and then
allow final flash-off at +60 to +65°C. Allow base coat to cool
before applying effect coat. |
| |
Flash-off without air diffuser until the entire surface is
matt. |
|
|
|
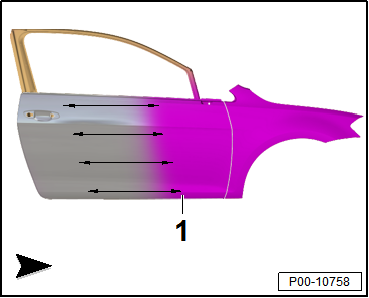
| – |
When the entire surface is matt, apply one or two full coats
of pure blending additive for Aqua Premium -LVM 035 100 A3--1-
without hardener. |
|
|

|
| Preparing the effect colour: |
| – |
The effect colour is mixed with 20% of additive for Aqua
premium -LVM 035 301 A3-. |
Note
| In the event of large surfaces, high temperatures and a low
humidity up to 10% of Aquaplus demineralised water -LVW 010 000
A5- may be added. |
|
|
|
| Step 1, blending in the effect colour (from the outside
towards the inside) |
| – |
The effect colour is applied from the fade-out area towards
the new part -1-. I.e., it is
applied from the outside towards the inside (»wet
in wet«) into the blending additive for Aqua Premium -LVM
035 100 A3-. |
| – |
Then, the next effect colour coat is applied towards the new
part as necessary. |
Note
| For some effect colours, 2 to 3 additional spray passes
must be applied to visually match up the effect. |
|
|
|
| Step 2, blending in the effect colour (from the outside
towards the inside) |
|
|
|
| Step 3, blending in the effect colour (from the outside
towards the inside) |
|
|
|
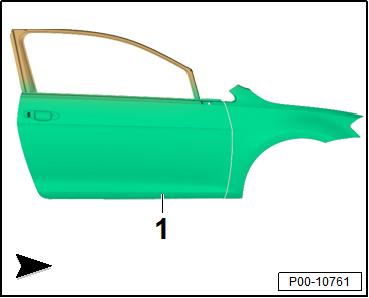
| – |
After flashing-off, apply a coat of 2-pack HS clear coat
-1- to the entire repair area. |
Note
| |
It is recommended that starting with the first spray pass,
all subsequent spray passes are already matched to the repair
area/base coat, starting from the furthest blending area. I. e.,
all subsequent spray passes remain within the previous spray
pass to avoid visible edges or shadows. |
| |
Keep the material flow trigger of the spray gun completely
open while applying Aqua Premium waterborne base coat. |
| |
The spray pressure for the effect coat may be varied between
1.5 and 2.0 bar depending on the size of the object. |
| |
For information on the drying times, refer to the technical
data sheet for the relevant product. |
| Notes for application on large surfaces: |
| |
In general, the additive for Aqua premium -LVM 035 301 A3-
should always be used when applying 3-stage colours. |
| |
In the event of large surfaces, high temperatures and a low
humidity it is recommended to add up to 10% of Aquaplus
demineralised water -LVW 010 000 A5-. |
| |
The use of stationary air diffusers or force drying, e.g.
low baking, for efficient flash-off and drying processes is
recommended. |
| |
The spray equipment must be suitable for water-based
products. Pay attention to the manufacturer's specifications. |
| |
The Aqua Premium mixture paint can be used only as part of a
colour formula. |
| |
If any mixing colour is applied alone, the results may
differ substantially from the description in this technical data
sheet. |
| |
Rinse with Aquaplus demineralised water -LVW 010 000 A5-
before and after use. Then wash out with nitrocellulose thinner
-LVE 856 000 A3-. |
| |
Collect liquid water-based waste separately from
conventional liquid waste. If the two are mixed, it may be
impossible to dispose of the mixture, or at best difficult, and
therefore expensive. |
|
|
|
| Personal protective equipment: |
| |
Adhere to the safety data sheet. |
| |
Wear personal protective equipment during application. |
|
|
|
Issued 04.2013
Product description/objectives
To attain visually perfect colour transition in blending
area or to adjacent par ...
Issue 05.14
To be able to execute fault-free design and multi-colour
paintwork with Aquaplus non-metallic, metallic and pearl effect
base paint ...
© 2016-2024 Copyright www.vwgolf.org

 Aqua Premium system, blending system for 2-stage colours
 Aquaplus design and multi-colour painting