Volkswagen Golf Service & Repair Manual: Assembly overview - fuel tank, vehicles with multi-link rear suspension
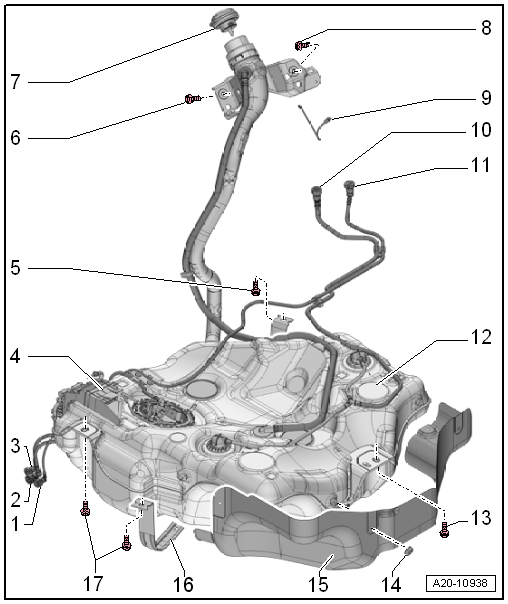
| 1 - | Fuel line |
| Vehicles with auxiliary heater |
| To metering pump -V54- |
| Do not kink |
| To pull off, press release button on connection. |
| Plug-in connectors must engage »audibly« when joined. |
| Ensure plug-in connector is secured properly by pulling it. |
| Disconnect plug-in connectors → Chapter |
| 2 - | Fuel supply line |
| To engine. |
| Clipped onto fuel tank |
| Do not kink |
| To pull off, press release button on connection. |
| Plug-in connectors must engage »audibly« when joined. |
| Ensure plug-in connector is secured properly by pulling it. |
| Disconnect plug-in connectors → Chapter |
| 3 - | Breather line |
| To activated charcoal filter solenoid valve 1 -N80- |
| Clipped onto fuel tank |
| Do not kink |
| To pull off, press release button on connection. |
| Plug-in connectors must engage »audibly« when joined. |
| Ensure plug-in connector is secured properly by pulling it. |
| Disconnect plug-in connectors → Chapter |
| 4 - | Bracket |
| For fuel pump control unit -J538-. |
| Removing and installing fuel pump control unit -J538- → Chapter. |
| 5 - | Bolt |
| Renew after removing |
| 20 Nm + 90° |
| 6 - | Bolt |
| Renew after removing |
| 8 Nm + 90° |
| 7 - | Cap |
| Screw in until engages audibly |
| Secured to tank flap unit by means of retaining strap. |
| 8 - | Bolt |
| Renew after removing |
| For securing fuel filler neck. |
| 8 Nm + 90° |
| 9 - | Earth connection |
| For fuel filler neck |
| For diverting electrostatic charge |
| 10 - | Breather line |
| To activated charcoal filter |
| Clipped onto fuel tank |
| Do not kink |
| To pull off, press release button on connection. |
| Plug-in connectors must engage »audibly« when joined. |
| Ensure plug-in connector is secured properly by pulling it. |
| Disconnect plug-in connectors → Chapter |
| 11 - | Breather line |
| To activated charcoal filter |
| Clipped onto fuel tank |
| Do not kink |
| To pull off, press release button on connection. |
| Plug-in connectors must engage »audibly« when joined. |
| Ensure plug-in connector is secured properly by pulling it. |
| Disconnect plug-in connectors → Chapter |
| 12 - | Fuel tank |
| Removing and installing → Chapter. |
| 13 - | Bolt |
| Renew after removing |
| 20 Nm + 90° |
| 14 - | Nut |
| For heat shield |
| 2 Nm |
| 15 - | Heat shield |
| For fuel tank |
| 16 - | Securing strap |
| 17 - | Bolts |
| Renew after removing |
| 20 Nm + 90° |
 Fuel tank
...
 Assembly overview - fuel tank, vehicles with front-wheel drive and torsion
beam rear suspension
Assembly overview - fuel tank, vehicles with front-wheel drive and torsion
beam rear suspension
1 -
Cap
Screw in until engages audibly
Secured to tank flap unit by means of retaining strap.
2 -
Earth connecti ...
Other materials:
Removing and installing remote control receiver for auxiliary coolant heater
-R149-, Golf Variant
Note
If the remote control receiver for auxiliary coolant heater
-R149- is renewed, the remote control receiver for auxiliary
coolant heater -R149- needs to be adapted to the auxiliary and
supplementary heater using the vehicle diagnostic tester ...
Dimensions - lettering on rear lid
Note
When fitting the lettering, observe the fitting notes
→ Anchor.
1 -
Lettering
Model designation.
2 -
Lettering
Engine designation
For technical designations without engine designation, a ...
Overview of fitting locations - electrical and electronic components,
standard seat, seat of type "ergo Aktiv"
1 -
Massage control unit -J740-
Removing and installing
→ Chapter
Depends on equipment
2 -
Seat heating element
Heated seat cushion for driver seat -Z6
Heated seat cushion for front passenger seat -Z8
Depends on ...
