Volkswagen Golf Service & Repair Manual: Removing and installing seat heating element -Z6-/-Z8-
| If the seat padding in a vehicle with seat heating is
renewed, then the respective seat heating element must also be
renewed. |
|
|
|
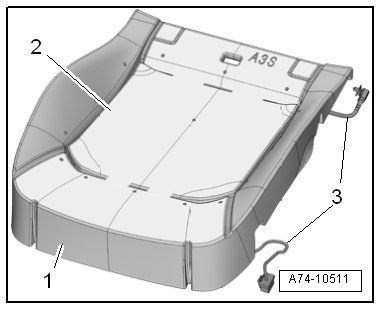
| – |
Separate seat cover from seat padding
→ Chapter. |
| – |
Cut through wire -3- right at
old seat heating element -2-. |
 Note Note
| The old seat heating elements remain fitted on the seat
padding -1- and the new heating
elements are bonded in onto the old ones. |
| Install in reverse order, but note the following: |
| – |
Thread wire -3- through cable
guide. |
| – |
Align new heating elements on seat padding. Do not pull off
the protective films for this. |
| – |
Pull protective films off heating elements one after the
other. Ensure to not damage the heating elements. |
| – |
Bond in new heating elements so that they coincide with the
old ones and are free of creases. |
| – |
Place connections of the individual heating elements on
bottom of recesses. |
| |
→ Chapter „Assembly overview - cover and padding for seat pan“ |
| |
→ Chapter „Assembly overview - seat heating element“ |
| |
→ Chapter „Assembly overview - front backrest“ |
| |
→ Chapter „Assembly overview - front seat“ |
|
|
|
Note
Removal and installation is described for the left seat.
Apply the same instructions for removal and installation of
right seat components as appr ...
Removing
If the backrest padding in a vehicle with seat heating is
renewed, then the respective backrest heating element must also
be renewed.
...
© 2016-2026 Copyright www.vwgolf.org

 Separating backrest cover from backrest padding
 Removing and installing backrest heating element -Z7-/-Z9-